by Howard A. Fine, DMD, MMSc
A simple Photoshop technique for increasing hard-tissue and soft-tissue visualization of scanned x-rays
 |
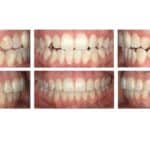
Direct digital x-ray machines offer the practitioner high-quality images where the relationship of the hard tissue to soft tissue is easily visualized (Figure 1).
Although many orthodontists have acquired the high-end machines required to produce these images, the costs involved have been prohibitive for others. Some practitioners are still using the older indirect digital x-ray machines. In these machines, the original x-ray plates were substituted with digital plates capable of being scanned in a drum scanner. Others simply scan their traditional x-ray images into the computer using a conventional flat-bed scanner.
The trouble with nondirect, scanned images is that it is sometimes difficult to visualize hard-tissue and soft-tissue relationships as one image. The software requires you to brighten the image to see the soft tissue and darken the image to see the hard tissue (Figures 2 and 3).
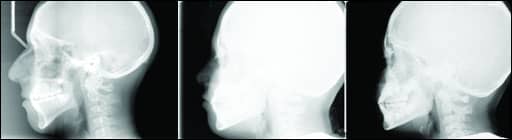 |
| Figure 1: A direct digital x-ray; Figure 2: Brightening shows soft tissue; Figure 3: Darkening shows hard tissue. |
If this situation is a problem, using Adobe Photoshop can help. There is a way of combining two images in such a way that you highlight what you want from both images and hide the rest. In this case, we want to highlight the soft-tissue profile from Figure 2 and highlight the hard-tissue profile from Figure 3. The technique involves layering the two images over each other and creating a mask to hide the offending parts of the images. The steps are as follows:
Step 1: In the software you use to visualize the x-ray image, brighten the image so that the soft tissue is very clear. Don’t worry about obliterating the hard tissue (Figure 2). Export the image, identifying it as the soft-tissue image. Do the same for the hard tissue by darkening the image. Here, the soft tissue will be obliterated. Export the image, this time identifying it as the hard-tissue image (Figure 3).
Step 2: Open Photoshop and import both the soft-tissue and hard-tissue images (Figure 4). Highlight the move tool on the toolbar.
 |
| Figure 4: Both images in Photoshop; Figure 5: Soft tissue layered on top. |
Step 3: Holding down the shift key, drag the soft-tissue image over the hard tissue image, so that the soft tissue is now a layer over the hard tissue (Figure 5).
Holding down the shift key allows the layers to be synchronized as the images are moved. This is important because you want the anatomic structures to be coordinated between layers. You can now close the original soft-tissue image. What you are left with is a layered image of soft tissue over hard tissue, yet all you see is still soft tissue (Figure 6).
In the next few steps, you will hide the offending parts of the top layer and allow the hard tissue in the underlying layer to be visualized.
 |
| Figure 6: All you see is soft tissue; Figure 7: A mask on the soft-tissue layer. |
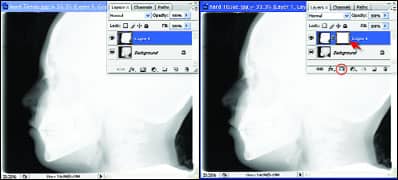
Step 4: Click on the mask icon in the layers palate, which creates a mask on the soft-tissue layer (Figure 7).
Step 5: Click on the gradient tool and highlight the white-to-black gradient (Figure 8).
 |
| Figure 8: Highlighting the gradient tool; Figure 9: Showing hard and soft tissue. |
Step 6: Drag the mouse over the image, starting over the soft tissue and ending within the hard tissue. A mask will be created in this top layer that is allowing the soft tissue of the top layer to be seen, yet hides the rest of the top layer to allow the hard tissue of the bottom layer to be seen (Figure 9). If you do not like the resultant image, press Ctrl-Z, which will undo the last step. You can create different masks by dragging the mouse over different aspects of the image until you are satisfied.
Step 7: From the layer menu, choose “Flatten image,” which will now combine the two layers (Figure 10).
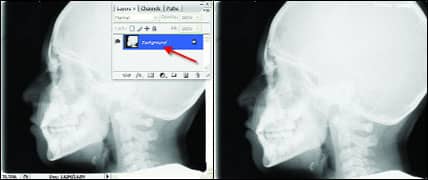 |
| Figure 10: Combining the two layers; Figure 11: The transformation is complete. |
Step 8: Save the combined image with a new name, and the transformation is complete (Figure 11).
|
To read more articles by Howard A. Fine, in our free online archives. |
This Photoshop technique is an effective way of increasing what is known as the dynamic range of an image. With increased use of direct digital images and cone beam technologies, this technique will be obsolete before long. Until that time, however, this process may be useful in those situations where the x-ray software does not automatically improve visualization of the image.
Howard A. Fine, DMD, MMSc, maintains private practices in Mount Kisco and Goldens Bridge, NY. He is a member of the National Association of Photoshop Professionals (NAPP). He can be reached at