BY STUART FROST, DDS
Over the last 10 years, technology and orthodontic techniques have harmoniously come together to pave the way for a new era in the end smile result. As many of us know, it’s no longer just about having straight teeth. A desirable smile now includes an ideal occlusion, arch width, a smile arc, incisor display, full lips with vermilion curl, and properly torqued teeth. While it’s important to treat every case with these benefits in mind, it is also essential we highlight them to existing and potential patients. With more than 23 million US adults interested in improving their smiles, according to Millennium Research Group1 there is a large pool of potential patients in today’s market—and it just may be on the rise.
 Figure 1: Patient pretreatment. According to a recent survey conducted by online dating site match.com2, the No 1 qualifier both men and women judge one another on is teeth. While statistics such as these shine a positive light on the future of our industry, we must remember that in order to keep potential patients interested in improving their smiles, we as clinicians have to consistently exceed our patients expectations by creating beautifully shaped, esthetic finishes.
Great results stem from a treatment approach that keeps the end result in mind, while also combining advanced technology and innovative treatment mechanics. Treatment planning around the upper incisor ensures an esthetic result with optimal incisor show for smile arc, position for lip drape, and torque for correct light reflection, which is critical to the overall esthetics of the finish.
In this article, I’ll review the latest developments in the art of finishing, and provide several key pointers to keep in mind when applying these techniques. This will include the review of the three crucial elements to achieving an advanced finish: bracket positioning, bracket torque selection, and simultaneous mechanics.
It Starts with Bracket Positioning
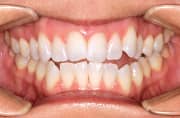 Figure 2: Patient pretreatment close up, identifying severe open bite and crowdingIn some of the finishing seminars I teach, I quote the words of my colleague J. Michael Steffen, DDS, MS: “You can’t straighten teeth with crooked braces.” With this in mind, remember that the most crucial step to finishing is bracket positioning. A common cause of a poor or mediocre finish is incorrect bracket placement at initial bonding. Without proper placement, it becomes more difficult to finish a case beautifully and have a good occlusal finish.
To achieve ideal bracket positioning, it is critical to consider the patients enamel display at rest and smile arc or lack thereof. My specific bracket position will vary in the anterior according to preserving, enhancing, or creating a beautiful smile arc.
When I bond, I focus on the mandibular arch first and then the maxillary arch: second molar to canine on half of the arch, the same sequence on the other half, and then finish lateral to lateral. I bond the maxillary arch in the same sequence. I focus on esthetics and smile arc protection for the maxillary anterior and overbite and overjet for the mandibular anterior, bonding all other teeth for ideal occlusion. In terms of the buccal segments, ensure your patient’s marginal ridges are aligned, and rely on contact points for optimal references.
While many of us work to master bracket placement, keep in mind we also have access to technologies such as Insignia™ Advanced Smile Design. Insignia’s digital imaging technology has been a valuable resource to my practice, as it assists in ensuring precise bracket placement.
Also, with new digital impression solutions, like the Lythos™ Digital Impression System that I recently adopted for my practice, my staff no longer needs to deal with the inherent challenges associated with traditional impressions. Instead, staff can quickly take patients’ intraoral data and integrate it seamlessly into my digital treatment planning software. This type of technology not only streamlines my treatment approach; it also excites my patients, as they like to view for themselves what their teeth look like on a screen.
Bracket Torque is Key
Torque selection is the second step to developing an ideal finish, and must be analyzed during the treatment planning process. There is no magic approach when it comes to bracket torque—every patient is unique and requires a unique treatment plan. While bracket torque is not a universal approach, I have found customized appliances to be great, practice-enhancing tools.
Variable torque bracket selection is key for optimal finishing-controlling. Determining the most appropriate torques of individual teeth during treatment is, in my opinion, the art of orthodontics. With variable torque selection, finishing is accomplished in less time with greater patient comfort and with far less complicated mechanics for the clinician, such as adding tedious torque bends to wires.
When using digital solutions such as Insignia, bracket selections can be customized to produce a torque prescription that considers each patient’s individual tooth anatomy and the occluso-gingival positioning of the bracket to best achieve the patient’s final result. While sophisticated appliances can make treatment easier, the technique can’t be lost. Three tips for selecting the correct torque are:
- Plan around the maxillary incisors, keeping sagittal position for enhanced soft tissue esthetics, vertical-frontal smile, and rest position in mind.
- Don’t over-torque centrals, laterals, or cuspids.
- When choosing anterior bracket torques, if you are going to err, err toward selecting a low torque.
Simultaneous Mechanics
 Figure 3: Patient post-treatment with a beautiful broad smile and smile arc.Prior to the evolution of simultaneous mechanics in the last 10 years, clinicians would follow a step-by-step process that involved leveling and aligning first, then focusing on arch width and finally the patient’s anterior and posterior teeth. The detailing and finishing would wait for the end of the case. This meant one step had to be complete before the next step was executed. It also resulted in all the heavy mechanics to begin 6 to 12 months into treatment, creating added patient discomfort and frustration.
Just the thought of being able to practice in today’s orthodontic age excites me. The industry’s innovations are endless and are truly enhancing the way we treat and finish. Today, clinicians are able to use passive self-ligation appliances, like the Damon® System, disarticulation, and initial elastics in conjunction with one another to level, and align and correct the transverse and A-P of the case simultaneously. We work on all three planes of occlusion, from the very beginning of treatment. For example, with traditional treatment in a class ll patient with moderate overjet, we would usually wait 8 months to 1 year to correct the class II with heavy elastics. Now, with simultaneous mechanics, we use early light elastics to start correcting the class ll from the moment brackets are placed.
While simultaneous mechanics are a highly efficient method of managing cases, it also opens up the opportunity for orthodontists to focus on finishing the smile and making the occlusion better from the beginning of treatment.
Debonding and Finishing the Case
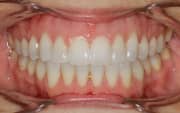 Figure 4: Patient post-treatment with open bite closed, proper gingival and incisal contours. A rule I encourage you to follow is to not hold off on finishing methods, such as contouring and tooth shaping, until the end. These mechanics should be done throughout the course of treatment. For example, if you save all of your contouring work for the debonding day, you may not be able to get the correct smile symmetry and tooth shapes that you desire.
Also, be careful to not overlook the finer elements of finishing. This includes not being afraid to equilibrate the occlusion in the final finishing stages. Two weeks prior to debonding a case, I will use articulation paper to check for any occlusal discrepancies that may be preventing the occlusion from settling together. On occasion, we’ll use finishing elastics as an end-of-case detailing technique, where we’ll cut or clip the archwire in the posterior segment and run finishing elastics to get a better occlusion.
After the brackets are removed, I run through a sequence of polishing burs to address any uneven edges and recontouring needed. I also keep a diamond bur, a handpiece, articulating paper, and Shofu sandpaper discs on hand to recontour cuspids and reshape any teeth that need to be refined further.
It is these types of steps that help me finish cases not only on-point with my treatment plan, but beyond many of my patients’ orthodontic treatment expectations. When seeing the level of results today’s orthodontics can deliver—from broader smiles to fuller lips—my patients become firm believers in the power behind brackets and wires, sharing their experience with friends and family, which in turn helps boost leads coming to my practice.
In closing, we are at a precipice in our industry. The convergence of technology and technique is enabling clinicians to produce superior results that were unheard of a decade ago—we never thought that we would be opening spaces, creating arch width and beautiful smiles, without extractions. When coupled with treatment plans that are designed with the end in mind, this synthesis will ensure our industry continues to achieve optimal smiles for every patient. OP
References:
- Millennium Research Group, US Orthodontics Consumer Study, March 2011
- http://blog.match.com/2013/02/05/additional-key-findings-from-sia-3/
 STUART FROST, DDS, is an Arizona native dedicated to the advancement of orthodontics. He is a Damon System mentor and associate professor at the University of the Pacific School of Orthodontics, where he educates and trains residents on the Damon System. He graduated from the University of the Pacific School of Dentistry in 1992, and later completed a 1-year fellowship for Temporomandibular Joint Dysfunctions and a 2-year residency in Orthodontics and Dentofacial Orthopedics at the University of Rochester.