Five Keys to Indirect Bonding
Caryann Schoenfeld
President of Ortho Training Inc
Plano, Tex
 |
| Caryann Schoenfeld |
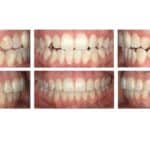
Silverman and Cohen introduced the indirect bonding technique in 1972, but approximately 80% of orthodontists still do not use this technique. Considering the many advantages that it presents—placement accuracy, reduced chairtime, less patient discomfort, and often, decreased treatment time—this is a very substantial number. Staff training and bracket failures are the top two reasons given for not using this technique.
Avoiding bracket failure is always the objective, whether using either direct or indirect bonding. The challenges that accompany most indirect bonding techniques, however, can be intimidating for even the most experienced chairside assistant.
 |
| Key 1: An accurate impression. |
For many, all it takes to make them shy away from the process is hearing one story from a veteran practitioner who has had the unfortunate experience of removing an indirect bonding tray and finding multiple brackets that did not bond.
Many professional colleagues and friends across the country have shared their own indirect bonding horror stories with me and, after discussing their techniques, I often learned that it was a simple but critical step that had been missed or incorrectly performed that caused the failures.
 |
| Key 3: Moisture-free drying. |
Over the years, it has become clear to me that there are five essential keys that have consistently deliveredindirectbonding success, no matter which of the many different methods or materials you use. These five keys are as follows:
1) If you are creating your own indirect bonding tray, remember that an accurate representation of the anatomy is the key to your setup. It starts with the impression: I recommend a two-phase, two-step technique for reliability and detail.
2) Maintaining a dry field is critical. The NOLA Dry Field system provides excellent access and visibility, as well as continuous suction for moisture control.
3) Avoid using the air/water syringe for drying, as most systems will contaminate a prepared surface with oil and water. The two portable drying systems that provide moisture-free air for drying prepared teeth are the NOLA Air Dryer and a chairside microetcher without the canister.
4) Try in your indirect bonding tray prior to preparing/placing adhesives. Test for potential rocking and access difficulties prior to patient preparation. After trying in the tray, it is essential to decontaminate the bracket bases using pure acetone and a cotton-tipped applicator.
5) Microetch each tooth with 50-micron aluminum oxide for 3 to 4 seconds. This can increase bond strength up to 60%.
Using the D527 Bracket Height Gauge
Marston Jones, DDS
Assistant Clinical Professor, University of Maryland
 |
| Marston Jones, DDS |
Many years ago, when we started to place direct bonded brackets, I was looking for an instrument that could be adjusted to allow individualization of my bracket heights to each patient. All that was available were gauges in 1/2-mm increments. I first used a modified architect’s drafting tool, and when I developed an instrument that would do what I wanted, I then had a local machine shop produce them for our office. Dentronix recently began production of the D527 Bracket Height Gauge.
After first positioning the maxillary lateral bracket, I can use the height gauge to measure that height and match to it all other maxillary brackets. I position a mandibular incisor bracket and adjust the gauge to that height, transferring that measurement to the remaining mandibular brackets. The tip can also be adjusted as necessary.