by J. Clifton Alexander, DDS, MS, and William l, Mastorakos, DDS, MS
How to place both lingual and labial brackets quickly and accurately
Indirect bonding offers many advantages over direct bonding, such as improved accuracy of bracket placement and reduced chairtime for the orthodontist. We use indirect bonding for both of our labial and lingual appliances, and we are firm believers in the technique.
 The lingual-appliance indirect-bonding setup and transfer tray is dependent on some very intricate and sophisticated lab work using computer-aided design. The labial indirect bonding setup and transfer trays, on the other hand, are all made in our office with our staff performing all of the fabrication using the prescription labial appliances that we carry in inventory. We use a variation of tray design that is more favorable to our specific bracket de-sign, which incorporates multiple rotational wings and hooks.
The first and most critical step in both techniques is the full arch impression. In addition to an accurate impression, other “Keys to Success” apply in both techniques:
? Use the materials recommended.
? Don’t take shortcuts.
? Maintain a dry field.
? Ensure excellent-fitting transfer trays.
 Let us also say that one of the keys to success with any procedure in your practice is to have a well-trained staff. We depend on our staff to perform critical steps in most of our daily procedures. Before starting any new procedure, go over your expectations and the keys to the process. The fastest way to failure is to expect your staff to understand the procedure from the beginning and think that they will work through the system on their own. While they are most likely capable of doing so, the lack of leadership and encouragement by the orthodontist will undermine the potential of a positive experience for all.
Customized Lingual Indirect-Bonding Setup/Transfer Tray
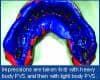
1) Setup: We use a two-step polyvinylsiloxane (PVS) technique, beginning with a heavy-body PVS impression with a plastic liner to create a custom tray that records no detail of the dental anatomy. This is exactly the same procedure recommended and used for the customized clear, removable aligners that have recently become popular. We then use a light-body PVS wash to capture the detailed anatomy of the arch. This type of impression is necessary because of the multiple pours that must be performed in the lab to fabricate the customized appliances.
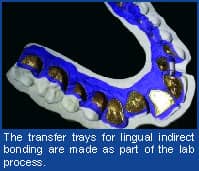
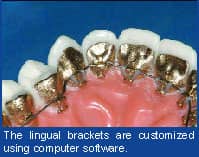 2) Bracket Positioning/ Transfer Trays: The lingual brackets we use are 100% customized in a lab using advanced computer software. These brackets are positioned on a virtual computer model of the teeth to achieve an ideal target result. The archwires are then formed in the same way, as a virtual image to this same target. The resulting brackets are then placed back on the malocclusion model, and the transfer trays are made. The transfer trays, made as a part of the lab process, are a combination of a light-body PVS material that covers the brackets themselves and a heavy-body overlay that perfectly adapts to the archform and anatomy, ensuring an accurate transfer to the patient.
It is crucial to have a good-fitting transfer tray to secure the bracket pads to the tooth surface. The assistant should always try placing the indirect-bonding trays into the patient’s mouth prior to starting the preparation procedure. The trays should fit snugly without rocking. After the tray try-in, clean the back of the bracket-pad surfaces with pure acetone to decontaminate the pads. Never retouch the surfaces to be bonded with your fingers, regardless if they are gloved or not.
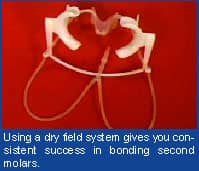
3) Creating and Maintaining a Dry Field: Insert a dry angle on each buccal segment. Then, insert the dry-field system with a tongue retractor. With this system, one can successfully bond second molars consistently, whether lingual or labial.
If you have two sizes of retractors, try the larger retractor in first to allow yourself clear access to all teeth; we only use the smaller one if the larger one will absolutely not fit.
 Pushing the tongue retractor back as far as it will go will allow for clear access to the second molars and will be more comfortable for the patient. A common misconception is to go smaller and place the tongue retractor more anteriorly. If you err on the side of small, there will most likely be anterior gingival impingement. Also, if the tongue retractor is not placed far enough posteriorly, it will impinge on the lingual gingiva. It is in a divergent pattern just as the mandible is, so it is most comfortable the farther posterior it is.
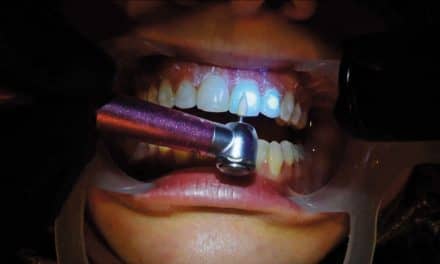
4) Tooth Preparation: Microetch all surfaces to be bonded with 50-micron aluminum oxide crystals for 3–4 seconds on each tooth surface—even nonenameled surfaces—using high-speed suction in addition to the low speed attached to the tongue retractor. This step allows the lingual surfaces of the teeth to achieve an ideal chemical etch in the next step. To reduce the amount of crystals that get on the patient, place a damp patient bib with a hole cut out for the mouth over the patient’s face.
 5) Preparing for Bonding: If there are nonenameled surfaces, be sure to use the appropriate etchants and primers for that surface. Air-dry the teeth prior to applying the etch. (Water on the surface will dilute the etch.) Apply etch to all surfaces to be bonded, and allow it to remain for 60 seconds. It is very important to use gel etch, not liquid etch, since we don’t want the etch to flow interproximally and possibly form composite bridges between the teeth. Suction etch before rinsing. Rinse each surface for 3 seconds, then air-dry the teeth to a frosty white, ensuring that there is no moisture contamination.
Instruct the patient to breathe through his or her nose until the tray is inserted so that the moisture from the breath does not cause moisture contamination. No primers or sealants are necessary on enamel surfaces with this technique. Only use primers if you have a metal or porcelain crown that requires special-surface primers.
 During the next part of the procedure, it is easier and quicker to have two people perform the bonding procedure.
We keep our adhesive refrigerated to allow more working time, since we will be applying a chemical curing adhesive that is mixed prior to application. This is critical! Our assistant removes the small bottles after we have sat down and approved the etched surfaces. Only then do we begin to mix the adhesives.
Mix four drops of two-part chemical cure filled composite resin part A to four drops of part B in a single mixing dish. Our assistant paints the adhesive on the back of the bracket pads while we apply a generous amount to the tooth surfaces. You have about 2 minutes of working time at this point, so it is critical that you work efficiently.
After applying a generous amount of mixed adhesive to the bracket pad and the tooth surface, our assistant then hands us the tray for placement. We insert the tray with firm, equal pressure, careful to ensure that we have the posterior segments fully seated. We carefully hold the tray for 2–4 minutes until the adhesive is fully set in the mixing dish.
 At this point, we are ready to remove the tray from the patient’s mouth, and we do so by gently but firmly peeling the tray from buccal to lingual. After allowing the patient to rinse and take a quick break, we are ready for archwire insertion.
Labial Indirect-Bonding Setup/Transfer Tray
The process of labial indirect bonding is a little different because we do it all in-house, using our well-trained staff to perform the necessary lab work. We also use different adhesives and transfer trays. Of course, some steps are identical to the lingual process above—for example, obtaining and maintaining a dry field. In outlining this approach, we will refer back to the above when necessary to avoid explaining a part of the procedure a second time.
1) Impressions: While one could take the same type of PVS impression as above, we choose to take a high-quality alginate impression for the labial technique. The PVS is just not necessary, and we can save a little time with just an alginate. The impression is poured using a vacuum mix of plaster with good vibration to prevent any bubbles in the model.
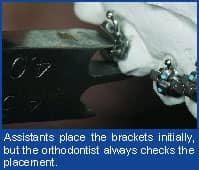
2) Model Preparation/Bracket Placement: After roughly trimming the model, the assistant allows it to dry completely overnight. The next day, a layer of model separator is painted on the model and allowed to dry. Once the separator has dried, the assistant places the brackets on the model using light-cure adhesive and positions them on the teeth in as close to the ideal position as possible, removing any excess flash as well. We train our staff in bracket positioning but always check the position ourselves, on every tooth, before curing them in a light-curing unit.
The assistant then places the model in a light secure drawer in the lab and hangs a note on the handle indicating to us that we have brackets to check. During the course of the day, between patients typically, we take 2–3 minutes to check each model in the drawer, slightly tweaking each bracket on each tooth to the most ideal position for that patient. After we are sure of accurate bracket placement, we place the model in the light-curing unit for 4 minutes. From here, the staff begins the transfer-tray fabrication.
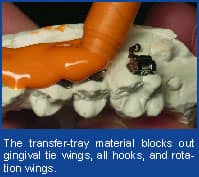
 3) Indirect-Bonding Transfer-Tray Fabrication: The transfer tray is what sets this technique apart from most other methods. We had to develop a tray that would not form such a retentive lock with our brackets, which, except for the maxillary incisors, are all single brackets with rotational wings and ball hooks. Other transfer trays would typically engage these aspects of the brackets to the degree that immediate bond failure would occur when removing the tray. That was unacceptable. The tray that we use consists of a light-body PVS material that blocks out the gingival tie wings as well as all hooks and rotation wings.
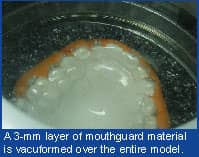
The assistant uses a syringe applicator to apply a bead of light-body PVS under and around all of the brackets to approximately the middle of the bracket body. After that sets up, the model is placed in the vacuformer, and 3 mm of clear mouthguard material is heated and formed over the model and initial tray. At that point, the model with both trays is soaked in warm water for at least 20 minutes to dissolve the separator and loosen the brackets. The tray is removed, trimmed to the level of the orange light-body PVS, and placed back in the light-curing unit for 2 minutes to ensure a complete cure. The bracket pads are then lightly microetched with a 50-micron powder to remove any separator or plaster residue. The tray is then rinsed and allowed to dry a few days before the bonding procedure.
 4) Patient Preparation: Immediately after the patient is seated for the bonding procedure, the assistant will try the transfer tray in to make sure it seats completely without rocking. After this, the patient preparation is the same as the lingual procedure, except that we don’t microetch the labial surfaces; rather, we pumice them thoroughly.
5) Bonding Procedure: Once we have a dry field (see above), the assistant will chemical-etch the teeth to be bonded according to normal protocol, suction the etch, then rinse and dry thoroughly. After double-checking for a nice, frosted appearance to the etched surfaces, the assistant will paint a thin, fully covered layer of moisture-inhibited, unfilled resin on the teeth. Then, a pinhead-sized ball of light cure filled composite resin will be placed at the gingival margin of each bracket pad within the transfer tray. The purpose of this resin is to fill any possible microvoids in the pad/tooth interface as well as to impart more bond strength. If one is careful when applying the light cure filled composite resin to the bracket pads, there is rarely, if ever, any unnecessary flash.
The assistant will then seat the trays, making sure that they are seated without interference from the dry-field system, lifting the suction tubes, if necessary, to seat the mandibular tray. After the tray is completely seated, the assistant will use a high-quality light-curing unit (the stronger the better!), placing the curing tip on the occlusal buccal surface of the tray. Then, starting at the molar on one side and pressing in a gingival/lingual direction to make sure the brackets are flush with the enamel surface, we begin curing the arch, with 10 seconds between each tooth.
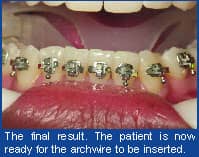
6) Tray Removal/Finish: Now that the adhesive has been initially cured, the trays may be removed. The clear, 3-mm tray will easily lift off from the occlusal. The orange light-body PVS tray can be removed by simply using a scaler and peeling away from the brackets in a gingival direction. Once the trays have been removed, the dry-field system is removed and the patient is allowed to take a break and rinse before archwire insertion. z
J. Clifton Alexander, DDS, MS, has private practices in Dallas and Coppell, Tex. He is an assistant clinical professor at St. Louis University. He can be reached via email at [email protected].
William Mastorakos, DDS, MS, has a private practice in St. Louis and is an assistant clinical professor at St. Louis University. He can be reached at (314) 966-4117.