 By Michael C. Alpern, DDS, MS
Correction of rotated teeth has been a challenge in the past. With today’s technology, this clinical challenge has become more simplified and predictable. There are, however, certain diagnostic questions that require examination prior to beginning biomechanics:
- Is there enough arch length (room) to permit correcting the rotation and aligning the tooth?
- Is there enough buccal-lingual alveolar bone available (especially buccal or labial bone) to accommodate the rotation correction?
- Has full root development occurred? If not, consider waiting.
- If there is inadequate arch length available, is expansion possible, or is extraction required?
- Is the gingiva healthy enough to permit the tooth rotation required? Blondes and redheads tend to have fragile, limited gingiva. Will gingival grafting and/or bone grafting be required before, during, or after rotation correction?
- Where significant rotations are present with marked lack of alveolar arch length, is rapid palatal expansion bite-plane therapy, with mandibular alveolar up-righting (using a ligated palatal expander as disposable anchorage) advised before your attempt rotation correction? This is especially important for treatment of marked rotations in the maxillary incisor region.
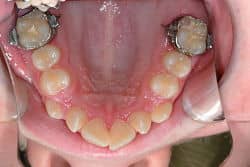 Figure 1: This maxillary occlusal image was taken after the patient was treated with a bonded Rapid Palatal Expansion Bite Plane System. The orthodontist should answer all of these questions and keep the parents and/or patient informed. Patients and parents do not like surprises.
The technique that I have used successfully for 35 years is to correct the rotation with the least stress on the teeth directly adjacent to the tooth requiring rotation correction. These “orthodontic abutment teeth” generally receive the maximum force from the tooth to be rotated. In the past, I have found that, especially if the tooth to be rotated is large with a very long root, rotation correction can place such strong forces on the abutment teeth that they are unintentionally moved either buccally or lingually out of their desired position.
The technique I use maintains the main archwire, most often with a full, vertically filled bracket slot. This tends to increase the stabilizing forces on the abutment teeth and minimalize the overall forces on these teeth. Then I use a smaller piggyback wire to correct the rotation.
Clinical Details
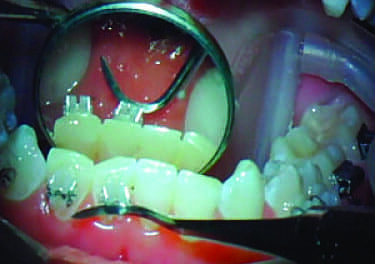
For the main archwire, I use a temperature-sensitive NiTi wire with individual forces throughout the wire. In an .018 slot, (most of the time) my initial wire is a .018 x .018 NiTi wire, iced to place. I use a push-coil spring to slightly open the space for the rotated tooth. I place a bonded bracket on the rotated tooth in the finished position, if possible. Figures 2-5: These images shows initial insertion of the .018 x .018 NiTi, temperature-sensitive wire. I placed push coils between the maxillary central incisors and maxillary cuspids to open adequate space to permit the rotation correction. The piggyback wire, .016 x .016 temperature-sensitive NiTi, was fully engaged into the right and left maxillary lateral incisors and was ligated on top of the main archwire on the adjacent maxillary central incisors and maxillary first bicuspid brackets. At this initial stage, the piggyback wire rests on the lingual surface of the adjacent maxillary right cuspid (due to the severity of the rotation on the maxillary right lateral incisor). On the left side, the piggyback wire rests on the labial surface of the adjacent maxillary left cuspid and is ligated to the bracket on the maxillary left first bicuspid.
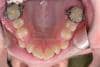
The wire that I use to correct the rotation is usually a ?.016 x .016 temperature-sensitive, NiTi wire. I ice the wire before inserting it into the archwire slot of the rotated tooth. I extend each end of the piggyback wire over at least three to five of the abutment teeth brackets on each side of the tooth to be rotated. I always use stainless steel ligatures to secure this piggyback wire over the main archwire on the adjacent bonded brackets. This ensures stability to the teeth on each side of the tooth to be rotated. Figure 6: An occlusal view of the progress of rotation correction 22 days after initial insertions. Note that the piggyback wire is now resting on the buccal of both cuspids.
  Figure 7: After 22 days, the rotated tooth has moved from a near 90º rotation to near normal. Bonded functional covers on the occlusal of the mandibular molars have prevented occlusal trauma from the opposing arch and served as vertical restraints of growth.
After most, or all, of the rotation has been corrected, I remove the piggyback wire. When possible, I then attach the rotated tooth to the main archwire by using ice sprayed on a cotton swab to permit the main archwire to flex into the bracket of the rotated tooth. In some instances, a self-ligating bracket might need to be reinforced with a stainless steel ligature for a few weeks.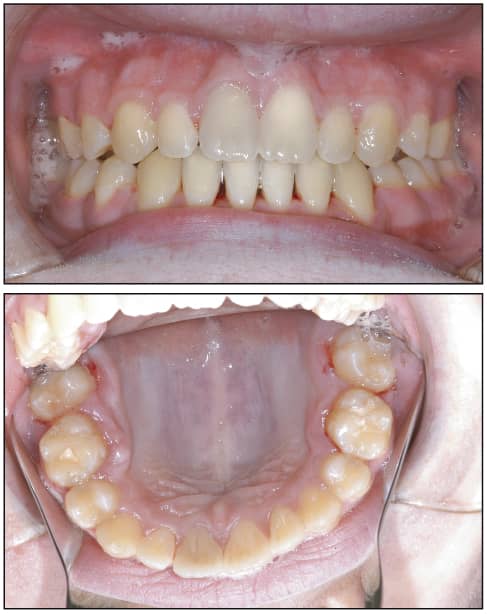 Figures 8 and 9: Final views of the patient at debonding day.
Advantage of the Technique
Using this approach, the rotational forces have little effect on the abutment teeth. The traditional approach is to use a smaller-sized main archwire that is flexible enough to engage the rotated tooth. The problem is that when rotational forces applied to the rotated tooth create undesired tooth movements in the abutment teeth, a sequence of wires is usually required to realign all of the teeth. The Piggyback Technique helps me avoid this waste of time and resources.
Michael C. Alpern, DDS, MS, maintains a private practice in Port Charlotte, Fla. He can be reached at [email protected].