
by David Sanders, DDS
Placing and removing rapid palatal expanders is not as difficult as it once was
 |
In an orthodontic office that averages almost 15 expanders per month, you need the right scheduling template to follow so that you have the right block for this procedure. With an increasing number of patients using expanders, some offices run into a timing issue, which is what we have experienced. The problem wasn’t the insertion time, but the removal time. When removing traditional banded expanders, orthodontists must refit and cement new bands on the patient. Having the band sizes written down helps, but it still needs a special time blocked to allow for the removal, the cleaning, and the proper cementation.
After conducting some research, we discovered the Freedom-Lock™ Rapid Palatal Expanders (RPEs) from Accutech Orthodontic Labs Inc. The benefit to using this appliance was that, rather than the expander being soldered to the bands, the Freedom-Lock inserts into the bands, and it can be integrated into multiple types of appliances. Therefore, it is a separate entity from the cemented bands.
 |
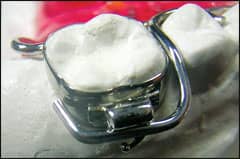 |
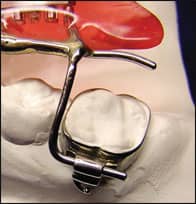
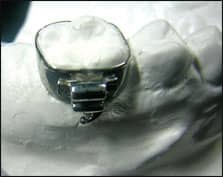
| Figure 1: The Freedom-Lock has a gentle curve that crosses the occlusal surface. | Figure 2: The design delivers a snap-tight lock for insertion and easy-release flexibility for quick removal. |
The Freedom-Lock is a rigid and secure appliance for the patient, but it provides the clinical advantage of a quick removal or reinsertion at any time during treatment. Any size or brand of screw that would be used for a traditional fixed RPE can be used with this system. Its hinged mechanism fills the buccal tube with a snug fit but easily slides in and out, and it has a gentle curve that crosses the occlusal surface (Figure 1). The hinge mechanism locks in by design, and the custom-designed “flat” locking clasp is paramount to this system’s retention. It is designed to deliver a snap-tight lock for insertion and easy-release flexibility for quick removal (Figure 2).
Adapting to the New Appliance
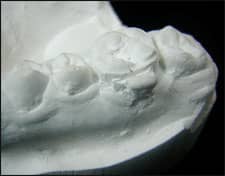
Since our office already used HG tubes on the molar bands, we wanted to try the appliance on a few patients to see how it worked and which design seemed to work better. After trying the traditional Hyrax (Figure 3) and Haas styles with acrylic pads and with occlusal rests on the premolars (Figure 4), it turned out that the style that worked best for us was the Haas style without any occlusal rests. The added palatal coverage seemed beneficial to achieve a better fit and more consistent bone separation.
 |
 |
| Figure 3: The traditional Hyrax style. | Figure 4: The Haas style with acrylic pads. |
A Clinical Example
The initial process was to fit the maxillary molar bands in the traditional manner, take an impression, and pour the impression with the bands in it. The laboratory then fabricated the expander using the bands on the model. This allowed for a slightly better fit to the bands, but it led to some difficulties. Recementing the bands didn’t always get them in the same spot as they were on the model at the lab, and the insertion appointment took more time than if we were using a traditional soldered expander. We cemented the banded expander to both molars at the same time; with the Freedom Lock expander, both bands were cemented individually and then the expander was fit into place.
The major time saver with the Freedom-Lock is during the removal appointment, which you can do as a regular archwire appointment. It takes about an additional 30 seconds to cut the tie wire on the flat locking clasp, rotate the expander, and slide out the insertion wire. So we weighed the time added at cementation against the time saved at removal as well as the efficiency of the expander.
 |
 |
| Figures 5 and 6: The Freedom-Lock with cemented bands in instead of placing the bands in the poured model. | |
We asked if the lab could form the appliance on a model taken of cemented bands (Figure 5) instead of placing the bands in the poured model (Figure 6). This would allow us to cement the bands at the bonding appointment and then just insert the expander at the next appointment—without having to cement anything then.
As long as the operator can produce a model with a good impression of the maxillary bands, the lab can form the insertion end and the Freedom-Lock end fairly accurately. The operator may still need to adjust the ends bucco-lingually and occluso-gingivally to allow a good line of insertion due to some model distortion and tooth movement between appointments. However, over time this has become much easier and quicker. It is very similar to fitting a removable TPA.
 |
| Figure 7: The end of the appliance is placed against the band and seated palatally to see how the insertion end lays on the headgear tube. |
Insertion and Complications
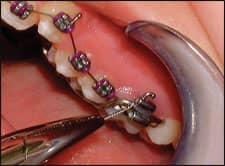
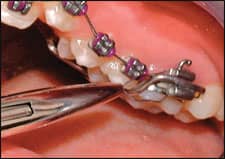
To insert the Freedom-Lock, the operator places the Freedom-Lock end against the band and seats it palatally to see how the insertion end lies on the headgear tube (Figure 7, page 52). This lets the operator make any adjustments to insert it.
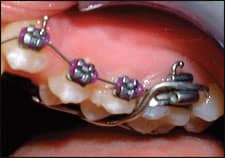
After it is inserted in the headgear tube, the operator rotates the Freedom-Lock toward the palate and then “snaps” the appliance’s end over the other headgear tube (Figure 8, page 52) and ties that with a ligature wire (Figures 9–11, page 52). As with other types of expanders, sometimes it doesn’t seat completely against the palate. But after a few turns, it seats better.
 |
 |
 |
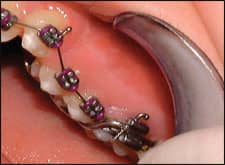 |
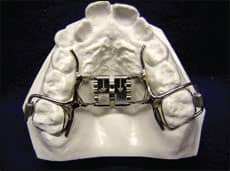
| Figures 8 through 11: After Freedom-Lock was inserted in the headgear tube, the operator rotated the appliance toward the palate and then “snapped” its end over the other headgear tube and tied that with a ligature wire. | |
We have used this expander in conjunction with appliances for the majority of cases. Patients are instructed to turn the expander once per day, and for a full cross-bite, we start with 20 turns and check again. In cases where the jaw is narrow and we are trying to expand and reshape, we begin with 16 turns to stay in occlusal contact with the lower arch. Then after the lower arch begins to upright, we can turn the expander more.
We have discovered some minor complications with this technique. First, because we place a wire at the initial appointment, the molars move before the expander is inserted. This is not enough to be a major problem, but sometimes it is an inconvenience.
|
| Figure 12: The completed procedure. |
|
For a complete listing of companies offering RPEs, visit our online Buyer’s Guide. |
The second issue that comes into play is that if the molars are rotated mesial in, it makes it very difficult to insert the appliance into the headgear tube, especially if there is a bracket on the second premolar. The operator must make sure that the insertion wire is on the least rotated molar. In severe cases, we have rotated the molars with appliances prior to making the expander. Since the bands are on the molars, we can continue with treatment with no problems.We also have had an issue because the Freedom-Lock end covers the archwire tube on the band. To fix that, we place a NiTi wire the day we insert the expander. Sometimes we leave the NiTi wire in the entire time the expander is in. In other cases, we untie the RPE and switch to a 0.018- x 0.018-inch Bioforce archwire. This allows us to align the teeth and limit the archwire changes while the expander is in place.
In conclusion, the Freedom-Lock has given us bone separation comparable to that which we got from traditionally soldered expanders (Figure 12). It has also turned the removal appointment into a regular archwire appointment, yielding significant time savings.
David Sanders, DDS, has been in private practice in Morgantown, WVa, for 16 years. He received his DDS and his masters in orthodontics from West Virginia University. He can be reached at
 |