by S. Jay Bowman, DMD, MSD, and Aldo Carano?, Dr Odont, MS, Spec Orthod
Using a rigid hook and spring auxiliary slid onto the archwire to direct eruption of impacted teeth
|
|
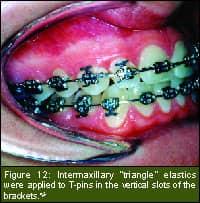
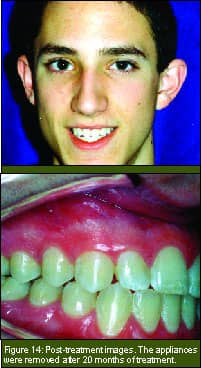
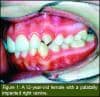
The management of impacted teeth is a common problem in contemporary orthodontics. Various treatment mechanics have been created to direct the eruption of impacted teeth, including the use of interarch and intra-arch forces applied to some type of attachment on the affected tooth. The development of dental bonding has permitted smaller surgical-exposure sites and reduced morbidity for the surgical procedures required to place these attachments. It is important that these impacted teeth are first directed vertically, toward the occlusal plane, to clear the crown of the tooth from impeding bone. Then, the canine can be directed laterally toward the archform. The purpose of this article is to describe one such bonded attachment and the use of two new auxiliaries, the rigid hook and the spring auxiliary, for the direction of impacted or severely rotated teeth. The Rigid Hook The rigid hook1 consists of a short section of wire with open loops on opposite ends. Intraoral elastics, elastic chains, elastic thread, or NiTi coils can be attached to these open loops to produce forces to direct the eruption or rotation of teeth. The loops can be closed with pliers when linking one hook to another to form a chain or when connecting the hook to a bondable “loop button.” The Loop Button The loop button1, or bondable eyelet, consists of a 1-mm helix of round wire that has been welded or braised to a small-diameter, bondable base. Only a small surgical exposure of any surface on the crown of an impacted tooth is required to bond this attachment. A rigid hook can be linked to the loop button prior to bonding. Then, this combination is bonded to the tooth with the helix positioned parallel to the roots of the adjacent teeth. In this configuration, a continuous archwire may be placed through the lumen of this helix once the tooth has sufficiently erupted. If, however, the tooth is deeply impacted, then a second rigid hook may need to be linked to the first. At the completion of the surgical exposure and attachment of the loop button, a portion of the rigid hook will extend through the gingival tissues, making it available for the application of a variety of forces. Vertical Eruptive Forces Typical intra-arch mechanics to direct the eruption of impacted teeth (such as elastic thread or a flexible archwire applied to a gold chain) may tend to tip or intrude the adjacent teeth. In contrast, vertical eruptive forces can be created using an intermaxillary elastic stretched from the rigid hook to the opposing dental arch. This arrangement does, unfortunately, introduce the unpredictable factor of patient compliance with wearing elastics. Lateral Eruptive Forces: The Slingshot Effect If anchorage is unavailable from an opposing arch, then intra-arch forces may be produced using multiple rigid hooks added to the same loop button attachment, much like keys on a key ring. Elastic chain is attached to one end of the rigid hook and directed to adjacent teeth, thereby creating a slingshot effect. A closed-coil spring is placed on the base archwire to prevent tipping of the adjacent teeth toward the impacted tooth. A combination of intermaxillary elastic and the slingshot effect can be used to provide both vertical and lateral eruptive forces. The Spring Auxiliary The spring auxiliary2 is a preformed module that is simply slid onto a rectangular continuous archwire at the site of an impacted tooth. The spring auxiliary’s vertical loop extends perpendicularly from the occlusal plane in its passive state. A stainless-steel ligature is placed through the helix at the apex of the spring auxiliary’s vertical loop. Then, this loop is directed toward the impacted tooth. The ligature is tied either directly to the helix of the loop button or to the loop of the rigid hook, which is then linked to the loop-button attachment. As another alternative, the spring auxiliary may also be tied to the links of a gold chain that has been attached to the impacted tooth. Mode of Action The spring auxiliary is supported by 1) the rectangular base archwire; and 2) reciprocal force from the incisal one third of the adjacent teeth where contacted by the lateral extensions of the spring auxiliary. The spring auxiliary may need to be periodically retied to maintain a constant force as the tooth is erupting. The first-generation spring auxiliary was designed to produce both vertical and lateral eruptive forces for palatally impacted canines. The second generation spring auxiliary produces more vertical forces and was created for buccally impacted teeth. Due to the second generation spring auxiliary’s multiple helices and cantilever design, tissue impingement adjacent to the impacted tooth may occur. Therefore, more frequent office visits to monitor progress are recommended. The amount of force produced by the spring auxiliary can be increased or decreased by bending the vertical loop toward or away from the impacted tooth prior to activation. Due to this auxiliary’s inherent flexibility, it will typically fit the available arch length even if the space for the impacted tooth is wider or narrower than the unerupted tooth. In fact, the Spring auxiliary’s vertical loop can be adjusted to produce some mild force to assist in closing, maintaining, or opening the space. Rotational Couples and Retraction With the Rigid Hook Often, impacted teeth are also significantly rotated and require directional forces to “spin” them into correct alignment. Once an impacted and rotated tooth has erupted sufficiently, a second loop button may be bonded to the crown on the side opposite to the original attachment. An elastic chain and rigid hook combination are added to each loop button to produce a rotational couple. (For example, forces directed to the lingual cleat of a molar and also directed mesially to the anterior teeth.) The rigid hook and elastic combination can also be used as a retraction module for the sliding closure of dental segments or for retracting individual teeth. In this scenario, a right-angle bend is made on one end of the rigid hook, and that helix is “hooked over” the archwire or onto a soldered or crimpable hook. The elastic chain is then stretched to a posterior abutment, such as a hook on a molar tube. Conclusions The combination of the rigid hook, the loop button, and the spring auxiliary provide simple and predictable solutions for the resolution of impacted and severely rotated teeth. Initiating treatment with a bondable loop button (with a linked rigid hook), placed during routine surgical exposure of an impacted tooth, provides a number of mechanical options: 1) Intermaxillary elastics may be employed from the open loop of the rigid hook to help generate vertical eruptive forces. 2) A preformed spring auxiliary module can be tied to the rigid hook or directly to the loop button to produce vertical and lateral eruptive forces without dependence upon compliance. 3) Two rigid hooks, linked to an elastic chain, may be added to produce lateral “slingshot” forces.6 Upon sufficient eruption of the tooth, any rotations can be resolved by producing a rotational couple using two rigid hooks with elastic chains directing forces in opposite directions. z S. Jay Bowman, DMD, MSD is in the private practice of orthodontics in Portage, Mich. He is an adjunct associate professor at St Louis University and the Straightwire instructor at the University of Michigan. He can be reached at [email protected]. Aldo Carano, Dr Odont, MS, Spec Orthod, was in the private practice of orthodontics in Taranto, Italy. He was an adjunct associate professor at Saint Louis University and a visiting professor at the University of Ferrara. ?Deceased. References 1. Bowman SJ, Carano A. The monkey hook: An auxiliary for impacted, rotated, and displaced teeth. J Clin Orthod. 2002;36: 375–378. 2. Bowman SJ, Carano A. The Kilroy spring for impacted teeth. J Clin Orthod. 2003;37:683-688. 3. Bowman SJ, Carano A. Short-term, intensive use of the tooth positioner in case finishing. J Clin Orthod. 2002;36: 216–219. 4. Bowman SJ. Fine-tuning case completion with the new Pro-flex positioner. AOAppliances, etc. 2003;7:1–2. 5. Bowman SJ, Carano A. Improve-ments in pre-adjusted appliances: Butterfly brackets. Good Prac. 2001;2:5–7. 6. Bowman SJ. Canine obedience training. Paper presented at: University Dental Hospital, June 25, 2003; University of Sydney, Sydney, Australia. Steps in Directing the Eruption of an Impacted Tooth 1. Surgical exposure 2. Direct bonding of a loop button with a linked rigid hook 3. Creation of vertical eruptive forces using intermaxillary elastics from the rigid hook to the opposing arch 4. Creation of vertical eruptive forces using a spring auxiliary tied to the rigid hook or loop button 5. Creation of lateral slingshot eruptive forces using two rigid hooks, with elastic chain linked from the loop button to the teeth adjacent to the impacted tooth 6. Creation of a rotationalcouple with a loop button placed on opposite sides of the tooth, with rigid hooks and elastic directed in opposite directions. |