by Elliott M. Moskowitz, DDS, MSD
A reproducible and predictable in-house procedure
-

- Elliott M. Moskowitz,
DDS, MSD

The prospect of placing orthodontic attachments precisely, accurately, and efficiently has intrigued orthodontic clinicians for many years. The advantages of indirect bonding include the most optimal placement of orthodontic attachments and simplifying chairside procedures.1
With the continued development and expectation of customized orthodontic brackets and computer-generated orthodontic archwires for each and every patient, it is unlikely that current direct bonding techniques can meet the placement demands of this new orthodontic hardware technology. A better way to place orthodontic attachments, therefore, has become increasingly more important to the orthodontic clinician.
-

- Figure 1: Pencil marks drawn along the incisal edges, mesiodistal center points, and long axes of teeth ensure proper bracket placement.
I will present an indirect bonding procedure that has been used for more than 10 years in private practice and in several university orthodontic programs.2,3
Fabrication of the Indirect Working Casts
- Prophy the facial surfaces of the teeth with a rubber cup and pumice.
- Take alginate impressions with either a perforated tray or rim-lock metal trays.
- Pour the impressions immediately in a hard stone.
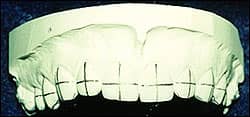
- The long axis and the mesiodistal center points of the teeth to be bonded should be marked with a pencil. Also mark the preferred incisogingival positions of the bracket slots (Figure 1).
- Apply one or two coats of liquid separating medium to the facial surfaces of the teeth on the cast and allow them to dry.
 |
 |
| Figures 2A (left) and 2B (right): Brackets with composite resin on bases are positioned on casts. | |
Bracket Placement
- Place the appropriate amount of Therma-Cure composite resin on the pad of each bracket, taking care to cover all of the pad surfaces.
- Place the brackets on each of the cast teeth with firm pressure, and position them according to the pencil marks (Figures 2A and 2B). The Therma-Cure provides virtually unlimited working time.
- The orthodontist should check all aspects of bracket placement—including excess adhesive around the bracket base—especially when either assistants or office technicians have performed the placement. The composite is now ready to cure.
Curing the Composite Resin
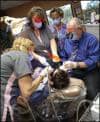
- Place the casts in a heated oven (Figure 3) to cure. I prefer a toaster oven. Therma-Cure requires 15 minutes to cure at 325ºF. It is important to use an oven thermometer because temperatures may vary from oven to oven.
- Allow the casts to cool, and then remove them from the oven.
 |
| Figure 3: Casts are placed in the toaster oven for curing at 325ºF for 15 minutes. |
Fabrication of Transfer Trays
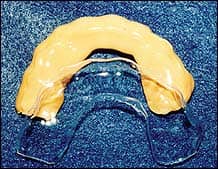
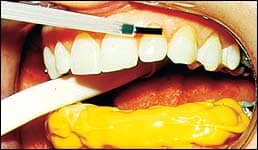
- Apply Reprosil impression material with a syringe over the thermally cured brackets (Figure 4). Start with the facial surfaces, and make sure that each bracket is covered. Extend the material onto the occlusal or incisal. The tray should not be unnecessarily thick.
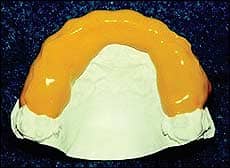
- Vacuum-form Essix .020 inch (0.5-mm) or .030 inch (0.75-mm) clear thermoplastic material over the cast, brackets, and undertray complex (Figure 5A). After cutting away the excess thermoplastic material, soak the entire assembly in warm water for approximately 5 minutes, then separate both trays from the cast. The brackets will be released from the stone and remain seated in the flexible undertray. Trim the trays with crown and bridge scissors (Figure 5B). Rinse away residual solidified material and other debris from the undertray and brackets. Inspect the composite pads, and trim off any flash.
 |
| Figure 4: Light-bodied polyvinylsiloxane impression material is applied with a syringe over all brackets, extending onto occlusal or incisal surfaces and onto lingual surfaces. |
 |
 |
| Figures 5A (left) and 5B (right): Clear thermoplastic material is vacuum-formed over the casts, brackets, and undertray. Trays are separated from the casts and trimmed to final form. | |
Chairside Bonding Procedure
- Lightly abrade the composite back of each bracket base with a microetcher (Figure 6).
- Isolate a single arch, etch the enamel, and rinse off the etchant (Figure 7).
- Mix two drops each of Enhance A and B primer. Apply the mixture to the composite bases and to the tooth surfaces.
- Mix unfilled bonding resin and quickly apply to the composite bases of the brackets and to the teeth (Figures 8A and 8B).
- Seat the tray immediately (Figure 9). Hold the tray in place for 1 minute, then allow the tray to remain in place for about 4 more minutes.
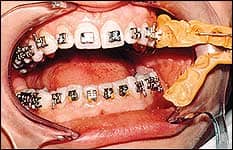
- Remove the clear overtray material (Figure 10).
- Gently remove the flexible undertray from the teeth with an explorer or scaler (Figure 11) using a gentle, rolling motion. Start from the lingual surface of the flexible tray to avoid dislodging the brackets.
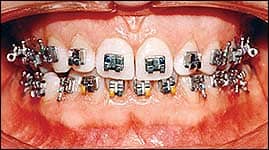
- Inspect the brackets. Floss interproximally to remove any bridging of the unfilled resin. There should be virtually no flash of filled composite resin around the bracket bases (Figure 12).
 |
 |
| Figure 6: The inside of the bracket-tray complex after washing and lightly abrading composite surfaces. | Figure 7: The dental arches are isolated, enamel surfaces are etched, and the etchant is rinsed off. |
 |
 |
| Figures 8A (left) and 8B (right): After an enamel bonding booster is applied to both the tooth surfaces and composite bases and allowed to dry, the unfilled bonding resin is mixed and quickly applied to the composite bases of the brackets and the teeth. | |
|
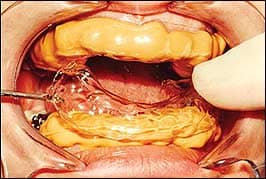 |
| Figure 9: The trays are seated immediately and held in place for approximately 1 minute. They are allowed to remain undisturbed for 4 more minutes. | Figure 10: The outer tray is removed. |
 |
 |
| Figure 11: The flexible undertray is teased away with an explorer or scaler without dislodging the brackets. | Figure 12: Any remaining unfilled resin can be removed by a scaler and by flossing interproximally. Wires are ready to be inserted. |
Conclusion
Accurately and precisely placing orthodontic attachments will enhance orthodontic treatment outcomes with respect to optimizing individual tooth position. There has been a resurgence of interest in indirect bonding techniques. The clinician should select a technique that is predictable and highly reproducible in his or her own hands. The in-office technique I have presented has proven to meet the demands of optimal orthodontic attachment placement and has greatly simplified chairside bonding procedures.
Elliott M. Moskowitz, DDS, MSD, is a clinical professor in the department of orthodontics at the New York University College of Dentistry. He can be reached at
References
- Kalange J. Indirect bonding: a comprehensive review of the advantages. World J Orthod. 2004;5:301-30.
- Moskowitz E, Knight D, Sheridan J, et al. A new look at indirect bonding. J Clin Orthod. 1996;30:277-281.
- Moskowitz E. Indirect bonding with a thermal cured composite. Semin Orthod. 2007;13:69-74.