by Howard A. Fine, DMD, MMSc
Tips on creating the ideal photomontage
Photomontages of our patients have become almost indispensable in daily practice. They allow quick analysis of the patient’s pretreatment condition and help verify other records such as digital models. Most of the orthodontic imaging programs give us the ability to quickly and easily create a photomontage of our patients. After shooting a few basic images, these programs will load, position, and flip those images that have been taken in a mirror. Unfortunately, they will not help you become a better photographer. The focus of this article is to provide some guidelines that will hopefully improve the quality of the images and thereby make the montage maximally useful on a daily basis.
The typical photomontage consists of the following images: frontal face, profile, some smiling or three-quarter view, a frontal view of the teeth, left and right buccal views, and upper and lower occlusal views.
Extraoral Facial Views
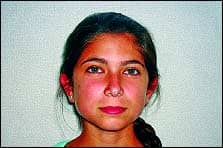
The frontal view of the face (Figures 1 and 2) should be taken with the camera at the patient’s eye level and with the patient’s lips at rest. For those patients with lip incompetence (the inability to close the lips without strain), it is up to you whether the patient should have the lips closed or open, thereby showing or not showing the lip strain.
 |
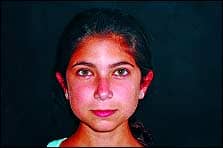 |
| Figure 1 | Figure 2 |
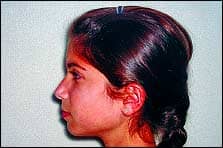
The profile view of the face (Figures 3 and 4) should be taken with the patient looking either right or left in what is referred to as a “natural” head position. The easy way to achieve this is to ask the patient to pretend he or she is at the beach staring out into the horizon. You will be surprised how easily this position can be duplicated time after time using the horizon analogy. It is critical to have an accurate profile view so that you can easily assess jaw relations and facial balance.
 |
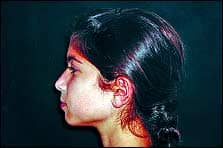 |
| Figure 3 | Figure 4 |
Notice how the facial photos have been taken against both a light and dark background. Without fancy lighting setups, the flash on the camera will usually create a shadow when a patient is photographed against the light background. A dark background can eliminate the shadow and highlight the facial features. The simplest way to make a dark background is to pick a door in the office that can be used as the “photo studio.” You then paint a large box on the door using black flat latex paint. Darker-skinned individuals can also be photographed against the black background, but you may have to increase the exposure on the camera.
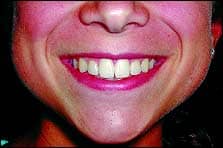
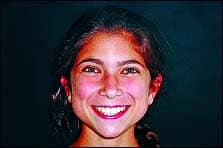
The third extraoral view is typically an image in which the patient is smiling (Figures 5 and 6). This way, you can assess diagnostic criteria such as how much tooth and gum show during smiling, smile arc, if there are any asymmetries, and midline coordination of teeth and face.
 |
 |
| Figure 5 | Figure 6 |
Figure 6 may be more common, but a close-up view such as Figure 5 can sometimes be more useful because it helps you to more easily visualize diagnostic criteria. If you adopt this view in the montage, it is important to capture all of the chin and part of the nose.
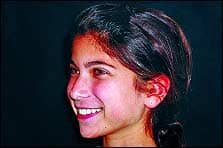
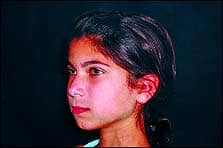
The final extraoral image that can be incorporated into the montage is the three-quarter view (Figures 7 and 8). The image can be taken either with the lips together or smiling, and is helpful in the analysis of facial balance.
 |
 |
| Figure 7 | Figure 8 |
Intraoral Views
 |
| Figure 9 |
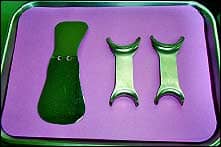
The intraoral views consist of the basic views of the teeth: center, right and left buccal, and upper and lower occlusal. You do not necessarily need multiple mirrors and multiple assistants to capture nice intraoral images. The basic tools are cheek retractors with both a small and large end and a mirror with both a small and large surface (Figure 9). I find that metal cheek retractors sometimes look better than plastic ones after multiple sterilization cycles. The patient will hold the retractors at all times and the photographer will hold the mirror for the occlusal photos, assuming that the camera is light enough to hold in one hand.
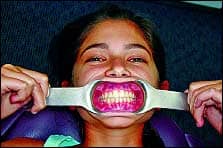
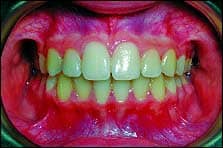
Ideally, the patient should be lying down in the chair. For the center shot (Figures 10 and 11), have the patient place the large ends of the retractors in his or her mouth so that you can see the teeth and gums. The small ends allow the lips and cheeks to curl over, obstructing the field. It is important to have a clear view of the gingiva so that you can document gingival health, or alternatively, periodontal concerns. The center shot should be taken with the occlusal plane parallel to the plane of the film, assuming no cant of the occlusal plane exists. If the is a cant, you must document this, so the occlusal plane will be, by definition, angled to the plane of the film.
 |
 |
| Figure 10 | Figure 11 |
 |
| Figure 12 |
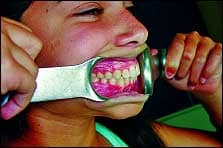
For the right buccal view, have the patient switch to the small end of the retractor on the right side (Figure 12), but use the large side of the retractor on the left. Again, the large side of the left retractor will hold the lips and cheek away, not obstructing the view. It is best if the patient gently holds the left side and pulls the right side as far back as possible. This will allow for maximum visualization of the occlusion on the right side. Have the patient turn his or her head as far to the left as possible, making it easier for the photographer to capture the right side.
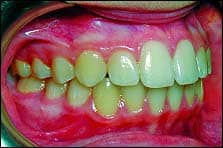
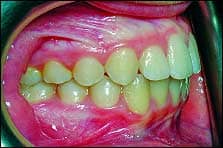
It is critical that you take the buccal shot as perpendicular to the occlusal plane as possible. In Figure 13, the image is angulated and it is harder to see the exact occlusal relations. Figure 14 shows the image properly acquired in a more perpendicular fashion. The better you can view the occlusion, the better you can assess treatment changes. The only downside to this arrangement is that it is hard to capture the distal of the first molars and any of the second molars.
 |
 |
| Figure 13 | Figure 14 |
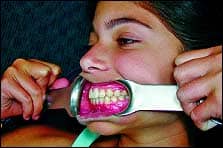
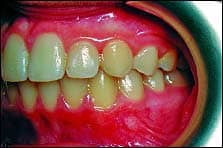
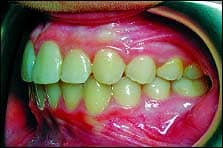
The left buccal shot is similar to the right buccal shot. Have the patient now reverse the retractors so that the small side is on the left and the large side is on the right. The patient should turn his or her head maximally to the right (Figures 15–17). Again, it is critical that the image be captured as perpendicular to the occlusal plane as possible.
 |
 |
| Figure 15 | Figure 16 |
 |
| Figure 17 |
On point-and-shoot cameras, the flash is off-center to the lens. Depending on the camera model, the flash is above and to the right or left of the lens. This will usually create a shadow on one side because the cheek is obstructing the light of the flash. To get around this, there are two alternatives. The first is to upgrade to a camera with a ring light instead of a traditional flash. The ring light sits around the lens, creating an even bath of light on the subject. Another alternative is to purchase a flash diffuser from one of the orthodontic camera vendors. They sell cameras that have been rigged with plastic or plastic and mirrors that help alter the path of the light so that shadows are minimized.
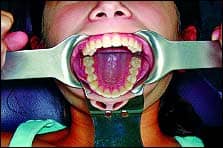
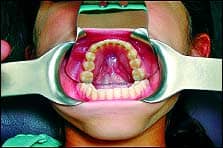
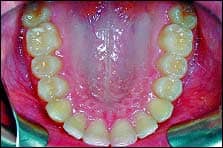
For the upper and lower occlusal photos, it is back to the large end of the retractors on both sides—this time using a mirror. When shooting the occlual view, it is important to keep the patient’s lips away from the teeth as the mirror is inserted in the mouth (Figures 18 and 19). To keep the mirror from fogging, it is best to warm it under water just prior to taking the images. For the upper occlusal view, have the patient tilt his or her head back so that the image in the mirror is again as perpendicular as possible to the film plane. The patient will often have to lift the retractors to keep the lips away from the teeth. It is always best to capture the second molars, but this is not always possible. Try to minimize the amount of mirror that appears in the photo, because it can be distracting. The same applies for the patients’ teeth. Try to minimize having two sets of teeth in the photo: the actual and the reflection. If you hold the mirror away from the teeth and don’t lean it against the teeth, only the reflection will appear in the photo, which is ideal (Figure 20).
 |
 |
| Figure 18 | Figure 19 |
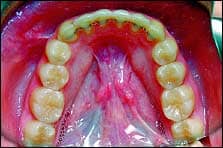
For the lower occlusal image, have the patient place the mirror under his or her tongue and have the photographer gently move the tongue out of the way so that the tongue is not sitting on the teeth in the photo (Figure 21). Again, it is better to capture the second molars fully, but this is not always possible. As with the upper occlusal photo, the patient may have to lift the retractors to pull the lips away from the teeth.
 |
 |
| Figure 20 | Figure 21 |
Remember, the images you have captured are actually mirror reflections of the actual occlusal planes. The good news is that once the upper and lower occlusal photos are captured, you usually do not have to manipulate them. The better, more sophisticated imaging programs have been written to expect mirror shots for the occlusal photos and automatically flip them around in the montage. A call to your imaging support team may cure the problem if the montage feature does not automatically flip the image.
Developing good photographic skills is a key component in the records-taking process. The better orthodontic management systems allow you to integrate the patient’s chart and photos so that—almost in an instant—as the patient is seated in the chair, you have access to the treatment plan and a visualization of the dentition at various stages. The better the photos, the better the analysis of treatment changes, which only helps in treating the patient more efficiently.
Howard A. Fine, DMD, MMSc, maintains private practices in Mt Kisco and Goldens Bridge, NY. He is a member of the National Association of Photoshop Professionals (NAPP). He can be reached at


