by Robert A. Miller, DMD
Seven keys to making brackets stay where you put them
 If you ask a colleague what his or her bond-failure rate is, you will likely get a response that it is between 2% and 20%. With the cost of each rebond approaching $100, one would think that all busy practices would have an easy-to-manage bond-failure tracking system to identify why problems occur.
It has been my observation that the busier the practice, the higher the percentage of bond failures. Since I began tracking our bond failures 5 years ago, our practice has reduced our bond-failure rate from 6.5% to 3%,1 even though we have experienced growth. The purpose of this article is to offer some tips to help you decrease your bond-failure rate as well.
I will, for simplicity of tracking, define a bond failure as one that cannot be explained. Most bond failures in our practice are largely due to chewing ice and pencils, or eating hard or crunchy food in a hurry. If we throw out the failures that occur within the first 24 hours after bonding (due probably to an adhesive failure), and those that we remove when changing wires, that leaves what I call the “UFOs” of bracket failure, since patients rarely admit to the cause of the problem. These are the ones that we need to track. Also worth noting is that we will always have bond failures such as traumatic facial injuries, where we prefer bracket failure over enamel failure.
 |
 |
An acceptable percentage in our practice is from 2% to 4%, which constantly fluctuates. With the popularity of self-ligating brackets, low bond-failure rates are the foundation of efficiency, since these bracket systems receive shearing forces at archwire placement and removal. We have made seven major changes in our bonding system during the past 5 years. Each change helped, but the combination of technique and material changes are responsible for the reduction in our bond-failure rate.
There are two basic techniques for bracket placement: indirect and direct. Some orthodontists use a four-handed technique in which the assistant helps the orthodontist by prepping the patient and maybe “buttering” the bracket, but the orthodontist places and positions his own brackets. In busier practices, most orthodontists allow the assistants to place the brackets and do the final positioning themselves. I will focus on this technique for the rest of this article.
Since all of the preparation in this scenario is done by trained clinical staff, acid etching with 37% phosphoric acid should only be applied for 20–40 seconds per tooth, after which the teeth should be rinsed thoroughly. Any variation here could weaken the bond strength. We use self-etching primer, which I will refer to as SEP, and which greatly diminishes this variability and yields an acceptable bond strength for routine bracket placement, even though it is considered “shallow etching.” Although shallow, the enamel rods are completely penetrated with primer, thus achieving an acceptable bond strength.
This is where the first of our seven ways to decrease bond failures2–4 comes in.
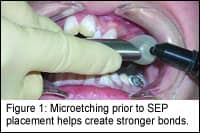
1) On some occasions (such as when you are dealing with mottled enamel, bonding molars, and lingual retainers), we “deepen” the etch by applying conventional etchant and rinsing prior to SEP placement. This was a breakthrough in the performance of etching materials because the rinsing step was eliminated, thus reducing the risk of contamination from water and saliva.5
2) Variability of bond-failure rates using SEP is due to the lack of surface preparation6 and using noncompatible adhesives.7 I therefore recommend that SEP only be used with an adhesive with which it has been shown to be compatible.1
3) Using precoated brackets reduces bond failures. Variability exists when “buttering” brackets, so the additional expense of precoating is offset by a reduction in bond failure. This creates a no-mix, unit-dosed system that, when properly executed, reduces the number of steps and lessens the opportunity for failure.
4) Bright, well-maintained lights are essential to properly cure adhesives used in orthodontic bonding. LED lights are the latest in convenience because of their size, portability, and brightness; however, they do require testing and maintenance.
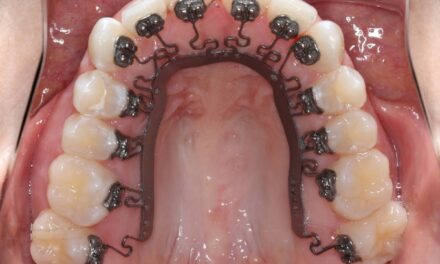
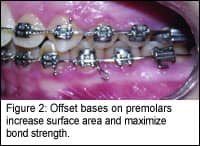
5) Large bases that are well-adapted to the facial surface of the teeth should be used on all posterior teeth, especially molars. Offset bases (Figure 2) should be used on all premolars to increase the surface area and maximize bond strength. Depending on the manufacturer, this recommendation could create problems if the mesh is not well-penetrated by the adhesive, or if contamination occurs during the “buttering” process.
6) Perhaps the most important step after initial bracket placement is to use temporary bite-opening mechanics to provide clearance during closure. For anterior “bite bonders,” I use a flowable adhesive that has wear characteristics that will not damage enamel when used with bite bonder molds. I sometimes use a thick mix of glass ionomer cement on the occlusal of maxillary first molars if the bite is open or excessive overjet exists. This may be especially important in cases where high-profile and/or self-ligating brackets are used, because these brackets are more susceptible to clinical failure—although we have not observed an increase in bond failures since we began using self-ligating brackets more than 1 year ago.
7) The final step requires a change that many team members resist at first, and that is the use of a dry field system. In a two-handed technique, there is often lag time between bracket placement and final positioning. This is an opportunity for contamination from saliva to weaken bond strength. The dry field system reduces this variable. This technique does take time to acquire the skill of placement, and some patients do not tolerate it well, but it is well worth mastering.
In summary, I have outlined seven steps our practice implemented into our bonding system that reduced our bond-failure rate by 50%. Although there are many techniques for tracking bond failures, this simplified approach makes it easy to record, monitor, and make changes to your technique or materials to help you achieve fewer bond failures. z
Robert A. Miller, DMD, practices orthodontics with his wife, Juliana F. Miller, DDS, MSD, in Culpeper and Centreville, Va. He lectures extensively on adhesives and other topics. He can be reached at [email protected].
References
1. In-office statistics for 2 years of bond failure tracking.
2. Miller RA. Laboratory and clinical evaluation of a self-etch primer. J Clin Orthod. 2002;35:42-45.
3. White LW. An expediate bonding technique. J Clin Orthod. 2001;35:36-41.
4. Pashley, et al. Aggressiveness of contemporary self-etching adhesives. Part II: Etching effects of unground enamel. Dent Mater. 2001;17:430-444.
5. Cacciafesta V, et al. Effect of water and saliva contamination on shear bond strength of brackets bonded with conventional, hydrophilic and self etching primers. Am J Orthod Dentofacial Orthop. 2003;123:633-640.
6. Miller RA. Bonding fluorosed teeth: new materials for old problems. J Clin Orthod. 1995;24:424-427.
7. Pandis N, et al. A comparative in vivo assessment of the long term failure rate of two self-etch primers. Am J Orthod Dentofacial Orthop. In press.