by Vittorio Cacciafesta, DDS, MSc, PhD
The 2D Lingual system is an aesthetic alternative for cases that don’t require third-order movements
Lingual technique is a very successful approach in the orthodontic treatment of adult patients, although it is considered one of the most difficult techniques, requiring great manual skills and experience, more chairtime than labial treatments, and often long treatment times with less-than-satisfactory results. The reason for lingual’s success might be the fact that it is superior in aesthetics to all the other treatment options, since it is the only technique that can be considered completely “invisible.”1
In lingual orthodontics, first- and third-order tooth movements are more complicated due to the variability of the lingual tooth anatomy.2 Torque control is also more difficult because of the reduced interbracket distance. Even small variations in bracket height can have a considerable effect on the applied torque. These factors have led to the development of various indirect bracket-transfering methods, such as TARG (from SDS/Ormco) and CLASS (from Specialty Appliances),3-4 or very sophisticated, fully individualized systems as Incognito.5
Forestadent developed the 2D Lingual technique to create an inexpensive lingual approach and bypass many factors that complicate conventional lingual treatment but still provide favorable results.6-10
2D Lingual brackets can be bonded directly or indirectly, without the need for a set-up in the laboratory. A very important factor in the use of lingual orthodontics is, of course, the question of whether the bracket system is comfortable for the patient or not. Lingual brackets can, if they are too high or bulky, also affect the patient’s pronunciation and cause speech troubles. In addition, as treatments will always take some time, many patients do not like to have a foreign body in their mouth disturbing their tongue posture and activity. This is often a major problem, especially with adults and adolescents.
The aim of this article is to present the design, characteristics, and clinical applications of 2D Lingual brackets.
2D Lingual System
The 2D Lingual technique consists of the following: 1) 2D Lingual brackets; 2) Titanol superelastic or Biolingual lingual archwires; 3) Light wire mechanics; 4) Low friction and light forces; and 5) Direct or indirect bonding (without any need of set-up).
The 2D Lingual technique employs a self-ligating lingual bracket that does not have a traditional rectangular slot in the base. Instead, the bracket has two clips on the lingual surface to trap the archwire. Because it does not have rectangular slots, only first- and second-order movements are possible.
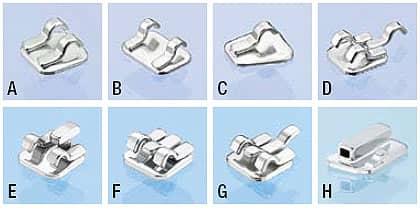
Figure 1: A) Medium Twin standard bracket; B) Large Twin bracket; C) Narrow Single bracket; D) Medium Twin with gingival hook; E) Medium Twin with T-Hook; F) 2D Plus with gingival hook; G) 2D Plus without gingival hook; H) Molar Tubes.
2D Lingual Brackets
There are seven types of 2D lingual brackets:
- The Medium Twin is a standard bracket that can be used on all teeth. It is indicated especially for relapse cases that do not require the use of power chains, or when comfort is a must (Figure 1A).
- The Large Twin is indicated for used cases where more rotational control is needed on wide teeth such as maxillary centrals or molars (Figure 1B).
- The Narrow Single can be used in cases with severe crowdings or rotations—whenever space is limited for a standard bracket (Figure 1C).
- The Medium Twin with gingival hook is indicated for more complex treatments where better management of power chains or intermaxillary elastics is needed. It allows for the use of auxiliary torquing springs for simple third-order movements (Figure 1D).
- The Medium Twin with T-Hook is designed for application of power chains and low-friction sliding mechanics (Figure 1E).
- The 2D Plus Lingual Bracket with or without gingival hook has a rectangular slot, thus enabling the application of torque on single teeth. There are different options to make a set-up for the affected tooth (Figures 1F and 1G).
- The Molar Tubes are extremely flat and chamfered for comfort (Figure 1H).
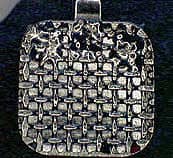
Figure 2: The retentive base.
The brackets can be used for all teeth, since there is no prescription. The self-ligating system has progressive friction. The brackets allow a vertical insertion of the archwire and are able to engage wires with a maximum diameter of .022 x .016 inches. The brackets allow you to use thin power chains; and 2D Plus brackets allow you to apply torque when needed. The brackets’ total thickness is 1.4 mm, including a 0.4-mm base (Figure 2).
The base is manufactured to allow the bracket positioning almost at the level of the cingulum of front teeth—that is, on the projection of the center of resistance. The absence of the slot in the base allows the archwire to be almost tangential to the lingual surfaces. Those characteristics, together with the use of round/squared wires and correct bracket positioning, should compensate for the different labio-lingual thickness normally present on the front teeth, particularly in the maxillary arch.
Opening and Closing the Brackets
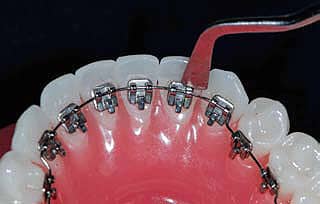
Figure 3: Opening brackets with a customized Haideman spatula.
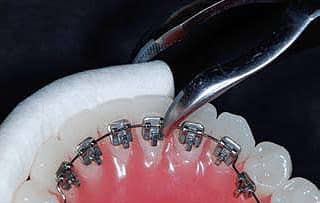
Figure 4: Closing brackets with a Weingart plier.
The bracket clips may be opened with a Haideman spatula that has been previously customized by thinning the ends with a grinder, or a specific probe, to allow the archwire to be inserted or removed.
Insert the modified spatula or special explorer in the notch on the right side of the clips, thus opening the bracket by mechanical deformation (Figure 3). Always direct the force of the explorer on the bracket pad to avoid debonding. The clips are laser-welded on the pad, and the material is tested to withstand at least 20 normal openings and closures. Once the archwire is inserted, the clips can be closed with a Weingart utility plier. I recommend closing only one clip at a time to reduce the risk of accidental debonding or damages. Hold a cotton roll against the labial surfaces of the teeth to avoid any slipping of the plier (Figure 4).
Direct Bonding Procedure
The 2D Lingual System does not require any lab set-up. After some practice and experience, all the steps can be done chairside and are very similar to the clinical steps required to bond conventional labial brackets.
For bracket application, you can use conventional college tweezers or thin bracket holders. It is important to slightly open the bracket clips before holding it with the tweezers. Once you are holding the bracket firmly, rotate the tweezers in order to show the base surface.
Successful bonding requires careful attention to three essential components: the tooth surface and its preparation, the design of the bracket base, and the bonding agent. The steps involved for an optimal performance in direct bonding of lingual orthodontic attachments are as follows: cleaning, enamel conditioning, sealing, bonding, and light-curing (if necessary).
Cleaning
Before bonding brackets, it is essential to remove the organic pellicle that normally covers all teeth. You can do this by cleaning the enamel surface using a mix of pumice and water, or prophylaxis paste, with a rubber cup or a polishing brush mounted on a low-speed rotary instrument. Then rinse the tooth with water to remove any pumice debris and thoroughly dry it with a stream of oil-free air. Use cheek and lip retractors, saliva ejectors, and cotton or gauze rolls during this procedure. If you need to increase the bond strengths, I recommend using a microetcher (sandblaster) on the enamel surface for 3 seconds.
Enamel Conditioning
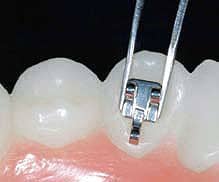
Figure 5: Bonding in the mandibular arch.
After moisture control, it is necessary to keep a completely dry working field and to create irregularities on the enamel surface. This is accomplished by covering the entire enamel surface with 37% orthophosphoric acid for about 30 seconds; longer etching periods provide no more, but actually less retention because of the loss of surface structure. For increasing the simplicity of etching procedure, acid gels should be preferable to acid solutions; gels provide better control for restricting the working field to avoid insulting the gingival margin and initiating bleeding. Do not contaminate the enamel surface with saliva, which promotes immediate remineralization, until bonding is completed; otherwise, re-etching is required. After rinsing the enamel again to completely remove the etching, dry the tooth surface with a moisture- and oil-free source to obtain a uniform and frosty white appearance. Recent advances indicate that microetching is also essential for successful treatment.
Sealing
A liquid resin can be applied with a small foam pellet or brush with a single gingivoincisal stroke on each etched tooth. The resin is able to penetrate into the irregularities created in the etched enamel surface, allowing the bonding material to mechanically interlock with the tooth surface.
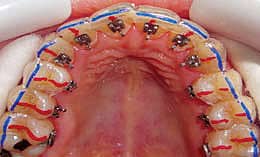
Figure 6: Bonding in the maxillary arch with the use of a vacuum-formed soft sheet as a reference guide.
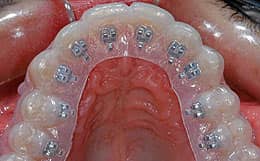
Figure 7: Indirect bonding with the use of a vacuum-formed sheet.
Bonding
After applying a thin layer of resin apply a small quantity of adhesive to the bracket base, then press it against the enamel in its correct position. Depending on the type of bonding material, it can set either by a self-curing process or by light-curing. An adhesive should have sufficient viscosity so that the bonded attachments do not drift out of position before the adhesive has set. Light-cured composite resins, such as Transbond XT (from 3M Unitek) or Kurasper F (from Kuraray) are preferable.
The bracket bonding procedure consists of transfer, positioning, fitting, removal of excess, and light-curing. When excess adhesive is carefully removed and good oral hygiene is maintained, the gingival condition is not adversely influenced by bonded lingual appliances. On the other hand, when excess adhesive is close to the gingival margin, it can produce gingival inflammation and hyperplastic gingival changes, with the possibility of decalcifications around the periphery of the bonding base. Direct bonding is easier, faster (especially if only a few teeth are to be bonded), and less expensive than the indirect bonding technique.
In the mandibular arch, you can direct bond by using a placement gauge to mark the desired height from the incisal edge and employing the thin bracket holder (Figure 5). In the maxillary arch, because of the more complex anatomy and limited visibility, I suggest using a vacuum-formed soft sheet as a reference guide or using indirect bonding. Bracket inclinations can be indicated on the tray by marking the long axes of the teeth. This system will allow brackets to be positioned at the correct height, thus avoiding occlusal interferences from the overbite (Figure 6).
Indirect Bonding Procedure
First, mark the long axes of the clinical crowns, occlusal margins, and bracket positions on a plaster malocclusion model. After you have isolated the plaster model with a separating liquid, you can bond the brackets on the model using light-cure composite. After light-curing the brackets, fabricate a transfer tray with silicones or a vacuum-forming machine (Figure 7).
After removing the tray from the plaster model, clean the bracket composite pads with acetone. Then prepare the patient’s teeth as in the direct bonding procedure, making sure not to use too much composite to avoid excess after removing the tray. Remove the tray carefully from the brackets.
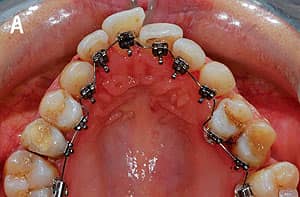
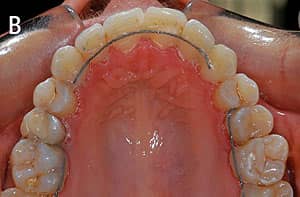
Figure 8: An adult presenting with maxillary anterior crowding. A is pretreatment, and B is post-treatment.
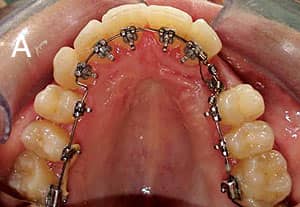
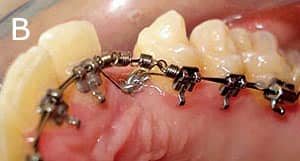
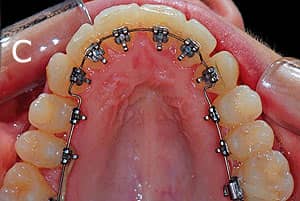
Figure 9: An adult presenting with an impacted maxillary canine. A and B are pretreatment, and C is post-treatment.
Characteristics of the Titanol Lingual Archwires
The NiTi wires normally used in combination with the 2D Lingual brackets are Titanol lingual archwires (from Forestadent) in three classic shapes (small, medium, and large, with sections of .012″, .014″, and .016″). These archwires are precurved from canine to canine, both for the maxillary and mandibular arch, and allow insertion of a first-order bend between canine and first premolar in order to produce the typical mushroom arch configuration.11 I have developed a method for adding simple first-or second-order bends to the preformed archwire by overbending the wire while it is in its martensitic (cold) phase. If you then gently heat the wire with a flame (up to approximately 60°C to 70°C), it will regain its austenitic phase, and the effective amount of bending can be checked. This clinical procedure requires only a few minutes of chairtime.8
Alternatively, you can use Biolingual wires, which are mushroom-shaped lingual archwires available in five different shapes and four different wire dimensions with a template to determine the correct shape. The use of NiTi archwires enables the clinician to produce low levels of applied force and to achieve a more consistent tooth movement during the first phase of treatment (levelling and aligning), because those wires have a wide range of deactivation, thus significantly reducing the number of appointments and reactivations.
Clinical Applications
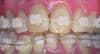
The 2D Lingual system can be effectively used for 1) post-treatment retention; 2) closure of minor spaces and diastemas; 3) limited correction of deep bites; 4) correction of crowdings, particularly in the mandibular arch (Figure 8A and 8B); 5) alignment of impacted or ectopic canines (Figure 9A to 9C); 6) correction of anterior and lateral crossbites; and 7) orthodontic preparation for orthognathic surgery.
In conclusion, 2D Lingual brackets are a valid alternative to conventional lingual brackets in adult cases that do not require third-order tooth movements.
Vittorio Cacciafesta, DDS, MSc, PhD, has been an assistant clinical professor in the department of orthodontics at the University of Pavia, Italy, as well as a visiting professor at Aarhus University, Denmark, and Temple University. He has published more than 100 refereed publications, one book, and four book chapters. He is co-editor of Ortodonzia Clinica, associate editor of Progress in Orthodontics, and referee for several scientific journals. He has lectured extensively in Europe, the Middle East, Asia, and North and South America. He can be reached at
References
- Nidoli G, Lazzati M, Macchi A. Migliora l’estetica con l’incollaggio linguale dei bracket. Attualita’ Dent. 1988;18:12-20.
- Nidoli G, Lazzati M, Macchi A, Castoldi A. Analisi clinico-statistica della morfologia dentale in rapporto al posizionamento dei bracket linguali. Mondo Ortod. 1985;10:45-53.
- Alexander CM, Alexander RG, Gorman JC, et al. Lingual orthodontics: a status report. J Clin Orthod. 1982;16:255-262.
- Nidoli G, Lazzati M, Macchi A. Applicazione diretta o indiretta dei bracket linguali. Mondo Ortod. 1984;9:63-72.
- Wiechmann D. A new bracket system for lingual orthodontic treatment. Part 1 €“ theoretical background and development. J Orofac Orthop/Fortschr Kieferorthop. 2002;63:234-45.
- Tagliabue A, Levrini L, Macchi A. Attacchi linguali Philippe: considerazioni cliniche. Mondo Ortod. 2000;25:187-192.
- Macchi A, Tagliabue A, Levrini L, Trezzi G. Philippe self-ligating lingual brackets. J Clin Orthod. 2002;36:42-45.
- Macchi A, Norcini A, Cacciafesta V, Dolci F. The use of “bidimensional” brackets in lingual orthodontics: new horizons in the treatment of adult patients. Orthodontics. 2004;1:21-32.
- Cacciafesta V, Sfondrini MF, Norcini A, Macchi A. Fiber Reinforced Composites in Lingual Orthodontics. J Clin Orthod. 2005; 39:710-714.
- Cacciafesta V, Sfondrini MF. One-appointment correction of a scissor bite with 2D lingual brackets and fiber-reinforced composites. J Clin Orthod. 2006;40:409-411.
- Fujita K. New orthodontic treatment with lingual bracket mushroom archwire appliance. Am J Orthod. 1979;76:657-675.