by Suhail A. Khouri, DDS
How to add the v-bend technique to your clinical armamentarium
 |
There was a time when orthodontists using superelastic wires for initial alignment of teeth could only achieve the straight archform determined by manufacturers, because they were not able to bend or activate the wires into customized appliances with traditional bending pliers. Then most clinicians started to burn the distal ends of such wires in order to cinch them back and prevent their slippage, but annealing distal ends ruined the wires’ elasticity, defeating the ultimate purpose of their use.
This is why I invented and designed Bendistal pliers: to place a permanent bend on distal ends of superelastic wires without annealing or interfering with their superelasticity, which should be well-preserved during treatment.
 |
| Suhail A. Khouri, DDS |
The resulting v-bend placed on the distal ends encouraged me to try placing v-bends in certain other locations on tied superelastic archwires and resulted in the clinical results presented in this article. This led to the development of v-bend techniques that I believe provide the clinical ease, comfort, and efficiency that constitute the tripod requirement for any popular advancement in treatment modalities.
In this article, I will touch briefly on how the v-bend techniques correct certain orthodontic problems.
What Makes These Pliers Different?
Following are the unique features of my pliers that enable them to perform their functions:
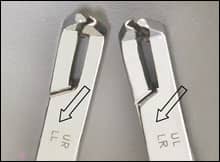 |
| Figure 1: Each pliers is stamped with the abbreviations of the quadrants it serves. |
- They were designed and made longer than usual to reach behind molar tubes.
- The tips are tiny to allow easy fitting between brackets. This provides convenience and easy manipulation for patient and clinician.
- The back of the pliers’ jaws were made with a bevel to avoid pinching the cheek mucosa during use.
- Engraved on each pair of the two-pair set are abbreviations of the quadrants served by each pair to avoid confusion (Figure 1). One pair cinch back and bend archwire intraorally in the upper right and lower left quadrants of the mouth (ur, ll), while the other pair serves the upper left and lower right quadrants (ul, lr).
What Can You Do with These Pliers?
One squeeze of the pliers’ jaws can place a permanent, activating v-bend extra- and intraorally, on superelastic wires. These v-bends activate such wires as easily as stainless steel wires. They can help you create the following:
- cinch-back bends;
- intrusion bends;
- step-up/step-down bends;
- step-in/step-out bends;
- molar tip-back bends;
- horizontal midline crossbite bends;
- mushroom wire bends;
- loop bends; and
- molar rotation bends.
For some examples, see Figures 2A, 2B, and 2C below.
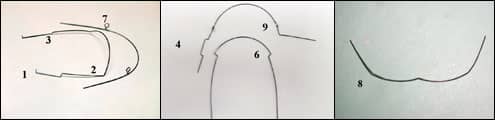 |
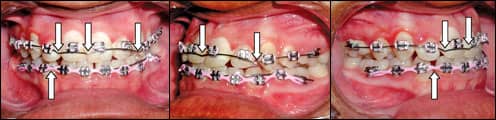
| Left (2A): Cinch-back, intrusion, step-up, and loop bends; Center (2B): Step-out, mushroom-wire, and molar rotation bends; Right (2C): A midline crossbite bend. |
Distal-End (Cinch-Back) Bends
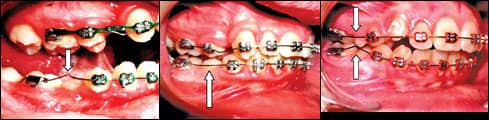
These pliers were named after this original function of bending the brittle and unbendable distal ends of superelastic archwires (by one easy squeeze), intraorally without burning them (Figures 3A, 3B, and 3C).
 |
| Left (3A): A cinch-back bend to prevent wire slippage from the molar tube in the lower right quadrant; Center (3B): Cinch-back bends in the upper and lower right quadrants; Right (3C): Cinch-back bends in the upper and lower left quadrants. |
Molar Tip-Back Bends
Placing the v-bend before the molar tube can efficiently tip back or tip forward molars according to clinical needs and depending on the pliers’ tips orientation to the archwire. This bend can be placed by one squeeze instead of fabricating helices (Figures 4A to 4C). This bend serves the following clinical purposes:
 |
| Left (4A): The tip-back bend provides eruption space for the second premolar; Center (4B): The same patient after premolar eruption; Right (4C): The same patient after molar tip-back and second premolar eruption. |
- regaining space for the eruption of impacted second premolars;
- strengthening posterior anchorage when placed before the posterior segment of teeth; and
- finalizing correction of the molar relations.
Maxillary Incisors Intrusion and Opening Severe Overbite
It is well-known to orthodontists that successful incisors intrusion and opening of severe overbite has always been a big challenge to achieve.
The v-bends made with Bendistal pliers became the essence of a new technique that effectively opened severe overbites. One full squeeze of the pliers places the v-bend intraorally on tied archwires. The flexibility of such archwire allows for safe placement of a permanent bend in the middle of the interbracket distance without breaking adjacent brackets. Such a bend activates the archwire to intrude or move a group of incisors to where you want them to be. The best location for intrusion is behind canine brackets with the apex of the v pointed downward. However, inverting the bend will help close open bites.
Figures 5 and 6 below are intraoral photos of two patients exhibiting complicated overbite situations that were effectively and easily treated with a v-bend technique.
 |
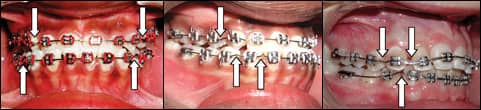
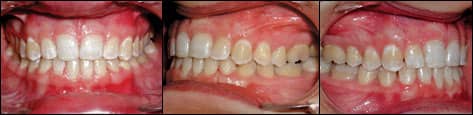
| Figure 5A: Severe overbite in a Class II, Division 2 patient before treatment |
 |
| Figure 5B: The same patient during treatment. Note the intrusive v-bends behind the canine brackets on the upper and lower archwires. |
 |
| Figure 5C: The same patient treated with the v-bend technique and one premolar extraction. |
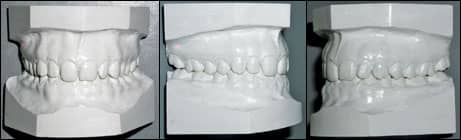 |
| Figure 6A: Models of a severe 95% overbite in a Class I adult patient before treatment. |
 |
| Figure 6B: The same patient after opening the bite. Note how the v-bend opens the overbite. |
 |
| Figure 6C: The same patient after dramatic opening of the deep bite using the v-bend technique. |
Nonsurgical Correction of Class III Malocclusion
I developed and clinically perfected this v-bend technique, and I have shown clinical results in correcting skeletal as well as dental severe overbites. It depends on placing the simple intraoral v-bends in strategic locations on tied, superelastic archwires.
I applied the same principle of using the dramatic ability of the v-bends to intrude anterior teeth in opening deep bites to disengage incisors that led to Class III malocclusion, and the clinical results were dramatic. The v-bends were able to level, intrude, and disengage incisors (with the help of a bite raiser in severe cases, and without it in mild cases). This particular disengagement of incisors is considered the crucial “surgery saver” for Class III patients. After this step it is easy for any orthodontist to provide spaces in the mandibular dental arch by using existing spacing, first premolar extractions or interproximal enamel reduction; to retract lower incisors; and to allow for normal incisal jump that restores normal overbite and overjet relations.
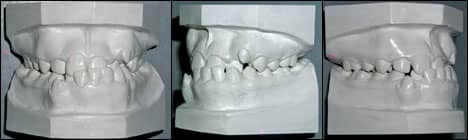 |
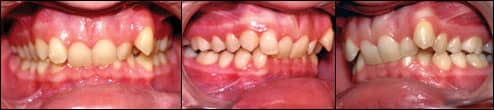
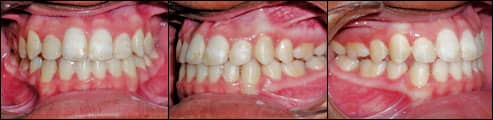
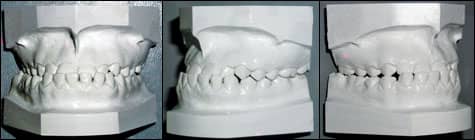
| Figure 7A: Pretreatment models of a Class III patient showing complicated incisal interlocking crossbite. |
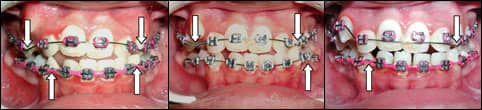 |
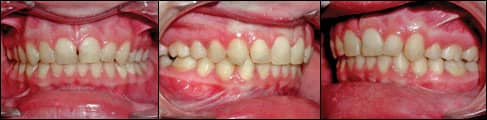
| Figure 7B: Frontal intraoral views showing incisor disengagement with the v-bend technique. |
 |
| Figure 7C: At an advanced stage in treatment, showing selective locations of v- bends that disengage teeth where needed. |
 |
| Figure 7D: Post-treatment results. |
 |
| Figure 8A: Pretreatment models of an adult Class III patient with a unilateral posterior crossbite. |
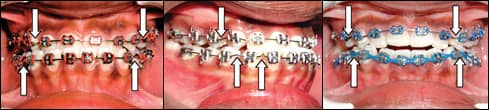 |
| Figure 8B: Stages of treatment using the v-bend technique. Note how you can overdisengage incisors using upper and lower intrusive v-bends, and how only existing spaces were used to retract mandibular incisors without extraction. |
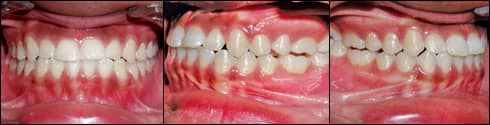 |
| Figure 8C: Post-treatment photos of the same patient. |
Suhail A. Khouri, DDS, is in private practice in Chesterfield, Mo. He is a diplomate of the American Board of Orthodontics. He has a financial interest in the products mentioned here. He can be reached at