by Paul Gange
How to get a strong bond under challenging conditions

Bonding orthodontic attachments remains one of the most technique-sensitive procedures in the orthodontic office today. Using self-etching primers, bonding to porcelain, and bonding to metal and composite restorations are areas of concern that have seen improvement. This article will address the state-of-the-art technique for these procedures.
Self-Etching Primers
Enamel preparation prior to bonding has traditionally been done with 37% phosphoric acid. This requires a thorough prophylaxis with pumice to clean the surface; an application of acid on the surface for approximately 30 seconds; then a thorough rinse of each tooth for 5 to 10 seconds to remove the acid, demineralized particles, and calcium phosphate salt crystal. Bonding resin is then applied to the enamel before placing the appliance using bonding paste.
Self-etching primers such as Transbond Plus® (from 3M Unitek) and Reliance SEP™ have become popular because they condense the etching and bonding resin steps into one. However, as with any bonding procedure, there is technique sensitivity that can determine success or failure.
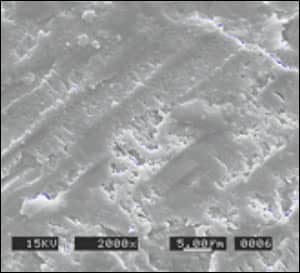
Figure 1: A bur-roughened porcelain surface has tell-tale grooves.
Both of these products are two-liquid systems that require mixing either in a well (Reliance SEP) or in a blister pouch (Transbond Plus). The two ingredients must be thoroughly mixed to properly activate the acid. As with phosphoric acid, you should prophy, rinse, and dry the enamel. You can then apply the self-etching solution to the enamel in a scrubbing manner for at least 5 seconds per tooth. The scrubbing application is a vital step with a self-etching system, and is contrary to the proper technique with phosphoric acid application, which involves dabbing the acid on the surface. The amount of material applied to the enamel should not be excessive, as this can weaken the bond and cause patient discomfort if it contacts the gingiva.
Next, dry the surface with one or two bursts of air to displace the excess material and evaporate the water component from the area where the bracket will be placed. Insufficient drying can adversely affect the bond strength. Self-etching primers are hydrophilic and can be applied to a moist surface, but if saliva or moisture contamination occurs after application and drying, apply a fresh layer of self-etching primer, then scrub and dry. An alternative technique is to apply a coat of Assure® bonding resin and then dry. The tooth is now ready to accept an appliance with a light-cured paste.
Bonding to Porcelain
Bonding to porcelain has become more difficult as the types of porcelain and ceramic have become stronger and more aesthetic. The problem with bonding to porcelain is that in order to get an effective bond, you need to rough up the surface before chemically treating it.
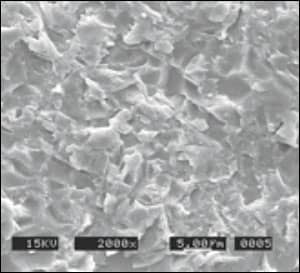
Figure 2: Sandblasted porcelain is more mechanically retentive.
Generally, roughening is performed with a medium or coarse bur that will leave the surface dull and unattractive at the time of debonding, resulting in patient dissatisfaction. Sandblasting porcelain with 50-micron alumina oxide will mechanically prepare the surface yet not damage the porcelain as a bur would. The SEMs in Figures 1 and 2 show a bur-roughened porcelain surface versus a sandblasted surface. The sandblasted surface is more mechanically retentive, but does not have the grooves associated with bur preparation. Chemically, the glass in the porcelain is etched with a solution of 7% to 9% hydrofluoric acid. Be careful with this product, and apply a chemical barrier gel to the gingiva to neutralize any acid that might reach there.
After etching with the hydrofluoric acid for 4 minutes, carefully rinse the acid off the porcelain and into suction. The next step is to dry the surface and apply a thin coat of silane. “Thin” is key here: An excessive layer of silane can compromise bond strength. The surface is now ready for a bonding resin such as Assure, followed by the bracket and the paste of your choice.
At the time of debanding, remove the bracket and reduce the composite to a thin film. The porcelain can be polished with a rubberized finishing point, followed by a prophylaxis with a diamond polishing paste to restore luster.
Bonding to Metal
The most difficult surface to bond to in the mouth is gold, followed by amalgam and stainless steel. To further complicate matters, the metal surfaces that orthodontists encounter are generally in the posterior section of the mouth, where as much as 20 Mpa of shear bond strength is required. This is why I recommend sandblasting any metal surface with 50-micron alumina oxide rather than roughening it with a bur. Sandblasting will nearly double the bond strength: A recent study at Reliance showed that sandblasted gold produced a shear bond strength of 19 Mpa, versus 10 Mpa when it was roughened with a coarse bur.
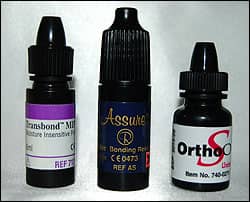
Figure 3: Hydrophilic primers decontaminate surfaces.
After mechanically preparing the metal surface, apply a layer of 4 Meta metal primer, then dry it. Next, apply a bonding resin. Assure bonding resin can be used in place of the metal primer and bonding resin, saving a step.
The surface is now ready to accept a bracket with a light-cured or chemically cured paste. When using a light-cured paste, be sure to cure at least 20 to 30 seconds per bracket regardless of light intensity, as the light rays will not refract or penetrate as they do on enamel. Surface restoration after debonding is the same as with porcelain.
Bonding to Composite Restorations and Acrylic Temporary Teeth
Finally, a surface that is a little less complex to bond to: a composite restoration! Simply roughen with a fine diamond, not a carbide or a green stone. The fine diamond does not leave a smear layer, and consequently you are bonding directly to the composite. Apply a coat of Assure bonding resin, and apply the bracket with any light-cured or chemically cured paste.
An acrylic temporary or pontic tooth requires a different preparation. Lightly roughen with a fine diamond, then apply a coat of plastic conditioner. Dry, then apply a coat of Assure or Ortho Solo® and dry again. Then place the bracket with any paste and cure as prescribed. Surface restoration after debonding is the same as with porcelain.
Wet-Field Bonding
To find all the products mentioned here, visit our Buyer’s Guide.
Whether you are using self-etching primer or phosphoric acid etch and bonding resin, there is nothing more frustrating than preparing a patient for a full-arch strap-up and having the clinician who is placing the brackets with paste detained. Once the resin is on a tooth it looks shiny, and moisture or saliva contamination on top of that surface cannot be detected.
The best way to safeguard against a weak bond in that situation is to lightly dab the potentially contaminated surface with any of the following hydrophilic resins: Assure from Reliance, Ortho Solo from Ormco, or MIP® from 3M Unitek (Figure 3). Simply take the cap off the bottle, saturate a sponge pellet or microbrush, and lightly dab the contaminated surface. Then lightly dry, and rest assured you now have a chemically clean surface to bond to. These hydrophilic primers can be used to decontaminate enamel and nonenamel surfaces. Remember, a hydrophilic primer will bond to a wet surface, but if contamination occurs on top of the primer you must apply a fresh layer of primer.
The bonding materials available today are vastly improved, making it possible to achieve acceptable bond strength on all types of surfaces—enamel or nonenamel. The key to success remains proper application and technique.
Paul A. Gange is founder, president, and owner of Reliance Orthodontic Products Inc, Itasca, Ill. He has been involved with the development of orthodontic adhesives, sealants, and cements for more than 34 years. He can be reached at