
by Bill Dischinger, DMD
Advansyc is designed to orthopedically correct Class II malocclusions during orthodontic treatment

You plan on putting that in my child’s mouth?” How many of us have heard that over the years when showing a patient and parents a Herbst appliance? Or maybe we were just waiting to hear that.
When my father (Terry Dischinger, DDS, MSD) and I began designing the Advansync Molar to Molar Class II Corrector more than 5 years ago, comfort was our goal. We knew that with the advantages a telescoping Herbst provided, we could continue to make the appliance smaller and smaller. We felt if we could incorporate four pieces into the mechanism, it would allow us to make the appliance so small, it would only need to be attached to the molars. That is where the original name, Molar to Molar Corrector, came from. While designing and testing the appliance, we realized that there were so many other advantages we had not even initially considered.
Advansync Advantages
One of the advantages of the Advansync Molar to Molar Class II Corrector is that is has allowed us to orthopedically correct Class II while simultaneously doing all the orthodontics with the braces, saving at least 6 months of treatment. The appliance is attached just to the molars, in contrast to previous Herbst designs that were attached to the mandibular first premolars or had a long cantilever arm, making it impossible to place braces on the mandibular premolars. Our design eliminates the problem, and we now are able to bond both the maxillary and mandibular arches from second premolar to second premolar (upper and lower 5-5).
When we remove the Advansync, the orthodontics is virtually done, leading to a much shorter treatment time. Most cases in our office are being treated in 14 to 18 months, saving us well over 6 months from our traditional Herbst treatments.
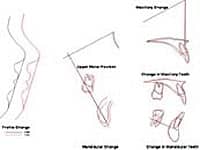
Notice the Class II correction with orthopedic movement of the mandible and no dental movement. In fact, notice that the mandibular incisors are uprighted during treatment.
Another advantage is the ability to control the mandibular teeth. Traditional Herbst appliances put a protrusive force on the mandibular teeth, either from a lingual arch pushing against the incisors or from the cantilever arm tipping downward and forward. With this new design, the force is only on the molars. We have found in our ceph tracings that many cases are even having a lingual movement of the mandibular incisors instead of the protrusive side effect seen before. We have found that with this new design, there is little or no tooth movement occurring in the lower arch, leading to a purely orthopedic treatment.
Fitting and Bonding
The Advansync is available in a kit or through lab fabrication at AOA Laboratories. In our office, we use the kit. At the initial appointment, separators are placed for the molars. In most cases using the kit, we still take impressions for working models to prefit the crowns prior to the placement appointment. However, you don’t need models because with the kit, you can just fit the crowns in the mouth like bands.
When the patient returns to the office for the “new start” appointment, the spacers are removed and the Advansync crowns are fitted one at a time. It is similar to fitting bands. We dip the screws in ceka bond prior to their insertion. We attach the mechanism to the maxillary crowns. We use a ¼-inch, 2-ounce elastic to tie the mechanism to the axle. This will help keep the arm out of the way while cementing it. Once the crowns have all been fit, they are set aside.
We now bond maxillary and mandibular second premolar to second premolar (5-5). We have used both direct and indirect bonding methods, but at this time, we tend to direct-bond most cases. The reason for this is that in order to level the arches and correct the overbite, the premolars need to be bonded very gingivally.
Following the bonding, we then cement the Advansync crowns one at a time. Once the crowns are cemented, we figure-8 lace the maxillary 6-6 full arch. This is key to the treatment. A Herbst appliance will distalize maxillary molars; we don’t want that to occur. If the molars distalize, the orthopedic effect on the mandible is lost. We lace every single patient this way, even patients on whom we may be using open-coil springs to create arch length in the presence of crowding. We always get asked how we are able to gain space yet have the whole arch laced together. We don’t really know how to explain it, to be honest. It just works, and has worked routinely for us for more than 5 years. We think the light ligarature wire has enough “give” to it that the arch is able to broaden yet hold the molars in place.
The next step is to place .014 CuNiTi wires in both the maxillary and mandibular arches. These wires go 6-6, through the tubes on the molar crowns. The upper wire is cut flush. The lower wire is annealed and bent up. If you are using springs, do not bend the lower wire tight with the end of the archwire tube. We almost always use springs to gain all the space before engaging crowded teeth on the .014 wires. This allows maximum arch development and prevents the dumping of mandibular incisors labially. Once the wires are placed, we attach the arm mechanisms to the lower crowns with screws that have been dipped in ceka bond. The initial activation will place the patient into a Class I canine position.
Once the appliance has been activated, the patient needs to be checked to ensure that the midlines coincide. If they are not aligned, then shims need to be placed on the side on which the mandibular midline is deviated until the mandibular midline is centered under the maxillary midline.
 |
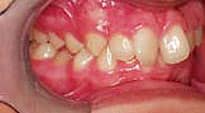
This initial profile photo of this patient shows a Class II skeletal pattern with a retrusive mandible. The initial intraoral buccal photo-documents her Class II malocclusion with bimaxillary crowding. |
 |
|
 |
The final profile photo shows a Class I profile with balanced facial proportions, and the final intraoral buccal photo confirms that the Class II was corrected to an ideal Class I relationship. |
 |
Continuing Treatment
We tell our patients that they will have trouble eating for about 5 days. Most patients will initially have a posterior open bite due to the activation. This is similar to a patient with bite turbos. With the crowns on the molars, though, patients with an Advansync are able to start eating normally sooner than patients with bite turbos.
We see patients with open-coil springs being used to gain space 6 weeks after their initial placement to either reactivate the springs or engage the initially blocked-out teeth. If no open-coil springs are being used, we see patients 12 weeks after the initial placement. At the 12-week appointment, we generally change the wires to .014 x .025 CuNiTi’s. The upper arch figure-8 lacing is maintained, and we place a surgical tie-back hook mesial to the upper first molar and ligature-tie it to the hook on the molar crown. This is double protection to prevent the molars from distalizing. The Advansync appliance is activated 4 mm on each side.
Some patients will be in their final overcorrected position at this point. Our overcorrected position places the maxillary canine end-on with the mandibular first premolar when the initial cuspid relationship is end-on or less. In severe Class IIs greater than end-on or in adult cases, we overcorrect a full tooth, placing the canines in a full Class III position.
Fifty percent of all Class IIs have a mandibular skeletal asymmetry. If the mandibular midline was deviated initially, then it needs to be overcorrected. When correcting asymmetries, we incorporate the same philosophy that applies to the overcorrected cuspid relationship. We overcorrect the midline by placing the mandibular midline half the width of a maxillary incisor over. Have we ever had a patient not drop back? In almost 30 years of using Herbst appliances at Dischinger Orthodontics, there has never been a patient who had not dropped back. We tell patients and parents it will take 2 to 6 months for the jaw to drop into position. We also tell them that if we do not overcorrect prior to the Advansync being removed, that as the jaw drops back, the overjet will return.
If at this activation patients are not in their final overcorrected position, then we see them 12 weeks later and activate them into the final position. We hold them in the final overcorrected position for 12 weeks and then take a tomogram of the TMJ to confirm that the condyle is centered in the fossa. If it is centered, then we remove the Advansync appliance and crowns a week later. If the condyle is not centered, we have patients return in 6 weeks to again take another joint film. Just about all patients are centered by that time. If you do not have the capability to take joint films, we recommend holding patients in the final position for 18 weeks (24 weeks for adults) to ensure that they are completely centered.
To read more articles about this topic, in our online archives.
Appliance Removal
The appliance is removed by cutting the crowns and removing them with a crown-removing plier. We then clean up the adhesive and section the wires 5-5. We do not bond the molars at this appointment, since the tissue is usually irritated and isolation is difficult. We have the patients return a week later when the molars are bonded. The case then proceeds with normal orthodontic mechanics to finish. The mandible typically takes 2 to 6 months to relapse into Class I. You need to be sure to level the mandibular arch. If this is not done prior to the Advansync being removed, then, as the jaw drops back, the overjet will return.
The Advansync Molar to Molar Class II Corrector has allowed us to simultaneously correct our Class II while accomplishing most of the orthodontic tooth movement. The appliance has been much more comfortable for our patients than previous designs. The acceptance of patients and parents has been phenomenal. We are able to be friends with our patients and treat them in much less time than we did before, orthopedically correcting Class II patients in virtually the same time it takes to treat normal Class I cases. Advansync cases to date appear to have better facial orthopedics than with previous fixed functional appliances.
Bill Dischinger, DMD, is in private practice in Lake Oswego, Ore. His father has a financial interest in products mentioned here. He can be reached at
References
- Tracey S. Hyper-aesthetic orthodontics. Clinical Impressions. 2000;9(1):1-7.
- Sarver DM. Principles of cosmetic dentistry in orthodontics: Part 1. Shape and proportionality of anterior teeth. Am J Orthod Dentofacial Orthop. 2004;126:749-753.
- Kokich VO, Kokich VG, Kiyak HA. Perceptions of dental professional and laypersons to altered dental esthetics: asymmetric and symmetric situations. Am J Orthod Dentofacial Orthop. 2006;130:141-151.
- Sarver DM, Yanosky M. Principles of cosmetic dentistry in orthodontics: Part 2. Soft tissue laser technology and cosmetic gingival contouring. Am J Orthod Dentofacial Orthop. 2005;127:85-90.