Frost uses the same bonding protocol for the Damon™ Clear bracket that he uses for metal brackets, including the adhesive. The Damon Clear includes placement gauges that do not rest on the enamel, making it easier to get a scaler under them for adhesive cleanup.
By Stuart Frost, DDS
In orthodontics we talk a lot about the finish, overall treatment mechanics, and best possible appliances and approach for each case. It can be easy to overlook the “basics,” such as bonding and debonding. However, from a patient happiness and practice efficiency standpoint, it is often these basics that can be a thorn in our sides, if not mastered and executed properly. For example, with debonding, I frequently hear clinicians say, “Esthetic brackets require special adhesives and bonding procedures, and either you can’t keep them on the teeth or debonding is time-consuming and uncomfortable for the patient.”
It’s a big problem when debonding is time-consuming, uncomfortable for the patient, and restricts you from using highly demanded clear brackets. The following takes a closer look at recommended debonding protocols and a few lessons I’ve learned along the way.
Bonding with Clear Brackets
My bonding protocol for Damon™ Clear is the same as for metal brackets, including the adhesive. With its laser-etched pads, Damon Clear has excellent bond adhesion. The specially designed debonding pliers, when used properly, provide a smooth, comfortable patient experience. It’s really important to find the right clear bracket for you. Test out what is on the market, and talk to your peers about their experiences.
Maintaining consistent protocols for all fixed appliances reduces errors and saves staff training time. For Damon Clear, we employ the same bonding protocol as Damon™ Q, and almost any adhesive is applicable. Grengloo™ (for metal brackets) is the choice of many clinicians because it dries invisibly under the bracket. Blugloo™ (two-way color change adhesive for aesthetic brackets) and Enlight® are equally effective. I have also used Transbond™ LR and Transbond™ XT (3M Unitek, Monrovia, Calif).
I have found the bonding adhesion of Damon Clear to be excellent, and the pad fits as good as or better than Damon Q. For this reason, as previously stated, we use the same bonding protocols with Damon Clear as we do with Damon Q. Sometimes using a light coat of Ortho Solo™ (painted on the etched tooth, not the bracket pad) improves bond adhesion. Some clinicians find that the laser etching and pad fit of Damon Clear are sufficient without the use of Ortho Solo, so, obviously, this protocol is a matter of clinician preference.
Teeth with fractured enamel or abfractions require particular care. Additionally, those who position brackets slightly gingivally to the FA point must ensure that adhesive cleanup is thorough. If adhesive remains close to the gingiva, it can irritate tissue. Furthermore, if adhesive gets under the bracket tie-wings, it will be difficult to get the jaws of the debonding pliers around them, making it hard to debond the bracket, which could cause patient discomfort. Excessive adhesive left around the pad can be particularly troublesome when removing brackets placed gingivally to the FA point in the anteriors and could, in certain cases, cause enamel damage.
Debonding Damon Clear
Debonding Damon Clear is comfortable for the patient if done properly. I hadn’t been using the pliers properly and had even stopped using Ortho Solo, thinking that the extra adhesion was the issue. When I started experiencing debonds, I re-evaluated my technique. I learned that if I rock the pliers, the patient will feel discomfort. I now rely on the Damon Clear debonding tool to do all the work and have reinstituted Ortho Solo. If you are experiencing debonds, take time to try and isolate the variables to pinpoint what the source of failure is. You don’t want to falsely assume it’s the appliance’s fault.
If debonding to remove clear brackets, keep the archwire in place during the procedure. If you’re taking the clear brackets off in order to rebond, then remove the archwire first. In this scenario, before debonding, remove the archwire and then explain to the patient that the popping sound they will hear is simply the crystalline cracking, not their enamel.
Stabilize the anteriors, and provide pressure anesthesia by placing a cotton roll horizontally across the incisal edges of the patient’s anterior teeth for the patient to bite down on. Engage the jaws of the pliers under the tie-wings, and slowly squeeze the handles to close the jaws around the bracket body. Continue squeezing slowly until the wedge on the pliers comes into contact with the tooth, and it will disengage the bracket from the tooth in one clean motion, from the gingival to the incisal aspects.
The wedge must be positioned on the occlusal side of the bracket, and you must not rock the pliers. Light, steady, slow pressure is all that’s needed. Finish by removing any flash with a debonding bur (20-fluted, Reliance Orthodontics, Itasca, NY), then polish.
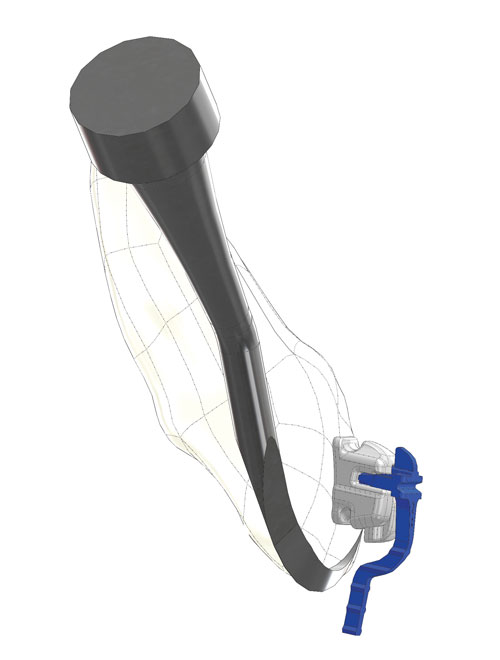
The Damon Clear Debonding Instrument must be used to debond the Damon Clear bracket. The instrument’s jaws and wedge are specially calibrated to the profile and base of the Damon Clear bracket, resulting in a fast, comfortable debonding experience for patients. There is a video tutorial available on Ormco.com that demonstrates the technique.
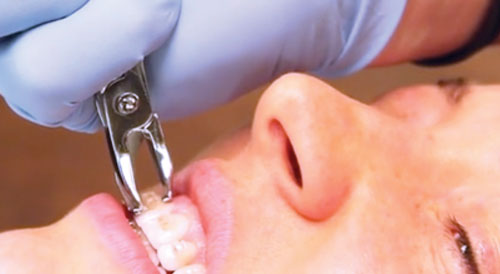
When debonding the Damon Clear bracket, Frost uses the Damon Clear Debonding Instrument, which features jaws and a wedge that are specially calibrated to the profile and base of the Damon Clear bracket.
Tips for a Stubborn Debond
There are times when you run into stubborn brackets that just don’t want to debond. If you ever have a stubborn debond, here are a few tips:
- Remove the excess flash from the occlusal and gingival part of the bracket pad/tooth interface using a fine diamond chamfer bur. The goal is to remove all flash to make the base of the bracket as small as possible. Keep in mind, when you have excess adhesive at the base of the bracket, it increases the size of the bracket pad to the edge of where the adhesive ends. Removing a clear bracket with an excessive amount of adhesive, occlusal and gingival, can cause the bracket to fracture the enamel during the debonding process.
- Deepen the slot with a diamond chamfer bur in a high-speed handpiece. This step helps weaken the bracket at the center for a clean bracket fracture, with both sides fracturing off.
- If one side remains attached, use a wingard or pin cutter to easily remove the last pieces from the tooth surface.
- If you remove a clear bracket and there is some porcelain left over on the tooth surface, use a round wheel diamond with medium grit to remove the porcelain. First, always make sure the patient has safety glasses on, and then slowly take down the rest of the porcelain until you reach the adhesive. From there, you can use the regular debonding bur to remove the adhesive. I recommend the wheel diamond over a chamfer diamond bur because the chamfer bur can roll off the porcelain and damage the tooth. Use the wheel diamond in a gingival/occlusal direction, and it won’t cause damage to the enamel.
- When selecting a clear bracket to use in your practice, look for a rigid bracket that will fracture cleanly off the tooth surface in one piece. Secondly, if you are continually facing issues with bracket debonding, take a close look at what instruments you are using. More often than not, the wrong instrument is being used, resulting in a difficult bracket removal.
Protocol for Rebonding
I get asked quite often about rebonding clear brackets. Let’s face it: clear brackets from any company can be expensive, and all of us are watching our overhead. Most manufacturers recommend not trying to rebond a debonded clear bracket for good reasons. However, after being involved in the clinical trials with the Damon Clear bracket and experimenting on rebonding these porcelain brackets, I have figured out how to rebond these brackets.
With the debonding procedure outlined below, I’m often able to remove clear brackets from the tooth cleanly and rebond them. Here are a few scenarios that illustrate how to rebond clear brackets—more specifically, Damon Clear brackets:
Step 1) If a patient comes in and their clear bracket is off, inspect the bracket with your loupes and look for fracture lines in the porcelain. If the bracket is intact, simply add Ortho Solo to the pad of the bracket and rebond.
Step 2) If the bracket has adhesive still on the pad and it isn’t a smooth surface, gently micro etch until there is a smooth surface and rebond following Step 1.
Step 3) If you want to remove a clear bracket and reposition it for better bracket position, then it is possible with excellent debonding technique. If the bracket comes off clean using the proper debonding pliers, then use your loupes to inspect the bracket for fracture lines. If there are no fractures, follow Step 1 and Step 2 to rebond. If there is any question in your mind that the bracket is compromised, select a brand-new bracket.
With teens and adults seeking aesthetically pleasing treatment options, we can’t afford to ignore clear brackets that offer more control than aligner treatment. With the right bracket and carefully crafted technique, debonding and rebonding with clear brackets can be just as reliable, efficient, and comfortable as the process is with metal appliances. OP
 Stuart Frost, DDS, is an Arizona native dedicated to the advancement of orthodontics. He is a Damon System mentor and worldwide lecturer. As an associate professor at the University of the Pacific School of Orthodontics, he educates and trains residents on the Damon System. He graduated from the University of the Pacific School of Dentistry in 1992, and later completed a 1-year fellowship for Temporomandibular Joint Dysfunctions and a 2-year residency in Orthodontics and Dentofacial Orthopedics at the University of Rochester.