by Stephen Tracey, DDS, MS, and Craig Andreiko, DDS, MS
How to make accurate PVS impressions for today’s digital orthodontics
|

With orthodontics shifting into digital- and computer-controlled systems, the link between the patient and computer-created appliances is the impression, and treatment quality is directly proportional to the quality of the impression.
Although orthodontists have traditionally made alginate their impression material of choice due to its low cost and relatively good accuracy, inherent drawbacks such as its dimensional instability, low tear strength, and inability to be used for multiple pours make it unacceptable for many of today’s sophisticated, digital orthodontic systems. Consequently, orthodontists have been forced to switch from commonly used alginate materials to high-quality polyvinylsiloxane (PVS) materials that are more accurate and dimensionally stable over time. Additional benefits of this classification of impression materials include increased tear strength and color contrast for easier impression readability.
PVS materials also give the orthodontist a plethora of choices: regular- or fast-setting materials; hand-mixing or automixing; low, medium, high, or extra-high viscosity; and, for some products, fragrance and taste. And while PVS impression materials are considered chemically hydrophobic, many manufacturers have modified their chemistry by adding surfactants and hydrophilic modifiers that enhance the ability of these materials to accurately record detail on slightly moist surfaces.
On the other hand, these materials are significantly more expensive and time-consuming, and are extremely technique sensitive—most practices have experienced difficulty with them.
The estimated cost per set of impressions is approximately $20 for materials plus chairtime. If you consider that the cost of rebonding a bracket is generally thought to be between $75 and $100, it is obvious that the overall cost for a set of impressions could easily exceed $100. Needless to say, multiple retakes are expensive and stressful for both staff and patients. Understandably, clinicians often settle for less-than-ideal impressions.
Using a myriad of materials and techniques, we have taken literally thousands of impressions for digital orthodontic applications. These impressions have subsequently been scanned and used to create a variety of orthodontic appliances.
Drawing upon this experience, we have developed a quick and simple method for taking accurate PVS impressions with minimal retakes. Although this is a two-step procedure, it is done in a single visit, without the need for lab work or intermediate models.
Materials
Materials for this technique include impression trays, PVS putty and wash, and a unique hydrodynamic spacer. Ideally, impression trays should be disposable, clear, and rigid; possess adequate undercuts; and require a minimal inventory of sizes. Body material should be easy to dispense, nonstaining, and available in unidose packaging. Consequently, we prefer putty to cartridge-dispensed material, which is much more difficult for staff to use. Wash material should be of a light viscosity that is easy to dispense from a cartridge, able to capture minute details, and light in color for visual examination. Both materials should be able to set in less than 3 minutes.
Key to this technique, however, is the use of a pliable foam spacer with a thickness specifically matched to the viscosity of the wash material. The impression spacers can be cut from 1¼32-inch closed-cell polyethylene foam, or they are available precut.
Method
Most practitioners are unaware that the latex in many glove brands, as well as even traces of lipstick or lip balm, are incompatible with PVS polymerization. Therefore, before taking impressions, it’s a good idea to test all glove brands presently used for impression procedures by dispensing a small amount of any used PVS materials onto a glove and examining the glove/PVS interface for inadequate polymerization (smearing). Also, prior to taking impressions, ask the patient to completely remove any lipstick or lip gloss.
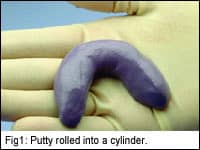
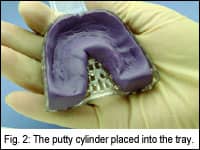
1) Putty impression: After selecting appropriate-sized impression trays, start a timer and knead one dollop of each color of PVS putty until the color is uniform. Then, roll the putty into a cylinder and place it into the tray (Figures 1 and 2).
Mold a foam spacer into the putty, being sure to use enough pressure to create an archform-shaped trough, and drive the putty into the tray interlocks (Figure 3).
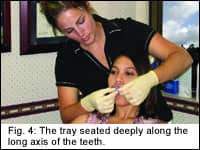
Before the putty’s working time has elapsed, place the tray and seat it deeply along the long axis of the teeth. It is a good idea to ask the patient to assist with complete seating of the tray by biting down solidly and using his or her tongue to mold the putty up against the distal aspect of the upper second molars (Figure 4).
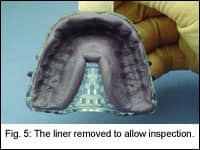
Once the putty has set sufficiently, remove the tray from the mouth. Then, remove the liner and inspect for large voids or lack of second-molar damming. Although these problems rarely occur, it is acceptable to repeat the process by adding putty to any deficient areas, replacing the spacer, and reseating the tray (Figure 5).
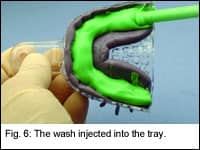
2) Detail wash impression: Once an acceptable putty impression is achieved, instruct the patient to brush and rinse with mouthwash. Then, reset and start the timer, and express a small test blob of wash material onto a tray cover or paper towel to purge the mixing tip and later to test for complete polymerization. Then, inject the wash into the tray, keeping the tip embedded in the material so no bubbles are introduced. Typically, about one third of the cartridge is used for each impression taken (Figure 6).
Before the working time has elapsed, softly and slowly seat the tray along the long axis of the teeth.
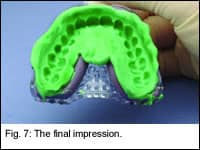
Once the set time has elapsed, check the test blob for complete polymerization and remove the tray. Examine the impression carefully for voids, paying particular attention to gingival margins and the distal aspect of the second molars. We recommend using magnification for inspection (Figure 7).
Discussion
A well-executed impression is one of the major keys to success in the utilization of today’s evolving digital orthodontic treatment systems. Increasingly, high-quality PVS is replacing alginate as the orthodontic impression material of choice. Highly desirable properties of this material include accuracy, high dimensional stability, adequate tear strength, elasticity, and the potential for multiple pours. However, its high cost, hydrophobic properties, and technique sensitivity often frustrate even the most skilled orthodontist. Fortunately, with carefully selected materials and proper technique, as recommended in this article, these problems can easily be overcome. z
Stephen Tracey, DDS, MS, is in private practice in Upland, Calif. He is a member of the AAO, the World Federation of Orthodontists, and the Academy of Laser Dentistry. He is an internationally recognized lecturer, with past presentations made in 15 countries on six continents. He has published numerous articles in a variety of professional publications. He can be reached by phone at (909) 981-8789 or via email at [email protected].
Craig Andreiko, DDS, MS, is an assistant professor at Loma Linda University in Loma Linda, Calif. He can be reached at [email protected].
Five Keys to a Perfect PVS Impression
1) Choose the right tray. Think of the three R’s: Rigid, Retentive and the Right size. Using flimsy trays may result in distortion and/or material pulling away from the tray. Using a tray that is too small may result in inadequate second-molar coverage and/or buccal impingement in the posterior of both arches. Using a tray that is too large may result in lingual impingement in the posterior of the lower arch.
2) Eliminate contaminants. Lipstick, lip balm, and some latex gloves can retard the set of PVS impression material. Therefore, patients should be asked to thoroughly remove any lip products; and latex gloves should be pre-tested by expressing a small amount of PVS material onto a glove and inspecting for areas of incomplete set.
3) Have patients brush and rinse. Plaque, debris, and thick, ropey saliva can sabotage your best efforts to obtain a perfect impression. Clean teeth will contribute greatly to impression detail, while rinsing with mouthwash will help thin and reduce saliva.
4) Pay attention to set times. There are a myriad of companies producing PVS materials, all with different set times. Neglecting to follow manufacturer instructions with regards to working times and set times can result in impression distortion that may go unnoticed. Use a timer.
5) Don’t settle. Because of the technical difficulty in obtaining perfect PVS impressions, multiple retakes are common, resulting in excessive chair time, increased cost, and significant levels of stress for patients and staff. Consequently, it is very tempting to excuse impression deficiencies as “good enough.” Don’t! —ST