by Bjorn Ludwig, DMD, MSD; Bettina Glasl, DMD, MSD; and Kevin C. Walde, DDS, MS
How the Ortho Easy system can help orthodontists achieve a variety of treatment goals
Bjorn Ludwig, DMD, MSD

Bettina Glasl, DMD, MSD

Kevin C. Walde, DDS, MS
Looking at the number of publications and courses, and the amount of advertising material about skeletal anchorage, it would seem that miniscrews are ubiquitous. Once some candid questions are asked and answered, however, it becomes apparent that the reality is quite different. There are surely various reasons why miniscrews are not yet in routine, daily use in many practices.
Two main reasons that are often stated by practitioners are the high loss rates of interradicularly placed miniscrews and nonworking and inefficient segmental biomechanics.
Because of the ease of manual placement and numerous studies and case reports on the insertion and use of mini-implants, interradicular positioning from the vestibule has become the preferred procedure. However, several problems occur relating to interradicular vestibular placement. If the planned appliance calls for vestibular screw positioning, both jaws have to present suitable vestibular locations. Biomechanical concepts must be considered when choosing the optimal insertion area. Viable insertion areas should be determined during the treatment-planning stage. The limiting factors are the individual anatomy and the dimension of the mini-implant. Based on available bone and tissue, suitable interradicular insertion sites in the mandible are between the premolars, between the second premolar and first molar, and between the two molars. The only suitable vestibular interradicular insertion areas in the maxilla are between the premolars and second premolar and first molar.1
Shifting Sites
Looking at insertion options in the maxilla, it is possible to shift insertion sites from the vestibule to the palate. The palate is toothless and offers a safe alternative to vestibular insertion. The hard palate appears to be an ideal insertion site for orthodontic mini-implants.2
Park demonstrated that miniscrew use in the anterior palate may result in a 100% success rate.3 So, when would you want to select an alternative insertion site? Intrusion of supererupted molars is a quite frequent indication for the use of miniscrews.4,5 In Figure 1, tooth #3 is intruded preprosthetically to enable the restoration of tooth #30 using an osseointegrated implant. Two implants were placed in the vestibule and one in the palate to apply a counter force to avoid buccal tipping. Figure 2 shows preprosthetic intrusion of teeth #2 and #3 to facilitate restoration of teeth #30 and #31 using osseointegrated implants. Only two palatal implants are placed to apply a straight vertical intrusive force.
Comparing these two treatment mechanics in similar cases demonstrates that, with only two implants, two molars can be easily intruded from a reliable and safe insertion site. Also, the chairside time is short, because, after placing the screws, an impression is taken and the difficult and time-consuming work is done in the lab.
Looking at the last decade of skeletal anchorage and investigating reliable insertion sites and efficient biomechanics, the Ortho Easy miniscrew system from Forestadent was developed to fulfill the need for classical vestibular interradicular insertion, which is still routinely used by many orthodontists. It is also designed for convenient miniscrew placement in the anterior palate. Laboratory workflow is enhanced by laboratory abutments that integrate with the miniscrews, and the system also includes perfectly fitting auxiliaries.
A Targeted Armamentarium
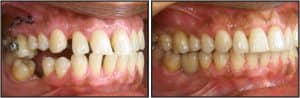
Figure 1: Preprosthetic intrusion of tooth #3 enables restoration of tooth #30 using an osseointegrated implant. Two miniscrews are placed in the vestibule and one in the palate.
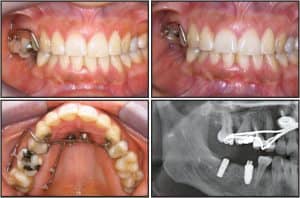
Figure 2: Preprosthetic intrusion of teeth #2 and #3 enable implant restoration of teeth #30 and #31. Only two palatal miniscrews with lab abutments are placed to apply a straight vertical intrusive force.
The number of miniscrews available per system varies between two and 154, depending on the length, diameter, and screw head type.6 However, almost all cases can be treated using screw lengths of between 6, 8, and 10 mm. Consequently, the Ortho Easy system contains only three types of screws. Clinical experience has shown that in most cases, only these three screw lengths are required. Generally, 8-mm screws are used in the maxillary vestibule and in the anterior palate, and 6-mm screws in the mandibular vestibule. For bicortical anchorage in the mandible, 10-mm miniscrews are used. In order to visually distinguish the three available lengths, the surfaces are anodized in three different colors.
The Ortho Easy miniscrew is made from “Titanium 6 Aluminium 4 Vanadium” (also known as Titanium Grade 5). Titanium alloys offer better strength, elastic behavior, resistance to wear and tear, and surface properties than pure titanium.
Shaft and Thread
The shaft of the Ortho Easy is cylindrically shaped. For optimum strength, the screw diameter should not exceed 1.6 mm (average diameter), nor should it be less than this,6 since the risk of bending or fracturing is higher with smaller diameters. The diameter of the thread shank increases from 1.4 mm to 1.8 mm in the region of the cortical compression step. It has a special thread with undercuts allowing for harmonic turning torque, reduced pressure on the bone, and primary stability. The bone goes into the undercuts of the thread paths during elastic recovery, which aids stable mechanical anchorage of the screw in the bony site. Ortho Easy miniscrews are designed with an almost blunt tip, which makes insertion into a tooth root nearly impossible.7
As is the case with other mini-implants, the most sensitive area for Ortho Easy miniscrews is the transmucosal part, also referred to as the gingival neck. A potential entry for microorganisms is created through the perforation of the gingiva. If these penetrate the peri-implant soft and hard tissue, the risk of inflammation increases. This can be a significant cause for early miniscrew failure. The transgingival part is approximately 2 mm in length, which corresponds to the average thickness of the mucous membrane.6 The conical shape helps securely seal the point of perforation in the same way a cork seals a bottle.
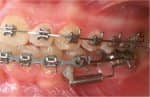
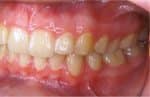
Figure 3: Aplasia of tooth #20 with radiological evidence of a wisdom tooth #17 that appears to be perfectly adequate. An 8-mm miniscrew was inserted in the interradicular space between teeth #21 and #22. A gap-closing device was attached, and the complete closure of the extraction space, which was 8 mm, was achieved after 11 months.
Screw Head
The coupling elements used to establish a connection between the miniscrew and various orthodontic auxiliaries are attached to the screw head. It’s most practical to work with a universal screw head design, to which all necessary auxiliaries (springs, elastic chains, round and square wires) can be attached.8 This is only possible for screws with a crosshead. The Ortho Easy has a universal, octagonal head in bracket design with a .022- x 0.025-inch crosshead. The screw head’s low height is designed to increase patient comfort and protect against irritation of the mucous membrane of the cheek.
Auxiliaries
The Ortho Easy system offers a variety of specially designed auxiliaries for use with vestibular insertion. These auxiliaries are applied directly at chairside, and may also have an application when Ortho Easy miniscrews are applied palatally. Auxiliaries include the following: L-anchor, U-anchor, clutch and compression springs, uprighting springs, cross tubes, sliding hooks, power arms, and the Space Jet. The auxiliaries are available in a .019- x .025-inch size that is compatible with the head of the Ortho Easy miniscrews, as well as a .016- x .016-inch size for insertion in the additional slot of a Forestadent BioQuick® bracket.
Transfer abutments are also available for fabrication of appliances in the laboratory. The abutments are used in the impression for transfer to the lab to create an analog, and can then also be used in the fabrication of the appliances.
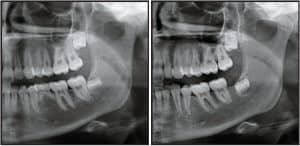
Figure 4: In addition to a tip-free position of the molar, the post-treatment x-ray image also shows enough space for the wisdom tooth to erupt.
Space Closure
A common use of miniscrew support in the mandible is mesialization of molars to close single gaps of missing premolars or severely decayed first molars.9 New therapeutic techniques can manage the partially edentulous situation without compensatory extractions and eliminate the problem of lost stability of the units used for anchorage support. It is here that the effect of Newton’s third law is particularly apparent, and the interception of the opposing forces is a major consideration within the therapeutic strategy. The closure of dental spaces using Ortho Easy miniscrews can be highly recommended if: 1) you have no alternative and viable conventional methods, and/or you are not certain that these will be effective; 2) you want to avoid extensive use of fixed orthodontic appliances for cosmetic or functional reasons; 3) you need a short-term treatment or partial treatment that does not involve correction and realignment of the main dental arch; 4) asymmetrical treatments are associated with the risk of midline displacement and the possibility of compensatory extraction; 5) you need to create a suitable dental baseline situation for preprosthetic treatments.
When you propose space-closure treatment, it is important that you make the patient aware of the costs and risks of the treatment as well as the available alternative options, such as the use of a bridge or osseointegrated implants.
Molar Space Closure
Despite all the advances made in prophylactic treatments, premature loss of the primary molars has not yet been eradicated. What should the patient be offered when no succedaneous tooth exists: implants, a bridge, or space-closure treatment? If your goal is to minimize prosthetics as well as overall treatment in order to conserve the surviving natural teeth, depending on the existence of suitable replacements (such as third molars), a prosthetic solution may not be appropriate. The basic concept of restorative dentistry—first destroy in order to reconstruct—is frequently not the best solution. Figure 3 shows aplasia of tooth #20 with radiological evidence of a wisdom tooth #17 that appears to be perfectly adequate.
An 8-mm miniscrew was inserted in the interradicular space between teeth #21 and #22. A Space Jet space-closing device was attached, and the complete closure of the extraction space, which was originally 8 mm, was achieved after 11 months. In addition to a tip-free position of the molar, the post-treatment x-ray image also shows enough space for the wisdom tooth to erupt (Figure 4).
Palatal Auxiliaries and Laboratory Systems
The Ortho Easy system also offers lab abutments that can be used after palatal insertion of the miniscrews to take a transfer impression. The appliance can then be designed in the lab utilizing the abutments and placed at a later date. Appliances can be designed that focus all of the anchorage requirements on the miniscrews, leaving the maxillary dental arch (5-5) available for simultaneous treatment of other dental issues, such as alignment. These techniques are particularly effective for the distalization of upper molars and/or palatal expansion using hybrid RPE appliances. The lack of acrylic buttons is designed to improve hygiene.
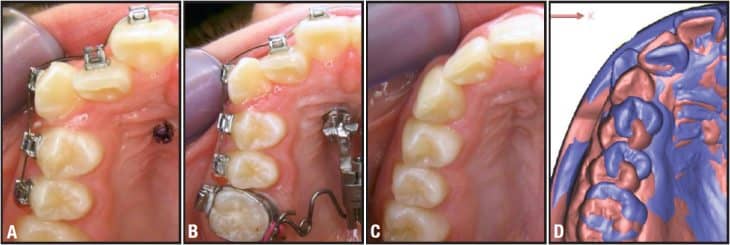
Figure 5: a) Laterally placed mini-implants in the anterior palate and simultaneous bracket bonding 5-5. b) Skeletal Frog appliance at the start of distalization. c) Occlusal view during the retention phase. d) Superimposition of treatment start and finish casts (violet is initial, and pink is final). The distalization amount is up to half a premolar width, without reactive proclination of the front or excessive transverse expansion.
The Frog Appliance10
The anterior palate provides reliable anchorage if mini-implants are placed along a line connecting the first premolars or, in the case of uncertainty due to missing canines or mesially migrated premolars, 4 to 5 mm behind the posterior portion of the incisive papilla.11 The distance to the median suture should be less than 3 mm to ensure optimum bone thickness. Two mini-implants were inserted according to these parameters to provide stable four-point support for the appliance (Figure 5)
Initially, the Nance button of the standard Frog appliance was anchored using the mini-implants in the palate. The limited hygiene options of the palatal buttons, however, often resulted in the accumulation of food debris and localized irritation of the covered mucosa. This problem gave rise to the idea of developing an abutment that allowed direct connection of the mini-implant to the screw body. An abutment tailored to the Ortho Easy system can now be used as a transfer aid as well as a coupling and anchorage element.
The appliance (made by Forestadent) includes premade components that are custom fabricated into the finished appliance by the laboratory. The prefabricated components consist of a distalization screw, a .032-inch stainless steel preformed transpalatal arch, and a hex key for activating the screw. The transpalatal arch can be removed from the screw housing. The appliance is activated at the front of the screw, which allows the adjustment key to be inserted sagittally into the hex.
According to Walde, the inventor of the Frog, activation every 4 to 5 weeks using three to five turns of the screw at each appointment is adequate to achieve a distalization of 1 to 2 mm per month. A 360° activation of the screw body opens .4 mm. Alternatively, the appliance has a control mechanism that was designed so that it can also be activated by a quarter-turn by the patient every 3 days.
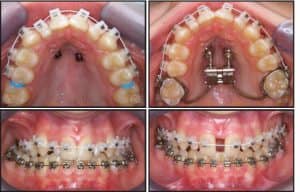
Figure 6: The mini-implants are each placed approximately 2 mm lateral to the mid-palatal suture so that the rupture of the palatal suture is not impeded. The hybrid appliance function is created by using a combination of dental anchorage using molar bands and skeletal anchorage using mini-implants.
Hybrid RPE12,13
In collaboration with Wilmes, a standardized rapid palatal expansion appliance with combined dental and skeletal anchorage was developed. It is called the “Hybrid RPE” because it incorporates two anchorage techniques. Like skeletal distractors, the Hybrid RPE mainly keeps the anterior dental arch free to allow other treatment procedures to be performed simultaneously. The mini-implants are each placed about 2 mm lateral to the midpalatal suture to ensure that the rupture of the palatal suture is not impeded (Figure 6).
The hybrid appliance functions using a combination of dental anchorage using molar bands and skeletal anchorage using mini-implants with abutments used for attachment. The abutments are used both as transfer aids for the laboratory procedure and as coupling elements for skeletal anchorage of the appliance at the time of appliance delivery. The basic mechanical framework is a Snap Lock expansion screw with a design that protects against spontaneous rewinding of the spindle. The mini-implants have a strategic dual function: In addition to providing skeletal anchorage in the anterior palate, they also function as antitipping elements to prevent reactive buccal inclination of the molars.
Conclusion
The Ortho Easy System is designed for classic vestibular interradicular insertion. A variety of auxiliaries are available to simplify treatment mechanics. The system also allows orthodontists to use palatal insertion, and lab abutments can be used to fabricate and connect a variety of laboratory-made appliances.
Bjorn Ludwig, DMD, MSD, has a private practice in Traben-Trarbach, Germany. He is scientific coordinator at the University Homburg/Saar. He has published more than 60 scientific papers about miniscrews, cleft palate, and interdisciplinary cases. He lectures and gives hands-on courses about miniscrews and lingual treatment around the world. He can be reached via e-mail at
Bettina Glasl, DMD, MSD, has a private practice in Traben-Trarbach, Germany. She is scientific cooperator at the University of Homburg/Saar, Department of Orthodontics. She is author of the books Mini-Implants in Orthodontics and Self-Ligating Brackets: Treatment and Concepts.
Kevin C. Walde, DDS, MS, is in private practice in Washington, Mo, and is an assistant clinical professor in the Department of Graduate Orthodontics at St Louis University. He has a financial interest in products mentioned here.
References
- Ludwig B, Glasl B, Kinzinger G, Lietz T, Lisson J. Anatomical guidelines for miniscrew insertion: Vestibular interradicular sites. J Clin Orthod. 2011;45:165-173.
- Gracco A, Lombardo L, Cozzani M, Siciliani G. Quantitative evaluation with CBCT of palatal bone thickness in growing patients. Prog Orthod. 2006;7:164-174.
- Park, HS. Clinical study on success rate of microscrew implants for orthodontic anchorage, Korean J Orthod. 2003;33:151-156.
- Landes CA, Glasl B, Kopp S, Sader R, Ludwig B. Microanchor mediated upper molar intrusion in deep posterior bite after long-term edentulousness for prosthetic reconstruction with dental implants. Oral Maxillofac Surg. 2008;12:155-158.
- Kravitz ND, Kusnoto B, Tsay PT, Hohlt WF. Intrusion of overerupted upper first molar using two orthodontic miniscrews: A case report, Angle Orthod. 2007;77:915-922.
- Ludwig B, Baumgaertel S, Bowman SJ. Mini-Implants in Orthodontics. Innovative Anchorage Concepts. 1st ed. London: Quintessence Publishing Co Ltd; 2008.
- Glasl B, Ludwig B, Kinzinger G, Zipprich H, Lisson J. Aktuelle Übersicht zum Risikopotenzial von Wurzelverletzungen bei interradikulÄrer Insertion orthodontischer Miniimplantate/Minischrauben. Experimentelle Ergebnisse und Literaturrecherche, Kieferorthop. 2010;24:7-15.
- Ludwig B, Glasl B, Lietz T, Bumann A, Bowman SJ. Techniques for attaching orthodontic wires to miniscrews. J Clin Orthod. 2010;44:36-40; quiz 45.
- Ludwig B, Glasl B, Kinzinger G, et al. Minischraubenverankerung fÜr den singulÄren LÜckenschluss im Molaren- und PrÄmolarenbereich: aktueller Stand, Biomechanik, Risiken, Limitationen. IOK. 2009;41:117-127.
- Ludwig B, Glasl B, Kinzinger GS, Walde KC, Lisson JA. The skeletal frog appliance for maxillary molar distalization. J Clin Orthod. 2011;45:77-84; quiz 91.
- Baumgaertel S. Quantitative investigation of palatal bone depth and cortical bone thickness for mini-implant placement in adults. Am J Orthod Dentofacial Orthop. 2009;136:104-108.
- Ludwig B, Glasl B, Bowman SJ, Drescher D, Wilmes B. Miniscrew-supported Class III treatment with the Hybrid RPE Advancer. J Clin Orthod. 2010;44:533-539.
- Wilmes B, Nienkemper M, Drescher D. Application and effectiveness of a mini-implant- and tooth-borne rapid palatal expansion device: the hybrid hyrax. World J Orthod. 2010;11:323-330.