by Howard A. Fine, DMD, MMSc
Marketing with your digital camera
 |
I’m going to make a bold statement: Every orthodontic office, whether “paperless” or not, whether or not you have digital x-rays or even management software, should have at least one digital camera available. Gone are the days when you took photos or slides of your patient, and then had to wait until the roll of film was finished, and then had to wait until the roll was developed. With digital imaging, you have your photos instantaneously, and you can immediately check to see that they are properly focused and accurate.
Now comes the best part: Digital images can be considered multifunctional because the same images can easily be used for different marketing solutions. Sure, you can still use your old slides and photos for marketing, but then you have to go to the trouble of having these images copied. Alternatively, digital images can be copied, resized, sent, and printed as many times as you like as long as you have a computer and a printer in your office. Even if you are that practitioner who considers himself computerphobic and has minimal computerization in the office, you can use digital images. Companies such as Adobe, ACDsee, and Ulead provide very simple, inexpensive, user-friendly cataloguing software that allows you to take your digital images of a patient and place them in digital “folders” with the patient’s name, thereby making them accessible not only for documentation, but for marketing as well. Orthodontic software companies have integrated digital imaging and practice management into a complete package, which is obviously a more sophisticated approach. In principle, digital imaging of patients should be considered a basic part of the records-gathering process, regardless of the level of technology present in the office.
Now, how do we use these digital images as part of a marketing strategy? Basically, it involves using the same images multiple times for both patient and referrer. Let’s take a look at some of the ways this can be achieved.
Treatment Planning, Case Discussion, and Referral Letters
 |
| Howard A. Fine, DMD, MMSc |
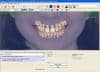
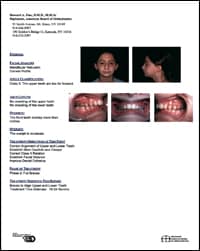
I recently called a few of my good referrers who I was sure would give me a straight answer. I first asked them if they read any of the materials or letters that I or my other orthodontic colleagues sent them. Most responded with a half-baked “yes.” I then asked them if they preferred receiving a letter describing in detail all aspects of the case, or a one-page, bullet–style sheet describing in basic terms the analysis and treatment plan. With an overwhelming positive response, they all said that a bullet-style sheet with photos was clearly more valuable to them (Figure 1, page 31). With this type of tool, they could easily follow the case and see progress along the way. They could also reinforce patient cooperation and oral hygiene if they did not see much progress between dental recall visits.
This one-page sheet is a simple item to create with digital images in hand. If you do not have orthodontic management software, you can write a simple letter in Microsoft Word and import photos into the letter by following the pathway Insert>Picture>From file, where the file is part of the catalogued images of the patient.
If you have one of the commonly available orthodontic management packages, you can easily create this type of sheet. The headers I use are Facial Analysis, Angle Classification, Arch Length, Overbite, Overjet, Treatment Objectives, Phase of Treatment, Treatment Plan, Extractions, and Treatment Notes (for those atypical or unusual aspects of the case you want to document). The bulleted subtext is in simple, generic phrases. For example, under Treatment Objectives, one might say:
Treatment Objectives at This Point
- Correct alignment of upper and lower teeth;
- eliminate crowding;
- establish ideal overbite and overjet;
- establish Class I dental relation; and
- establish facial balance.
Your digital-imaging support team can easily help you design one of these sheets. It basically involves deciding what headers, bulleted subtext, and photos you want. Once the basic template is designed, all you have to do is toggle on the phrases you like for a particular patient and the software automatically loads the headers, phrases, and appropriate images from the photo files. The software package also saves the report so that it can be viewed at any time.
The beauty of this kind of report is that because the phrases are simple, the same sheet can be used for the patient and the referrer. I find that I go over the report during the treatment discussion with the patient and then send a duplicate copy of the same report to the referrer. This way, the same digital images are working in two ways for you. As the case progresses nicely, both patient and referrer can view the positive progress and both can generate good will for your practice, especially since most orthodontic offices rely on referrals from both sources.
Smile Certificates
 |
| Figure 1: Photos illustrate each case for referrers. |
Both simple cataloguing software and orthodontic management programs can make a “Smile Certificate” or similar post-treatment marketing tool. If you don’t have an orthodontic management program, you can use Microsoft Word or the image cataloguing software to easily place before-and-after photos of the case side by side. Orthodontic management software packages have this as standard equipment. You can then print this on nice paper and send it to the patient and referrer. Again, the same digital images are used multifunctionally and serve to generate goodwill and referrals from both patient and practitioners.
Newsletters
Orthodontic offices that have their own Web sites can easily create patient newsletters with digital images included. Orthodontic Web site companies provide a template to make newsletters that can be e-mailed to patients. You can include practice-specific information and photos. If you send these out regularly, you may want to include a “case of the month,” for example. Remember, however, that you must have patient consent to use their images. HIPAA laws are very strict in this matter, so you must abide by the guidelines before creating this type of marketing tool. (As an aside, to avoid HIPAA and consent issues, the report in Figure 1 is my daughter’s.)
Photo-Sharing Books
At the last AAO meeting, I attended a wonderful lecture by an esteemed orthodontist in our field. One of the cases he presented was a beautiful orthognathic case that was a bit unusual. I thought that if I ever had a similar case, I would like to show the patient the possible result that can be achieved. I called the lecturer and requested a few photos of the case. Shortly thereafter, instead of some simple photos, I received a very nice little book with photos and some verbal description of the case. It was a very nice presentation piece. When I called and thanked him, he told me it was actually very easy to produce. And so, I pass the idea on to you.
If you look on the Internet under “photo-sharing books,” you will find a number of sites that will help you produce hard- or soft-covered books from your photos, with or without accompanying text. They are very cost-effective and are less expensive when ordered in quantity.
Again, if you have the digital images readily available, and you have consent, why not use them? The creation of a book usually involves downloading some type of user-friendly layout software, which then helps you place photos and text. You then have choices with respect to page color, backgrounds, fonts, cover colors, and materials. You then upload your book to the company, and it prints out your final product. This type of book can be used as a high-end marketing piece for your office as well as for your referrers. The obvious use would be to make a coffee-table-quality book of your before-and-after patient cases. You might collect examples of the most commonly treated types of malocclusions and describe in simple terms the orthodontic problem, the treatment objective, and the outcome. It takes some work to get a final product, but it is well worth the effort from a marketing standpoint.
Alternatively, a company called Unibind (www.unibind.com) offers a very simple, cost-effective way of making books in-office. It sells a heater-type device and different types of books, from thin plastic (Figure 2) to nice, hardcover volumes. The process is very simple. All you do is place any type of paper you want to bind together, be it photos or text, into its book. You then place the book on the heater and wait a few minutes. Once the book cools down, the pages are bound! That’s it! Its small books hold 2 to 10 pages (think before-and-after photos), while its bigger books hold 10+ pages. Replacement books are very inexpensive and can be bought in bulk. This product offers any orthodontic office the ability to create bound books within minutes. Wouldn’t it be nice to remove the braces, take some digital photos of the patient, print them up, and bind them, all before the patient has stopped looking at his or her new smile in the mirror?
 |
| Figure 2: Any orthodontist can create a bound photo book in three steps: 1) Place the pages in the binder. 2) Put the book in the heater. 3) Wait for the book to cool—and it is ready to use as a marketing tool. |
These books can also be used in the discussion of complicated, multidisciplinary cases. Orthodontic management of congenitally missing upper lateral incisors is one such situation. Every time one of these cases comes in, I have to prepare the patient for a lengthy treatment discussion. You have to discuss implant-site preparation and holding the site with temporary prosthetic devices during and after treatment. Because you have to wait for implant placement until the patient has stopped growing, these cases are long and drawn-out, and necessitate a multidisciplinary approach with oral surgery and prosthetics. Informed consent requires disclosure of all the steps involved.
I am preparing a book on this subject with my cases that shows the initial case, progress photos with false teeth on the archwires, preprosthetic results, and final case completion with prosthetics. A book like this will make treatment discussions much easier, especially if it is cost-effective enough to take home. In addition, it shows the work of the prosthetic dentist so that the patient will feel comfortable about the possible results. Alternatively, if the case warrants canine substitution for the missing lateral incisor, I can show the patient the end result with cosmetic reshaping of teeth.
| To read more articles by Howard A. Fine, DMD, MMSc, search our . |
Clearly, there are a myriad of orthodontic topics that can be illustrated. The point is that by collecting digital images into a book, you create a marvelous marketing tool that can show off your practice, your end results, and the results of the local practitioners you work with.
There is no end to the marketing possibilities that you can conceive using digital images that you routinely take of a patient. You don’t even need sophisticated software! The basic principle is that these catalogued images provide a significant database from which multiple digital marketing solutions can be generated, often within minutes of capture.
Howard A. Fine, DMD, MMSc, maintains private practices in Mt Kisco and Goldens Bridge, NY. He is a member of the National Association of Photoshop Professionals (NAPP). He can be reached at