by BjÖrn Ludwig, DMD, MSD; Bettina Glasl, DMD, MSD; Thomas Lietz, DMD; Joerg Lisson, DDS, PhD; and S. Jay Bowman, DMD, MSD
A step-by-step guide to placing TADs
 |
The insertion of a miniscrew is a relatively simple and quick clinical procedure. However, successful insertion requires adherence to a few simple, yet important, principles. There are certainly several methods that will yield favorable results. This article concentrates on those insertion steps that provide the patient and the orthodontist with a high degree of safety. This general information must, of course, be adapted to individual circumstances.
General Notes on Miniscrew Insertion
The basic prerequisite for successful treatment with miniscrews is accurate preoperative diagnosis and treatment planning. This also includes a comprehensive medical and dental history, and an accurate assessment of clinical and radiographic findings. In addition, the patient must have the treatment goals and alternatives carefully explained as part of obtaining informed consent. (The IC form available from the AAO includes a basic description of the risks and limitations with TADs.1)
 |
| Figure 1: An x-ray pin from Forestadent, shown in situ, in relation to the adjacent tooth axes. |
Proper infection-control procedures must be used during the entire miniscrew insertion process. Both the treatment station and the patient must be prepared with this in mind. Adherence to all hygiene measures required for an invasive procedure—a sterile work environment, gloves, etc—is required.
Preoperative Planning
Miniscrews depend almost exclusively on firm cortical anchorage (primary stability), since they do not become osseointegrated like typical dental analogue implants. In addition, it is most often preferable to insert these anchors in the attached gingiva rather than in the buccal mucosa. In selecting the insertion location, the orthodontist must take into account both clinical and paraclinical findings (radiographs, photos, and models) and plan for the orthodontic mechanics that are to be employed.
 |
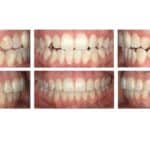
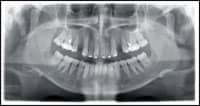
| Figure 2A: Pretreatment panoramic view. |
 |
| Figure 2B. After the extraction of upper premolars, an x-ray pin was placed through the soft tissue between the first molar and second premolars to confirm the correct insertion site for miniscrews. Note the position of the maxillary right x-ray pin, as it would seem to indicate that a miniscrew might be inserted into the mesial root of the molar in that location. |
 |
| Figure 2C: Both screws were subsequently inserted in a manner using clinically observable cues (such as noting the position of root prominences, parallelism, and anatomy of the crowns), indicating that there was false-positive interpretation of the radiographic guide. |
If a miniscrew is to be placed between roots, there must be at least 0.5 mm of bone between the root and the miniscrew on either side. For example, for a 1.6-mm-diameter miniscrew, the roots of adjacent teeth should be at least 2.6 mm from each other. Consequently, the interradicular space is an important consideration when selecting the longitudinal axis for the point of insertion. These measurements can be translated from panoramic radiograph to study model. It often helps to mark the vertical axis of the teeth adjacent to the insertion site along with the mucogingival junction on the model.
To ensure the accurate determination of the insertion site, radiographic aids (Figure 1) are useful.2 Their use may facilitate the selection of the insertion site, but cannot replace the other diagnostic measures. The accuracy of these radiographic adjuncts (such as an x-ray pin) are dependent upon the positioning of the x-ray tube, the x-ray object, and the x-ray film and/or sensor. Interpretations of radiographic distortions or inaccuracies in paralleling technique may result in false-negative or false-positive results (Figures 2A–2C). For this reason, miniscrew placement should always be based primarily on the clinical findings. If a miniscrew is to be inserted into an area where there is reduced risk of damage to roots, nerves, or blood vessels (such as the palatal region posterior to an artificial transpalatal intercanine line), the insertion location of the screw may be freely chosen (Figures 3A–3C).
Safe Zones for Miniscrew Insertion
Some areas of the mouth are potentially “safer” for the insertion of miniscrews. This refers to the reduced risk of iatrogenic damage, but also a lower failure rate. Poggio et al3 used a series of tomographic images to delineate locations distal to the canines where greater thickness of cortical bone and interradicular space are typically found. In the maxilla, the largest amount of interradicular bone was found in the palatal alveolus, between the first molar and second premolar. The least amount was found in the tuberosity. The most substantial amount of bone in the buccolingual dimension was between the first and second molars. In the mandible, the largest mesiodistal dimension was between the first and second premolar. The thickest bone was again between first and second molars, with the least between the first premolar and canine.
On the basis of panoramic surveys, Schnelle4 reported that adequate bone is most often found mesial to the maxillary first molars and also mesial or distal to the mandibular first molars. Unfortunately, the best sites are often found halfway down the roots in the unattached buccal mucosa. As a consequence, some compromises in vertical position may be required.
At the appointment prior to the miniscrew insertion, the procedures for the next visit should be discussed with the patient. Preoperative instructions and a prescription for 0.12% chlorhexidine gluconate (for postoperative use) can be given to the patient. At the miniscrew insertion appointment, the patient should brush, rinse thoroughly with water, and then rinse with 15 mL of 0.12% chlorhexidine gluconate to reduce the intraoral bacterial flora.
At this point, the exact site selection should be reviewed and can be confirmed with radiographic evaluation of a placement guide or stint. Any last-minute changes in selection of the type, diameter, and length of miniscrew should be made prior to initiating anesthesia.
 |
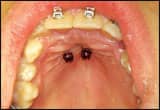
Figure 3A (left). Two Ortho Easy (Forestadent) miniscrews inserted into a “safe zone” in the palate just distal to an intercanine artificial reference. |
 |
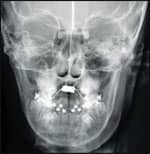 |
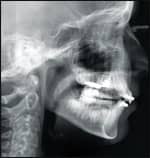
| Figure 3B (above left) and 3C (above right): Radiographic images confirm appropriate bone support for the miniscrews. | |
Anesthetic
Most miniscrews can often be inserted using only a profound topical anesthetic with attention to some important precautions5: TAC 20% Alternate (Professional Arts Pharmacy, Lafayette, La), EMLA (AstraZeneca, Wilmington, Del), DepBlu (Steven’s Pharmacy, Costa Mesa, Calif), or Oraqix (Dentsply Prof, York, Pa; Figure 4). In some instances, the use of a local infiltration of about 0.5 mL of a typical dental anesthetic may be necessary (Figures 5A–5B). During the interradicular insertion of a miniscrew, sensitivity of the periodontal tissue of the adjacent roots should be retained. The patient can then report discomfort if root encroachment occurs, thereby helping to prevent iatrogenic damage. It is for this exact reason that profound anesthetic (e.g. “mandibular block”) is not recommended.
Soft-Tissue Depth and Miniscrew Length
If an implant is to be placed into the unattached mucosa, then a stab incision with a scalpel or a biopsy or tissue punch is necessary to reduce the possibility that this tissue could twist and bunch around the threads of the screw, possibly resulting in tearing of those tissues.
If the miniscrew is placed in attached gingiva, then a dental explorer (with an rubber ring used for endodontic files) can be used to measure the thickness of the gingival tissue at the insertion site. When choosing the length of a miniscrew, the thickness of soft tissue is often the most important determining factor. The length of the miniscrew that resides in the bone should be at least as long as the portion outside the bone. Since mucosa thickness in most insertion locations is often 1 to 2 mm, the exact tissue measurement is not often critical. Since the head of the miniscrew must be above the soft tissue, longer miniscrews are obviously required in regions of thick tissue (such as the retromolar region and palate). Most importantly, miniscrew stability depends more on screw diameter than screw length.6,7 However, the maximum diameter is limited by the available interradicular space.
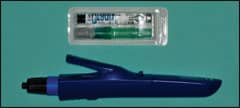 |
| Figure 4: Needle-free subgingival anesthesia (Oraqix, Dentsply Pharmaceutical, York, Pa). |
The thickness of alveolar bone and the planned insertion angulation are used to determine the appropriate length of the miniscrew:
- Alveolar width >10 mm: use miniscrews with a length of up to 10 mm;
- alveolar width <10 mm and >7 mm: use miniscrews with a length of 6 to 8 mm; and
- alveolar width <6 mm: miniscrews are probably contraindicated.
The following generalized guidelines can be used when selecting miniscrew length:
- maxillary buccal region: use an 8-mm or 10-mm miniscrew;
- palatal region (depending on the specific site): use a 6-, 8-, or 10-mm miniscrew; and
- mandibular buccal region: use a 6-mm or 8-mm miniscrew.
 |
 |
| Figure 5A: Injection pen with needle and anesthetic cartridge (Heraeus Citoject from Heraeus Kulzer, Armonk, NY). | Figure 5B: Infiltration of palatal tissue using the Citoject pen. |
Transgingival Penetration
A miniscrew must obviously penetrate through mucosal or gingival tissue. There are two methods to accomplish this: a) excision of a corresponding diameter of gingival tissue using a biopsy or tissue punch; or b) direct insertion of the miniscrew through the gingival tissue. There is currently no definitive evidence that either of these two variations significantly reduces postoperative complications, histological effects, and/or the failure rate of miniscrews.
Self-Drill or Self-Tap
Insertion Procedures Overview
A recommended sequence of procedures for inserting miniscrews (modified Cope Placement Protocol™)1,2 include the following:
- have patient brush and rinse with Peridex;
- apply topical anesthesia (such as TAC 20% Alternate);
- infiltrate anaesthetic as needed (such as 2% lidocaine with 1:100,000 epinephrine);
- locate and mark implant site (by impressing tissue with periodontal probe or using an x-ray placement guide);
- disinfect site with Betadine;
- measure soft-tissue thickness (bone sounding with periodontal probe or dental explorer);
- soft-tissue punch as needed (especially in unattached gingiva);
- bone surface indentation (No. 2 round bur) or pilot hole (1.1 mm drill) through cortical plate as situation requires
- insert implant; and
- attach mechanical load.
In many instances, the tissue punch and predrilling may be omitted (such as when a self-drilling screw is placed within the attached gingiva of the maxilla).
References
- Cope JB, Herman RJ. The ortho implant system. In: Cope JB, ed. OrthoTADs: The Clinical Guide and Atlas. Dallas: Under Dog Media LP; 2006.
- Bowman SJ. Thinking outside the box with miniscrews. In:McNamara JA Jr, ed. Microimplants as Temporary Orthodontic Anchorage. Ann Arbor: Craniofacial Growth Series; 2008:45:327-390.
Self-tapping miniscrews require predrilling (also known as pilot-drilling) of the cortical bone, appropriate to the length and diameter of the screw as well as the density of the bone. A self-drilling miniscrew will find its own way through the bone and, in principle, requires no predrilling.
Bone is more or less “elastic” depending on the site, age, and structure. Consequently, the screw diameter, as well as the thickness and hardness of the cortical bone at the insertion site, determine whether or not predrilling is necessary. Bone is strongly compressed during insertion and will suffer corresponding stresses if a screw is inserted without predrilling. This may result in cracking of the bone around the implant site. In addition, as it encounters greater resistance, the miniscrew is also subjected to higher torsional loads that may result in its fracture.
As a result, self-drilling miniscrews are best for regions with thinner and less dense cortical bone (maxilla). For regions with thicker and more dense cortical bone (mandible), predrilling at least through the cortical bone is required for self-tapping and is recommended for self-drilling miniscrews. Predrilling should be done at a maximum of 500 rpm, using a short pilot drill (corresponding to the internal diameter of the miniscrew) with sterile water-cooling to reduce the risk of thermal bone damage.
Inserting the Miniscrew
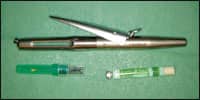
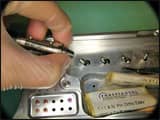
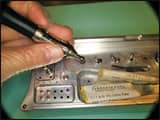
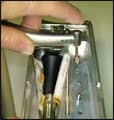
The miniscrew must be removed from its sterile packaging (Figures 6A–6D) or the work rack (Figures 7A–7G) without contamination. Do not touch the thread of the screw. The screw should be inserted at a constant rotational speed (at approximately 30 rpm) and with as uniform a torque as possible.
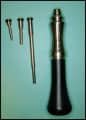
Manual Insertion: When using a hand driver, it is important to limit the torque applied to the miniscrew. This is most often accomplished by only using your thumb and first finger to apply the rotation force. This also stabilizes the wrist, thereby reducing wobbling of the screw. Many manufacturers provide various screwdrivers or hand drivers in several shaft lengths for the manual insertion of the screws. Long-handle drivers, especially those with large-diameter handles, pose the risk of attaining large torque levels during insertion, so insertion must be carried out carefully to avoid fracturing the miniscrew. Torque ratchets are available with some systems (tomas® by DENTAURUM and LOMAS by Mondeal) and provide a certain amount of control over the insertion torque.
 |
 |
 |
 |
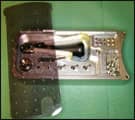
| Figures 6A–6D (clockwise, starting top left): Selection of driver attachments of different lengths. Inserting the driver in the handle from the rack in preparation for use. | |
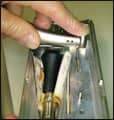
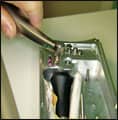
Handpiece Insertion: Machine insertion requires a surgical handpiece with a speed and torque that can be controlled (Figures 7A and 7B). The rotation rate should not exceed 30 rpm, and torque must be restricted to the maximum load limit of the screw as specified by the manufacturer. Machine insertion permits constant torque application during insertion, but, unfortunately, you lose the tactile feeling that allows you to differentiate between bone and root contact.
Attaching Linking Elements for Orthodontic Mechanics
An orthodontic load may be placed on the miniscrew immediately after insertion—no healing phase is required. Luzi et al8 described the results of a prospective evaluation of 140 immediately loaded screws that were inserted in 98 patients: 9.3% failed and 6.4% “partially failed” (meaning that they had minimal mobility and still might be used). The selected “linking element(s)” must be prepared accordingly and attached to the head of the screw (Figures 7C and 7D). To avoid adverse effects on the teeth to be moved, the load on the linking element should be limited to between 0.5 and 2 N (about 50 to 200 g).
 |
 |
 |
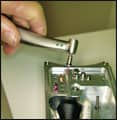 |
| Figures 7A and 7B: Inserting a driver attachment from a sterile rack into an implant handpiece. | Figures 7C and 7D: Placing the driver over the OrthoEasy miniscrew and removing from the rack. | ||
 |
 |
 |
|
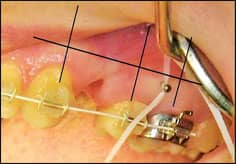
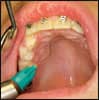
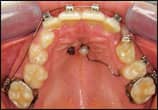
| Figures 7E and 7F: Inserting two palatal miniscrews using the implant contra-angle. | Figure 7G: Connecting a support wire segment from the miniscrew to a premolar using lightcured adhesive. | ||
Postoperative Care
The healing and continued health of the peri-implant gingival tissue and the status of the patient’s oral hygiene must be regularly reviewed throughout the time that the miniscrew remains in place. The patient must be instructed to avoid manipulating the screw with fingers, tongue, or lips, or with foreign objects like pens or pencils. The miniscrew must be clean and free of debris; otherwise, the screw may be prematurely lost.
Removing the Miniscrew
Miniscrews may often be removed without anesthetic or using only topical anesthetic. First, the linking elements of the orthodontic mechanism must be removed from the miniscrew. Then, the miniscrew is simply unscrewed using the insertion driver. The resulting small wound requires no special care beyond normal dental hygiene, and it typically heals within a short time (Figures 8A–8C).
 |
 |
 |
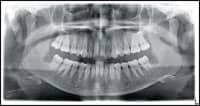
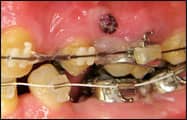
| Figure 8A: An OrthoEasy miniscrew inserted between upper first molar and second premolar. | Figure 8B: Immediately after removal of the miniscrew without anesthetic. | Figure 8C: Complete healing noted 4 weeks after removal. |
BjÖrn Ludwig, DMD, MSD, is in private practice in Traben-Trarbach, Germany. He can be reached at
Bettina Glasl, DMD, MSD, is in private practice in Traben-Trarbach, Germany. She can be reached at
Thomas Lietz, DMD, is in private practice in Neulingen, Germany.
Joerg Lisson, DDS, PhD, is the head of the orthodontic department at the University of Homburg/Saar, Germany.
S. Jay Bowman, DMD, MSD, is in private practice in Portage, Mich. He can be reached at
For more information on miniscrews, please see Mini-implants in Orthodontics: Innovative Anchorage Concepts, edited by Ludwig, Baumgaertel, and Bowman, and published by Quintessence.
References
- Informed consent for the orthodontic patient: Risks and limitations of orthodontic treatment. American Association of Orthodontists, St Louis, MO. 2005.
- Ludwig B, Glasl B, Lietz T, Lisson J, Bowman SJ. The x-ray pin: A pre-operative diagnostic aid for miniscrews. Orthodontic Products. 2008;15(2):18-24.
- Poggio PM, Incorvati C, Velo S, Carano A. “Safe zones”: A guide for miniscrew positioning in the maxillary and mandibular arch. Angle Orthod. 2006;76:191-197.
- Schnelle MA, Beck FM, Jaynes RM, Huja SS. A radiographic evaluation of the availability of bone for placement of miniscrews. Angle Orthod. 2004;74:832-837.
- Kravitz N. The use of compound topical anesthetics: A review. J Am Dent Assoc. 2007;138(10):1333-1339.
- Miyawaki S, Koyama I, Inoue M, Mishima K, Sugahara T, Takano-Yamamoto T. Factors associated with the stability of titanium screws placed in the posterior region for orthodontic anchorage. Am J Orthod Dentofac Orthop. 2003;124:373-378.
- Berens A, Wichmann D, Dempf R. Mini- and micro-screws for temporary skeletal anchorage for orthodontic therapy. J Orofac Orthop. 2006;67:450-458.
- Luzi C, Verna C, Melsen B. A prospective clinical investigation of the failure rate of immediately loaded mini-implants used for orthodontic anchorage. Prog Orthod. 2007;8:192-201.