by R. Matthew Miner, DDS
How one orthodontist ended his search for optimal bracket position
Accurate bracket positioning has long been a goal for orthodontists. The quest for optimal bracketing began after the arrival of the straightwire appliance and continues as orthodontists seek more efficient mechanics that use less wire bending. With the arrival of fully preadjusted appliances, the need for precise bracket positioning has been further driven by the specific tip, torque, and in-out information found in brackets that are individualized for each tooth.
If we are able to place brackets in the correct position for each tooth, we are then able to take full advantage of our preadjusted brackets by filling the slot to express the inherent positioning in all three planes. We know that labial surfaces of teeth are fairly consistent in shape.1 However, the individual variability of tooth anatomy presents challenges when we directly bond brackets. Manually estimating placement on each tooth is time-consuming, and it can be difficult to determine where a bracket should be placed on the tooth to achieve the optimal result. The pressure of chairtime when bonding is intensified by the added requirement of increased accuracy. These demands result in increased time for bonding and when brackets must be repositioned during treatment. Ultimately, rebonding for position often increases chairtime and, in most cases, results in longer treatment time.2
During our orthodontic residency we learned that we can eventually overcome these initial bonding errors by making multiple wire bends or by rebonding the brackets to correct positioning. Eventually, most orthodontists realize that incompletely filling the slot of the bracket is a more practice-efficient method for dealing with these inaccuracies. Yet many practitioners remain frustrated, paying for precise information in preadjusted brackets that they cannot use because of inaccurate placement.
Indirect bonding presents an alternative that many orthodontists pursue in an attempt to fully use preadjusted brackets. However, indirect bonding is highly technique-sensitive, requires in-office lab time, and takes precious chairtime to learn.
There are, however, numerous advantages realized by those who are persistent with indirect bonding.3 The main advantage is the decreased chairtime and the ability to delegate the bonding once the procedure is routine. The other advantages are the increased accuracy in bracket positioning, less repositioning, less instrumentation, less unnecessary time spent chairside, and less stress.
The 3D Virtual Setup
Through my experience, I have found a technology that merges precision digital software for bracket placement with predictable and delegatable bonding. Enter OrthoCAD iQ™.
Cadent OrthoCAD, known for digital models, developed iQ, a method for digital bracket positioning that is very precise and predictable. From your impressions, digital models are produced using laser scanning. A 3D virtual setup is created according to your prescription. If you have several possible treatment plans, you can request multiple setups to assist in your decision-making. Your specific brackets are placed on the projected result using computer-guided targeting technology. Bracket positioning is highly accurate and based on the final virtual setup you approve. Unlike with aligner setups, we have the ability to fine-tune the setup to the specific needs of patients. For example, if reverse torque on maxillary lateral incisors is needed in a Class II Division 2 case, that information can be requested in the prescription or added when you approve the case.
With the advent of laser surface scanning, 3D imaging, and bracket-position targeting, the possibilities in orthodontic procedures has changed forever.4 Although these different technologies have been available for a while, their application to orthodontics and precision bracket placement is much more recent.5,6 Over time, multiple studies have shown the accuracy of using such technology in orthodontics.7-9
OrthoCAD bracket placement technology has been available since 2003. Cadent OrthoCAD has now delivered almost 30,000 bracket-placement cases to orthodontists across the world. The majority of adult and adolescent cases can be accurately and predictably set up using this method.10
Accepting Change
Like many of my orthodontic colleagues, my search for an ideal bracket-positioning technique began after my initial experiences using straightwire. My results were not necessarily better using the preadjusted brackets unless I repositioned brackets after leveling/alignment and prior to placing rectangular archwires. The specific nature of preadjusted brackets required very accurate positioning for optimal results, but ideal bracket placement was difficult at best when bonding directly. I knew there had to be a more accurate method, but national straightwire lecturers were recommending routine bracket repositioning as a necessary part of the straightwire approach.
Over the years, I have tried different methods of indirect bonding in an attempt to minimize repositioning brackets. All of the clinical procedures had been technique-sensitive. They took too much of my time in the lab and were not predictable enough to be delegated to staff. Although the concept was good, the efforts were often greater than the benefits.
When I began using OrthoCAD for precision bracket placement in 2004, I was able to see each finished result before I began treatment. Visualizing the result had long been a goal of mine since my experience with early lingual appliances. Custom wax setups and indirect transfer trays were used for lingual brackets because direct bonding was practically impossible on the lingual surface. With the advent of laser scanning and 3D imaging, the bracket-placement process could be digital for all routine cases. I also knew that with OrthoCAD iQ, I would have more accurate bracket positions and less repositioning because of the laser-guided technology.
Committing Your Office
Adapting to the new technology took an investment in time for my office as a whole, but our efforts quickly paid off. Learning the software was fairly straightforward and intuitive. It was no more difficult than paying bills online. I did have to change my workflow slightly to account for the time to approve the cases that were downloaded to my computer, but that was a minimal change. Changing staff perceptions and procedures also takes time. Having a plan and using OrthoCAD iQ’s support staff helped tremendously. Their in-office training was especially helpful.
As every orthodontist knows, change is difficult for everyone. After I made the commitment to exclusively use OrthoCAD iQ, it took my staff 2 to 3 months to become comfortable. Currently, my entire clinical staff is confident bonding cases without my assistance.
There have been other benefits as well. Patients are pleased with the decreased chairtime and are impressed by the use of the technology we use to straighten their teeth. My staff is pleased to be more involved on bonding day, and I am happy to have more time to communicate with patients now that bonding is less stressful. We are all delighted to find panoramic radiographs with well-aligned roots that require no repositioning.
Practical Application
You must follow some new procedures and protocols to be successful with iQ. I have found that there are six steps to success that will make the change easier.
Step 1) Take accurate, stable impressions. Computer imaging will never be able to make up for poor impressions. Our office adapted to the process of taking PVS impressions over time as a result of doing aligner treatment. Although we occasionally have to retake an impression, we now know what to look for in the impression. Obtaining an accurate bite registration is critical, so we use a PVS material that will ship without distortion. Since orthodontists and their staff know the importance of good records, this step should be easy. If you have not developed a good staff skill level with PVS materials, the OrthoCAD trainers can certainly assist you and your staff.
Step 2) Submit a detailed prescription with preferences for finishing. The laboratory prescription is straightforward. First, you need to indicate which brackets you are planning to use for the case and which teeth you plan to bond. For example, if the patient has selected ceramic versus metal, you must specify so on the form. (OrthoCAD has scanned images of more than 7,200 brackets in their system.) Next, you need to provide the laboratory with your preferences for the final occlusion. You specify molar and canine relationships, then indicate overjet, overbite, and space closure. Treatment options such as extractions, IPR, and molar movement must also be chosen. In addition, we submit digital photos and x-rays that the company uses to more accurately position the teeth on the setup.
Step 3) Use the virtual setup as a diagnostic tool. Once you have sent the PVS impressions, appliances, and prescription to the laboratory, technicians will create one or more setups to meet your specifications for each patient. Scanned images are created from your impressions. Trained technicians, overseen by clinical specialists, develop a setup that reflects the best occlusion possible for the individual tooth shape and size. Following your request, the teeth are moved into position virtually and brackets and archwires are placed on the images according to your prescription. To ensure quality control, each case is inspected at seven different intervals.
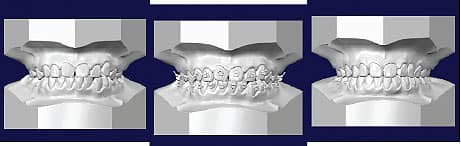 |
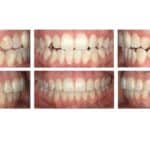
| Figure 1: Virtual Setup permits you to see the finished result and position brackets according to the completed occlusion. |
The setup option permits you to see the finished case before you start. It also allows you to compare multiple treatment options. If you have chosen to have more than one setup, you can decide which is best and approve only that one.
 |
| Figure 2: Modifying tooth positions on the setup changes the bracket position on the original malocclusion. |
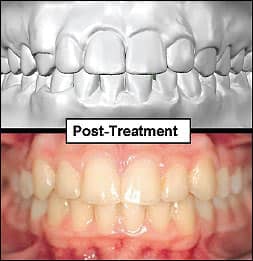 |
| Figure 3: Post-treatment view of setup and actual treatment result. |
Step 4) Modify the setup, if necessary. When the setup is returned to your computer for your approval, you must review the final occlusion and make any modifications that you require for an optimal result. Often, the brackets appear to be in an unusual position when you view the setup. As orthodontists, we are taught that the bracket should be positioned in the center of the tooth, so that when you let the setup determine bracket position, it is often counterintuitive to your eye. Since the setup method of positioning brackets is a superior procedure based upon sophisticated computer algorithms, we must reorient our thinking and learn to trust the final outcome, not the bracket position.
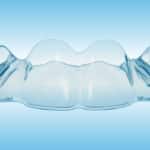
Step 5) Trust the computer-guided bracket placement and tray fabrication. When you approve the case, the OrthoCAD iQ technicians will transfer the virtual brackets to the actual model. The physical brackets are placed on the model in the same position you approved, using image recognition and computer-guided targeting technology. When the ideal position is achieved, the technician activates the tacking light that prevents the bracket from drifting. After the composite bases are completely cured, transfer trays are created with a soft inner liner and a hard outer shell. These are trimmed once the brackets are separated from the model.
Step 6) Follow the instructions for bonding trays closely. Your case is returned to you and is ready for bonding in less than 14 days. Specific instructions are available for assistance with the bonding procedure. Taking advantage of the in-office training speeds up the process of making bonding day predictable as well as delegatable. I now have more time and less stress on bonding day. My staff has been empowered, and they are more satisfied with their contribution to patient care.
|  |
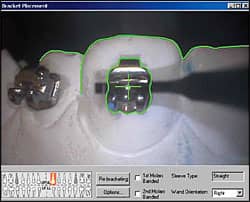
| Figure 4: Targeting software to accurately transfer bracket position to original model. | Figure 5: Occlusal view of ideal patient setup with brackets not centered, but teeth aligned. (Note: lines were added to represent midline of the tooth.) |
Benefits to the Practice
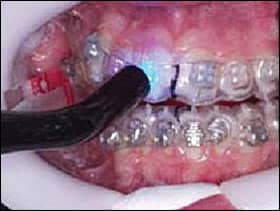 |
| Figure 6: Light curing brackets using iQ trays from the custom setup. |
Introducing OrthoCAD iQ to my office has provided great benefits to my practice. Principally, it has increased production because we are doing less repositioning of brackets. It has also reduced chairtime and resulted in more predictable finishing. All of these factors taken together have resulted in fewer appointments.
We have felt the effect throughout my practice. Patients and parents are happier because of the time efficiencies. The practice’s image has been enhanced by the technology. My patients appear more interested in their treatment. The staff is more empowered with their skills and is happy not to have to wait for the orthodontist on bonding day.
As the orthodontist of this team, I am pleased with all of the practice efficiencies. I see the results whenever I look at a panoramic x-ray and know I do not have to reposition brackets. I also see the results when the setup matches the final result and I see the smile we produced.
R. Matthew Miner, DDS, is in private practice in Dedham, Mass, and teaches orthodontics part-time at the Harvard School of Dental Medicine. He is a global lecturer and author focused on treatment efficiency and technology integration in orthodontic practice. He is a journal referee for Angle Orthodontist, a diplomate of the American Board of Orthodontics, and former chair of the department of orthodontics at Harvard. He is past president of the Angle Society (Angle East Component). He has a financial interest in products mentioned here. He can be reached at
References
- Ash MM. Wheeler’s Dental Anatomy, Physiology and Occlusion. 7th ed. Philadelphia: WB Saunders Co; 1993.
- Skidmore KJ, Brook KJ, Thomson WM, Harding WJ. Factors influencing treatment time in orthodontic patients. Am J Orthod Dentofacial Orthop. 2006;129(2):230-238.
- Kalange JT. Indirect bonding: a comprehensive review of the advantages. World J Orthod. 2004;5(4):301-307.
- Garino F, Garino GB. Digital treatment objectives: procedure and clinical application. Prog Orthod. 2004;5(2):248-258.
- Rheude B, Sadowsky PL, Ferriera A, Jacobson A. An evaluation of the use of digital study models in orthodontic diagnosis and treatment planning. Angle Orthod. 2005;75(3):300-304.
- Cha BK, Choi JI, Jost-Brinkmann PG, Jeong YM. Applications of three-dimensionally scanned models in orthodontics. Int J Comput Dent. 2007;10(1):41-52.
- DeLong R, Heinzen M, Hodges JS, Ko CC, Douglas WH. Accuracy of a system for creating 3D computer models of dental arches. J Dent Res. 2003;82(6):438-442.
- Zilberman O, Huggare JA, Parikakis KA. Evaluation of the validity of tooth size and arch width measurements using conventional and three-dimensional virtual orthodontic models. Angle Orthod. 2003;73(3):301-306.
- Santoro M, Galkin S, Teredsai M, Nicolay OF, Cangialosi TJ. Comparison of measurements made on digital and plaster models. Am J Orthod Dentofacial Orthop. 2003;124(1):101-105.
- Garino F, Garino GB. Computer-aided interactive indirect bonding. Prog Orthod. 2005;6(2):214-223.