by Scott G. Smoron, DDS, MSD
How to make sure the brackets stay put and the patients stay happy
 |
There are many factors that lead to a successful bonding appointment. It begins with equipment and preparation, then execution and education. When successful, a bonding appointment will set the patient up for success and help build a rapport with and faith in the orthodontic team.
Equipment
Proper equipment can contribute to a highly successful bonding, and poor equipment can ruin a bonding. Often, equipment is neglected even though it may be the reason for bond failures. The equipment I want to focus on are rotary instruments, curing lights, syringes, and covers.
A low-speed hygiene handpiece, used with pumice, is an excellent means of preparing enamel for bonding. Many use a simple prophy-cup or Q-Tip, but if you have staff trained in coronal polishing, the rotary instrument will better prepare the enamel surface. In addition, a high-speed handpiece with an extrafine diamond bur is essential to preparing primary teeth and porcelain surfaces for bonding; the diamond bur can be used routinely to prepare enamel and increase the consistency of the bonding process. Finally, a microetcher can be used to clean and etch the enamel. This tool is great for bonding to porcelain and metal.
 |
| Scott G. Smoron, DDS, MSD |
Next on the equipment list is a curing light for those who use a light-cured adhesive. For a couple of years prior to 1984, ultraviolet curing units were used; since 1984, all clinical curing lights use visible blue-wavelength light that cannot harm patients’ eyes. People may be sensitive to the intensity or color of the light, but it cannot do any more damage than an intense lightbulb can. Some orthodontists do not realize that they are not using an ultraviolet light. Sadly, I have seen an orthodontist’s Web site that states that he uses an “ultra-violent” light! Few patients would seek care there! Every assistant should teach patients that the light cannot harm their eyes.
Curing lights are either corded or cordless. Most cordless models are LED-based. Corded lights can be based on LEDs, halogen bulbs, or a plasma-arc process; some high-intensity corded lights have a large base unit where the plasma-arc or halogen bulb is cooled. With the advances in LED technology during the past few years, it is difficult to make a case for anything other than the LED cordless lights. However, the high-intensity halogen units or plasma arc units can make sense for bondings that require long, continuous spans of light usage.
The charging base/base unit for many lights has a sensor to test whether the correct wavelength and intensity is being produced; it is critical to check this regularly. It is disappointing to have an appliance fall off while activating the archwire because the halogen bulb was at the end of its life span and not producing the correct wavelength. Besides the clinician’s disappointment with the procedure, it does not help in communicating competence and excellence to the patient.
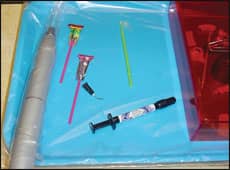 |
| Having everything in place makes the procedure go smoothly. |
The next critical piece of equipment is the air syringe. This is probably the most overlooked component of a successful bonding procedure. When I first took over the practice I am in, I noticed a much higher bond failure rate than was acceptable; after meticulous care in bonding, I arrived at the conclusion that the air/water syringes were leaking water into the air-only portion. Most air/water syringes will leak water unless rebuilt on a regular basis.
American Dental Accessories was very kind in guiding me through the parts necessary to splice off an extra air line and add an air-only syringe to each chair; it can also supply gaskets to rebuild the syringes you have. Either task can be accomplished with a hemostat, a pair of scissors, and a little time. This change of equipment produced an instant correction of the problem. If you incorporate Adper L-pops into your bonding routine and/or become a suctionless and waterless practice, the air-only syringe is critical to avoid contamination of the primer. If your bond failure rate is greater than 5%, repairing syringes and/or adding air-only syringes can help; it may single-handedly solve the problem and improve the consistency of your bonding process.
There are a variety of ways to protect light-sensitive primers and adhesives from ambient light. Primer and adhesive left exposed to light for even a couple of minutes during bonding do not retain their ability to create a mechanical, microscopic bond because the smallest molecules have already begun polymerization. Individual brackets with adhesive already applied are a way to deal with this, as are the orange plastic tray covers to protect other primers and adhesives. Practicon Dental and American Dental Accessories are both good resources for these products.
 |
| The NOLA system incorporates retraction and suction into a single device. |
Preparation
Staff should check the panoramic film of patients prior to preparing the bonding setup to look for metal or porcelain that will require different primers or adhesion boosters than enamel. For both, a light diamond bur or microetcher will help clean the surface and prepare it for bonding. With metals, use of a typical enamel primer used in the acid-etch technique will result in a good bond when combined with most adhesives. Porcelain requires the application of a porcelain etch and porcelain primer. Porcelain etch is a stronger chemical than enamel etch, and should never be allowed to come into contact with soft tissue such as gingiva or lips With either porcelain or metal, you should make an effort to cure for an extended time period and from different angles because light will not transmit through the porcelain or metal the same way it is transmitted through enamel. A reference card that reviews the bonding process should be laminated and kept chairside for staff reference. Knowing the procedure protocol puts everyone at ease.
Take the time to show your staff how much adhesive is necessary, where it should be placed on the bonding pad, and the variations on the amount and position based upon which tooth is being bonded. Demonstrate how to express a given amount from the syringe and then how to apply it to the brace. Explain that the thinner the application of primer, the better the bond strength; a wet, primer-saturated surface is not better and can interfere with bonding.
It also helps to create a reference list of all desired instruments and disposables. The panoramic film should be displayed for reference. If possible, occlusal photos displayed on-screen can be helpful for placement of premolar and other brackets. Preparation plans should be reviewed continually. The actual procedure should also be reviewed on a regular basis.
Execution of the Procedure
The enamel surface itself needs to be prepared for bonding. For those who indirect bond, teeth should be pumiced and/or polished prior to the indirect bonding impression. For both direct and indirect methods, teeth should be pumiced and/or polished prior to bonding. Any substance that contains oils or fluoride, even ordinary prophy paste, should be avoided, as these interfere with bonding. Orthodontic-specific prophy products are available, but simple pumice works quite well. In addition, peroxide can be added to the pumice to further clean the surface enamel.
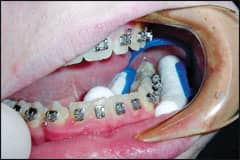 |
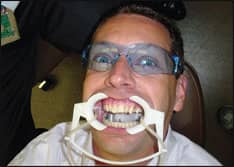
| A double cotton roll holder absorbs moisture, retracts the tongue and cheeks, and acts as a mouth prop. |
Once the enamel surface is clean, retraction of soft tissue is typically needed. From the NOLA system to simply using a finger, cotton rolls to systems with built-in lights, Ultradent’s PropGard, Discus Dental’s SeeMore, and Glenroe’s Spand-Ezz, there are many options. Practicon and Dynaflex are both outlets that carry some of these products and many more dental odds and ends; obtaining a copy of their catalogs may be worth it to better investigate the options available. Something as simple as a plastic device that holds two cotton rolls can make molar bonding much more successful!
When bonding with traditional acid-etch techniques, using a colored etch with gel-like consistency aids in proper application and removal. Onyx Etch is a black gel with flecks of silver; it is easy to see when applied. Other popular colors are blue, green, and red. The reason to use a product like Onyx is to ensure that all acid is washed away prior to priming. If any etch is left behind—which is possible when using a noncolored liquid etch—it can cause decalcification of the enamel under the adhesive or it can weaken the bond. Both iatrogenic decalcification and bond failures are possible outcomes.
After traditional etching come the primer and adhesive. Handling of the products and application technique can have a great influence on the clinical outcome. First, the primer and adhesive should not be contaminated; if the bottle comes into contact with any sterilants, chemicals, or even water, be certain that the bottle is fully closed and that the primer and/or adhesive has not been contaminated.
Second, the tooth surface must be dry, but not overly dry; continuing to dry a tooth after surface moisture has been driven off results in dessicated enamel that does not bond well.
Third, primers should only be applied immediately before placing the brace. Why? If you wait to bond, moisture in the patient’s breath contaminates the primed surface; these are the bond failures you blame on saliva contamination that you never saw. If time does pass, then reapply the primer immediately before placing appliances.
Fourth, the primer and adhesive should not come into contact with rubber gloves or explorers; assistants sometimes manipulate adhesive on a bonding pad with rubber gloves or even explorers that have already been used to remove ligature ties, contaminating the adhesive with saliva and plaque.
Primers are perhaps the most important component in bonding outcomes. For a patient with poor hygiene, a fluoride containing primer, like Reliance Orthodontics’ Pro Seal, can be great for protecting teeth from decalcification. There are other primers, like Ormco’s Ortho Solo and Reliance’s Assure, that increase bond strength and make bonding more consistent. As with the syringe, if bond failure rates are unacceptable, selection of a new primer and care in its application can have a dramatic impact on bonding success because the primer forms the interface with enamel.
If you use self-etching primers (SEPs), there are rules to follow. 1) Read the directions. 2) Start with a dry, decontaminated surface. 3) Mix the SEP properly. 4) Read the directions. 5) Work the primer into the tooth surface … rub, rub, rub. 6) Blow-dry off any liquid; the surface should be shiny when ready to bond, but never wet and showing movement of liquid. The wetness is the solvent component which, if left on the surface, will decrease the bond strength just as saliva would. Those who find the smell of the solvent-drying step offensive can place a high-speed suction near the occlusal/incisal surface and evacuate the solvent off the surface instead of blowing it off.
Finally, even though SEPs are themselves a primer, other primers—such as Pro Seal, Solo Plus, and Assure—can be of great value. If nothing else, they make moisture during the bonding process less critical.
When using curing lights, remember that the light is initiating a chemical process within the adhesive and primer, which results in polymerization and an immediate bond that is 95% of full strength. If you double the curing time, bond strength should increase to 97% to 98%; tripling the curing time brings the strength to 99%. The bond is not 100% until the adhesive is given time to cure, typically 24 hours.
Fuzzy Math Alert: When bonding 28 teeth, a 5% failure rate indicates that at least one bond will fail. If the adhesive is at 95% strength, that could translate into at least one failure. Increasing the bond strength to 98% of final polymerization could reduce bond failures to 0. Again, fuzzy math, but there’s a point to that.
When banding teeth, every band should have an internal surface that has been microetched, sand-blasted, or laser-etched. The adhesive should be beaded around the entire band and should be in contact with the gingival edge of the band. If the adhesive is beaded around the occlusal surface of the band, seating the band can result in a void under the band. This void will result in decalcification, typically seen at the mesio-buccal line angle near the gingival margin where the tooth tapers toward the root structure. Beading the adhesive along the gingival surface produces a seal that prevents voids under the band in a place that no patient could ever keep properly clean. If you consistently see decalcification around bands and nowhere else, it is iatrogenic damage.
Patient Education
The most important part of a bonding appointment is patient education. It is important to explain to the patient that orthodontists could place braces that would never come off—or at least not without damage. You can amplify this by explaining that once upon a time adhesives that were too strong were used and people had their teeth damaged. Then discuss the converse, about how all orthodontic appliances are now designed to be removed and that the patient should not be the one to remove them by eating crunchy foods.
|
To read more articles on this topic, search for , at the top of the page. |
If the bonding process has been well-executed, the patient will have great confidence in the orthodontic team. Do not underestimate the value of a comfortable, patient-focused procedure. Communicating your sincere concern for the patient can result in a stronger patient/team relationship that leads to better patient compliance; better compliance results in better treatment outcomes for the patient. This should produce a patient and an orthodontic team that are happy to have crossed paths, and that’s the bond that counts.
Scott G. Smoron, DDS, MSD, is in private practice in Mount Prospect, Ill. He can be reached at


