by Neil Warshawsky, DDS
On the road to increased profit and efficiency, you have some decisions to make
 |
| Neil Warshawsky, DDS |
Every year I am amazed that the orthodontic world evolves. Each year I believe I am using the best possible procedures and materials to benefit my patients, and every year I end up changing my core systems to be more efficient. Seven years ago I switched to a paperless office and never turned back. Going paperless was tough, but eventually I was thankful we dumped our paper charts. Nothing ever gets lost!
More than 5 years ago I switched my labial system from an .018-inch twin bracket to a very popular .022-inch friction-free appliance system. I thought it would be akin to switching religion, but—lo and behold—I swear by these brackets. Over time I have realized that I am human and my bracket placement can vary for many reasons.
When I talk with many of my professional friends all over the world, we all agree that, due to the technology being built into the brackets, their position is becoming paramount. Although we tend to bend wire for finishing details in the end, by and large we reposition brackets for ideal placement. Since time is money, and lack of chairtime is not fun in your schedule, my practice has adopted indirect bonding as a means of controlling our bracket position. I hope you’ll agree that it will ultimately allow for a better result.
 |
Although there are several premade indirect bonding services available, I am willing to suggest that if you use these systems, the ultimate time savings may be tied to the day you start and how well you place the brackets on the teeth. Therefore, I would like to focus on an indirect bonding system that you can do in your own office. After all, who went to school to learn to place the brackets—you or the lab tech? This article will represent my opinions, although I will try to be as factual as possible.
Model Behavior
The single most important fact about indirect bonding is that you need good models. They need to be poured immediately if they are in alginate. If they are a “next-generation alginate,” like ImprEssix from Raintree Essix or your favorite PVS material, they need to be poured up accurately and bubble-free in die stone so that they do not chip in the process. Once your models are taken, you should be prepared to bond the case as soon as possible. In our office, it is 7 to 10 days if it is an adolescent patient. If it is an adult who is receiving something customized like lingual iBraces, then typically we are not under a time constraint, since there is no reason for any teeth to move. Due to my own paranoia, I will usually request that any extractions are performed within just a few days of the bonding procedure (or afterward).
 |
| The most important fact about indirect bonding is that you need good models. |
X Marks the Spot
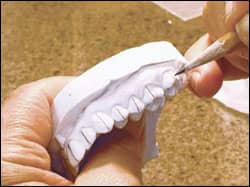
Once the models are poured, cleaned, and dried, we start by marking the middle of each tooth vertically. Next, we make a mark on the face of the tooth on the molars and lower bicuspids where the cusp tips of the opposing teeth lie. This is important to see if you will require bite-opening post bonding. Most important, I have my lab person do all of this so that it does not necessitate my time yet. I review the lab person’s work and correct the mistakes as I see them, and then we place two coats of diluted separating media on the models, allowing each coat to dry thoroughly. Then, we go back to our chart to see what bracket system we are using—variable torques, etc—and then we place them on a bracket card.
My lab tech places a small amount of our bonding composite on the pad of each bracket. She places the brackets on the models one arch at a time, taking care to center the bracket as much as possible on our orientation marks. Note that she does not push the bracket hard—if she does it might make my adjusting of the bracket more difficult. Also, she leave the excess composite for me to remove, since it will make adjusting the position difficult once it is cleaned up.
 |
| The assistant places brackets on the models, making sure not to press too hard, which would make adjustment difficult. |
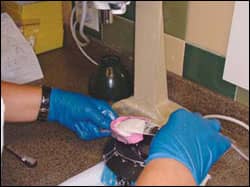
The models with the positioned brackets are placed in a lightproof box in the left drawer of my desk for orientation.
A trick to note: Since you cannot push gingival tissue out of the way and slide a bracket underneath the tissue collar, it is possible to trim the gingival side of the bracket if you need to push the bracket lower for ideal positioning. If your manufacturer makes gingival offset premolar brackets, they may work also.
Go Ahead, Make My Tray
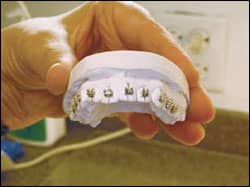
I start my day by reviewing the setup and measuring my slot height from the cusp tip using aluminum height gauges. I then make what I believe are the appropriate changes in the bracket positioning to level the occlusal plane. Ultimately, less is more, since it will preserve your newly created custom base pad. Once the brackets have been “diddled” into position, they get light-cured on the model. Many practices use a triad curing oven to do this because it is fast and easy, but I think you will find that a good curing light or some bleaching lights like the one from Zoom2 will work just fine.
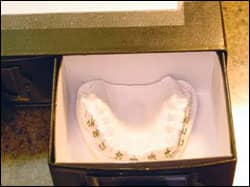 |
| The models with positioned brackets are placed in a lightproof box until the orthodontist can review and adjust them. |
I then spray the model with a silicone release material, like Trim-Rite, in preparation for creating the tray. Based on your experience, you can determine your own style of bonding tray. The first style, which is referred to as a double-tray design, uses 1 mm rubberized material (Model Duplicating material available from Raintree Essix works very well) directly over the brackets, followed by a 1 mm plastic overlay tray directly on top of the “soft tray.” In our office we have both the Biostar and the Druformat machines for blowing the material down on top of the brackets. I prefer the Biostar in general for the hard tray simply because it has a window to view the performance of the product under pressure.
The alternative bonding tray is fabricated by injecting a light-body indirect-bonding matrix beneath the gingival tie wings/undercuts of the brackets (Essix’s purple matrix material works well for this purpose), followed by a heavy-body, clear indirect-bonding matrix (Memosil or clear matrix from Raintree works well) for support on the body as well as the top of the brackets. Together, these indirect bonding matrixes form a cocoon over your prepositioned brackets. On top of the matrix you then thermoform a 1-mm plastic (Essix A+ works well) tray for support.
 |
| The orthodontist measures slot height from the cusp tip using an aluminum height gauge. |
Once the trays have cooled, you finish them by cutting them out on the model below the gingival margin of the bracket. Once the trays are cut, I prefer to soak the model for about 15 minutes to allow for easier removal of the newly fabricated indirect-bonding tray. Once the tray is off the model, its edges may be trimmed using a crown and bridge scissors. At this point in the second technique, I will vertically slit the purple matrix underneath the bracket to allow the tray to be removed more easily.
Finishing Touches
Lightly sandblast the finished trays with 50-µm silica to knock off any possible remaining stone. Take care not to remove the newly made customized bonding pad. Carefully rinse the tray again after sandblasting, and store it in a safe, dry place until the day of bonding.
Your final decision will be what bonding system to use to place the brackets on the teeth. The way I look at it, you have two choices. You may use the two-resin method popularized by Sondhi, in which part A is on the tooth and part B is on the bracket and you sandwich the two components together so that they chemically react and cure. There is more to it than that, but that is the gist. Keep in mind that this is chemical-cure only.
- You can read more articles about indirect bonding by searching our free .
Your second option is to use a universal bonding agent and composite. No matter which you pick, as a precaution you should always try the tray on to confirm the fit. Once I do, I usually clean all the bonding pads with acetone to make sure there are no contaminants. (It also does a nice job of softening the custom pad surface so that you may bond to it.) I prefer a composite that has a nice, long, thin tip to get the bonding material into the tray all the way. Raintree Essix has a composite that has a 1-cm metal tip on it that allows you to reach into the tray to place the material evenly but thinly on the bonding pad. Some orthodontists like to use a flowable composite for this because the tip works well to reach into the tray, but in my experience, flowable composite is too viscous—it runs and makes it harder to clean up. I also have to believe it may not be as strong for the purpose of bonding brackets, but whatever works in your hands is what you tend to use. Remember, too much glue is bad in this scenario. A thin layer is all you need. Once you get to this point, you’ll follow your usual bonding protocol.
I hope this overview of indirect bonding has been helpful. Given the rage for self-ligation currently overtaking the market, it is now more important than ever to make sure your bracket position is ideal.
Neil Warshawsky, DDS, is in private practice in Chicago. He can be reached at /i>