by Alfredo Gilbert, DDS, MS
Retention protocols in lingual orthodontics

For obvious reasons, retention in lingual orthodontic cases must be completely invisible. It is impossible to ask a patient who, since the beginning of the treatment, has asked for an aesthetic option, to use visible retainers such as the Hawley retainer or circumferential appliances.1 Consequently, the lingual orthodontist must be prepared to use different options.
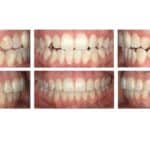
Among the most common alternatives I can mention are Essix appliances (from DENTSPLY Raintree Essix Inc) and fixed retainers (Figures 1 and 2). Both have the ability to maintain the teeth in the position in which the case was finished, and both are almost impossible to notice, even by people close to the patient. In my experience, though, these two systems have presented some issues, like the size that the Essix must have in the upper arch in order to provide enough stability, and the high incidence of debonding suffered by the fixed retainer (which, by the way, can happen without the user’s knowledge).
The purpose of this article is to explain the use of the Clear AlignerTM system of invisible retention, which is also able to resolve small finishing imperfections in cases treated with the lingual technique.
Finishing Problems Related to Lingual Technique
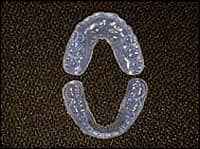
Figure 1: An Essix retainer.

Figure 2: A fixed retainer.

Figure 3: Small interbracket distances complicate the resolution of rotations. The black arrow points to a central incisor still rotated at the end of treatment.
Because of the small interbracket distances, the lingual technique presents some biomechanical problems when you come to the final stage of the case2 (Figure 3). Small rotations are a common problem at this time, because the brackets are so near to one another that producing a moment of force to rotate the teeth represents a great challenge for the clinician. Also, obtaining moments of force to modify tip or torque seems to be hard with these small interbracket spaces.
To resolve these issues, the orthodontist often needs to debond the bracket and place it in a different position (Figure 4) or with a different quantity of composite. This might also require decreasing the size of the wire, creating some risks of losing control over the treatment. Considering that lingual brackets must be bonded indirectly,3 the less you change the positions obtained through the setup, the more you keep control over procedures.
Using the Clear Aligner System for Finishing and Retention
The Clear Aligner system was designed in the first years of the 21st century by Tae-Weon Kim, DDS, MSD, PhD, as an orthodontic device with a broad range of applications. Kim explained that the system can be used for resolving crowding, arch constrictions, crossbite situations, and to recover from relapse.4
Using the system as an active retainer was not considered in Kim’s manual, but I have noticed that, in lingual cases, the clear aligner can help obtain the finishing positions.
Step-by-Step Procedures
The protocol begins with the orthodontist taking records of the case. Photos, x-rays, and models must be taken in order to have all the information required for finishing procedures. Since the appliance is manufactured over the casts, the quality of impressions and the material used for building a “positive” need to be extremely exact. I recommend taking impressions with polyvinyl siloxane and making models with Alpha 2 gypsum such as Velmix.
The Clear Aligner system is designed so that orthodontists do not have to send materials to an outside lab. The models can be photographed and captured through the software of the system, then presented on the computer screen (Figure 5). After the record has been saved, the model can be modified in your laboratory, resolving the problem. Another photo, now with the teeth in proper alignment, is recorded and included into the program.
The software allows you to calculate the magnitude of the changes you are planning to make. If you try to move a tooth more than 1 mm, the program will inform you of this “excessive” movement and “deny” permission for this impossible change. When the system finally accepts the planned adjustment, you vacuform two acetates—one of soft consistency and one of medium consistency. The first one is used for 1 week and the second for around 20 days.
When the patient returns to the office, new photos and models are taken to compare with the first records and, if it’s necessary, the new impression is used to manufacture a hard acetate to obtain the completely finishing position of teeth.
Special Procedures
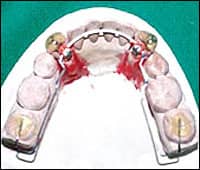
Figure 4: One way to resolve the bad positioning of a tooth is to rebond the bracket on a different position.
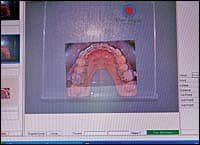
Figure 5: The clear aligner software allows the user to calculate the adjustment over the acetate.
In addition to the rotational adjustments, in some lingual cases the sagittal and horizontal planes require modifications of the tip and the torque. These problems are commonly seen in those cases where the upper laterals began with a very palatal position (Figure 6) and the brackets are not able to bring the teeth to the arch in a full-body manner.
The traditional manner of correcting this malposition (in labial technique) is to bond the bracket in a “head to tail” position with incisal pointing to gingival and gingival to incisal. This way, when a rectangular wire is inserted to the slot, the angulation of these brackets will be exactly contrary to how the prescription was designed. This creates “reverse torque” and allows the root to move to the desired position.
In lingual technique, because of the diminished interbracket distance, this procedure is very hard to do and in some cases ends with reduction of the required torque.5 In these cases, the clear aligner can resolve the problem in the following way.
First, analyze the teeth where torque and tip must be modified. You can use two different appliances for this purpose: Kim’s model checker or Biaggini’s Ray Set goniometry6 (Figure 7). These machines allow modifying and measuring positions in horizontal and bucolingual planes.
After having moved the tooth in the model, you can vacuform a soft acetate and proceed the same way you did with the rotational technique (Figure 8).
Final Retention Appliances
When the spaces have been completely closed, the rotations resolved, and tip and torque checked, you can move to manufacturing a final retainer with hard acetate, cutting the plastic to the level of the gingival margin. This leaves a more comfortable appliance that is completely passive and able to maintain the final positions that you choose for the case (Figure 9).
Patients should wear the retainers all day for the first 3 months after debonding, only removing them when they eat. After 3 months, I recommend wearing the appliances nightly for at least 2 years.
It could be a good idea to prescribe nightly wear for the time the patient wants to preserve teeth in a perfect position.7
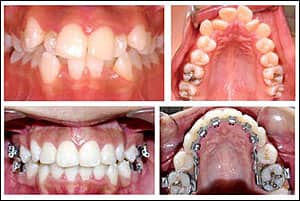
Figure 6: The palatal position of lateral teeth complicatesobtaining torque.

Figure 7: Tip and torque can be calculated with the use of Kim’s model checker (left) or the Ray Set appliance.

Figure 8: An example of a lingual case finished successfully using the Clear Aligner appliance as an active retainer.

Figure 9: Final retention appliances.
Alfredo Gilbert, DDS, MS, is a guest professor of lingual orthodontics at the Hospital Infantil du Mexico Federico Gomez and the academic coordinator of lingual orthodontics at the Facultad de Estudios Superiores of the Universidad Nacional AutÓnoma de MÉxico. He is the author of Lingual Orthodontics: The Truly Invisible Orthodontics, and teaches a hands-on lingual course at NYU. He can be reached at
References
- Reitan K. Principles of retention and avoidance of post-treatment relapse. Am J Orthod Dentofacial Orthop. 1969; 55:776-790
- Scuzzo G, Takemoto K. Biomechanics and comparative biomechanics. In: Invisible Orthodontics. Hanover Park, Ill: Quintessence Publishing Co Inc; 2003.
- Hiro T, Takemoto K. The Hiro system. J Japan Orthod Soc. 1998;57:83-91.
- Kim TW. Clear Aligner Manual. Korea: Myungmun Publishing Co; 2007.
- Proffit WR. Lingual Appliances. In: Contemporary Orthodontics. Mechanical Principles in Orthodontic Force Control. St Louis: The C.V. Mosby Co; 1986.
- Melsen B, Biaggini P. The Ray Set: A new technique for precise indirect bonding. J Clin Orthod Dentofacial Orthop. 2002;36(11):648-654.
- Gilbert RA. Retention in lingual orthodontics. In: Lingual Orthodontics, The Truly Invisible Orthodontics. Mexico: Editorial Trillas; 2008.