by Paul Castelein, DDS, MS
Indirect bonding for ideal appliance placement
The advent of bonded brackets in the early 1970s allowed orthodontists to place brackets on teeth in virtually any position. Today’s sophisticated engineering, using computerized milling machines, allows for exact tolerances to be built into the appliance. Direct bonding applies brackets to the teeth indiscriminately and does not take full advantage of the built-in prescription. Applying brackets to a set of casts without an accurate and reliable placement system will not take full advantage of the features designed into the appliance, either. Variations in tooth morphology, as well as incisal wear or fractures of anterior teeth, also require special consideration when it comes to bracket placement.
 Indirect bonding of brackets has recently become more popular because materials have been developed to facilitate the technique. In the mid 1970s, indirect bonding was laboratory-time-consuming because the procedure was being adapted to the poor available materials. Good clinical adhesives also were not available, and the technique required a great deal of doctor time, so practice usage was low. Changing any system in an office environment requires the orthodontist and team to be convinced of the long-term benefits.
I have been indirect bonding since the early 1980s and have used every conceivable method available. Once the orthodontist has decided to use the technique, he or she should schedule a team meeting to describe the procedure and consider the advantages. A commitment to at least 20 consecutive arches must be made to overcome the learning curve and prove the worthiness of indirect bonding.
The system described in this article is easy to learn and very accurate, and you can delegate as many of the steps as your team is capable of performing. You will be able to produce consistent, high-quality results, in most cases, with less treatment and chairtime as a matter of daily routine.
Prelaboratory Clinical Procedures
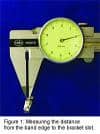
 All full-treatment cases in my practice have the maxillary and mandibular first molars banded because of headgear requirements in the maxilla and lower incisor control needs with a lip bumper or lingual arch from the molars in the mandible. In most cases, the molar bands have already been placed for 4 to 5 months while initial correction of the bite is being started and holding E space in the mandible. It is important to place the molar bands level with the marginal ridges to act as a starting point. The distance from the band edge to the bracket slot must be known for your personal prescription (Figure 1).
If you do not band molars routinely, it is still important to know the measurement for the molar bands that you may have to use during treatment. An appointment should be scheduled to take the bonding impression and to place separators if the molar bands are not in place. The teeth to be bonded must be thoroughly pumiced, and no loose primary teeth should be present before you take the impression.
If the incisal edges of any anterior teeth need to be equilibrated, it should be done before taking the impression unless the patient is very apprehensive. With that type of patient, I leave the teeth and equilibrate when the patient sees the need because of the uneven surfaces. I use perforated styrofoam trays with a high-quality, mechanically spatulated impression material. Ideally, the appliance-placement appointment is scheduled within 1 to 2 weeks of taking the impression.
Laboratory Procedures
                  |
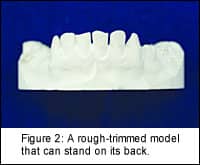
The impressions are examined to make sure that there is no debris, blood, distortion, or bubbles around the teeth. Retake the impression if any problems are present. By the time we have reached this point with most patients, the gum tissue is in good condition because we have been working with it for several months. Immediately pour the impressions with a vacuum-mixed hard laboratory stone. The model is then rough trimmed to a minimum size with a flat back so it will stand on its back (Figure 2). Allow the cast to thoroughly dry for 24 hours, or we place them in a model dryer overnight.
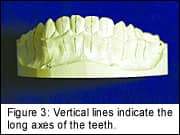
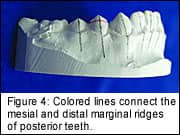
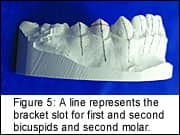
Using a mechanical pencil with 0.3-mm lead, draw vertical lines on the model to indicate the long axes of the teeth from the incisal or occlusal edge to the estimated apex of the root (Figure 3). To do this, a good panoramic radiograph must be in view. Lines should be drawn on all teeth to be bonded. On the buccal surface, use a 0.5-mm colored mechanical pencil for contrast, and draw lines connecting the mesial and distal marginal ridges for all posterior teeth to be bonded (Figure 4). The first molars are now going to be the starting point for all bracket-slot placements. The line connecting the mesial and distal marginal ridges of bonded teeth represents the occlusal edge of the band if the teeth were banded. We have previously measured the distance from the band edge to the bracket slot on the molars, and my prescription is 2 mm. Draw a second line 2 mm below the marginal ridgeline to represent the location of the bracket slot for the first and second bicuspids and second molar, if present (Figure 5). If you are bonding the first molars, use your molar prescription in the event that you need to band the molars for some reason in the future.
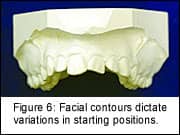
Using the first bicuspid in the maxillary and mandibular arch, measure the distance from the cusp tip to the slot line and transfer the distance to the respective central incisor teeth. The central incisor is usually about 4 mm in the maxillary and 3.5 mm in the mandibular arch. The lateral incisors in the mandible should be the same measurement as the central incisors. The cuspids in the mandible should be increased by 1 mm (Figure 5). The maxillary lateral incisors are also placed at the same measurement as the central incisors for my setup. Most orthodontists may choose to reduce the slot distance by 0.5 mm. Using the central incisor measurement, add 1 mm for the cuspids. If you are treating a deep-bite case, you may want to decrease the incisor distances; or to close a bite, increase the distances. Facial contours will also dictate variations in these starting positions. Fractured teeth may require probing the CEJ and recording any tissue difference before taking the impression. The difference is taken into account when measuring down from the tissue to place the bracket slot so that the end result is tissue alignment for proper tooth restoration (Figure 6).
Apply one coat of separating medium diluted one part separator to four parts water. Allow the separator to dry for at least 1 hour before placing the brackets. Having the separator placed at this point will allow the ceramic brackets to come off the model without showing lines on the base (Figure 7).
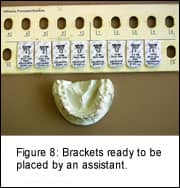
An assistant can now place the adhesive precoated brackets on the teeth (Figure 8). The assistant places the brackets firmly on the teeth, but does not extrude all of the bonding agent. The model is then placed in a lightproof box until I have time to check the positions and remove the excess bonding material (Figure 9, page 37). If you do not use adhesive precoated brackets to form the custom resin base, then use the bonding material of your choice. The model is now ready to be placed in a light-curing unit for a minimum of 4 minutes. If more than one model is placed in the unit, increase the time to 6 minutes for three models. I place the models on the back for better light-curing (Figure 10, page 37).
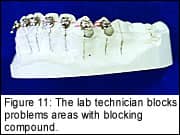
The laboratory technician then blocks problem areas, such as hooks or attachments, with a blocking compound to allow for easier tray removal from the mouth (Figure 11).
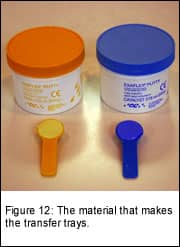
Many different materials and transfer-tray-making methods are available. In my practice, we currently use a very high-viscosity vinyl polysiloxane putty to form the trays (Figure 12). With a mixing time of 30 seconds, a working time of 1 minute, and a final set time of 4 minutes, it makes a rigid tray that is easily trimmed and cost efficient (Figure 13). One mix will make two trays, and one combo pack will make 75 to 80 trays.
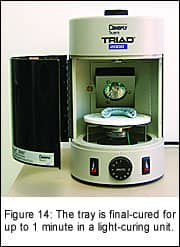
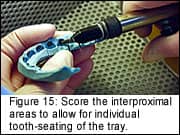
After the tray material is set, the cast should be placed in a bowl of warm water for 1 hour. Remove the tray from the model, and place it back in the light-curing unit with the brackets facing up for 1 minute to final-cure the custom base (Figure 14). Place the tray in a cabinet, and microetch the base very lightly with 50-µm aluminum oxide (Figure 15). Use oil- and water-free air to blow the tray free of dust and any loose particles. Trim the tray to a desired thickness, and reduce the labial and lingual flanges. I also score the interproximal areas to allow for individual tooth-seating of the tray. The brackets are now ready to be bonded.
Clinical Procedures
If molars are to be banded, remove the separators from the teeth and pumice all teeth to bonded and banded. The key to successful orthodontics is a clean tooth. We need to start with clean teeth to band effectively, and the same should be true for bonding. If banding is part of the appointment, the bands should be selected and fitted—but not cemented—before the bonding procedure.
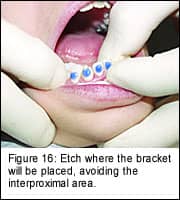
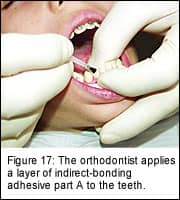
Isolate the teeth using your usual technique. Etching should be accomplished with 35% phosphoric acid in a gel form. A tinted etch allows you to see where you are dispensing material, and the gel does not allow the etch to run. I use a microtip and etch where the bracket will be placed, avoiding the interproximal area (Figure 16). The removal of any flash is much easier when etch placement is controlled. Thoroughly rinse the etchant from the teeth. While I apply a layer of rapid-set indirect-bonding adhesive part A to the teeth (Figure 17), the chairside assistant applies part B to the bracket bases in the transfer tray (Figure 18, page 38). Always seat the lower tray first, using a hingelike motion from the posterior to the anterior. Hold the tray in place with light pressure on the occlusal and an equal amount from the facial for 30 seconds (Figure 19). I section the trays, and do one quadrant at a time. We then proceed to the next quadrant to complete the bonding. Allow each quadrant to cure for an additional 2 minutes before removing the trays.
Scoring the trays during the laboratory phase facilitates tray removal. Start by placing a scaler on the occlusolingual area of the terminal tooth, and peel the tray to the buccal. Try to remove the tray in one continuous, careful motion. Remove any remaining tray or blocking material from the hooks and flash that may have developed. The cement mix could have been started during the tray removal, and the bands could have been cemented at this time. Once the cement has cured and the excess has been removed from the bands, the bonds are ready for wire placement (Figure 20). A 5-minute time period allows excellent bond strength to develop. The patient is now ready for any necessary care instructions and to have the headgear and lip bumper refit to avoid the brackets.
Using this technique or any variation you can incorporate will allow you to consistently produce superior results. I find that no matter how carefully I measure and place brackets on the cast, there is still some wire-bending to be accomplished. Variations in teeth require that inset and offset, as well as torque and overcorrection, adjustments be made. Some bracket resets have to be made because of teeth that were not fully erupted or severe rotations at the time of appliance placement.
Once you have gone through the learning curve of indirect bonding, you become better at direct bonding because you look at teeth in different proportions.
Paul Castelein, DDS, MS, is a diplomate of the American Board of Orthodontics and is a member of the Midwest Component of the Edward H. Angle Society of Orthodontists. He maintains a private practice in Princeton. Ill. He can be reached at [email protected].